
Need to change your main display in Windows 11 because the taskbar and new windows keep landing on the wrong monitor? The fix takes less than a minute in the Settings app. It works on every edition of Windows 11 and needs no administrator rights, but at least two displays must be connected to the PC or laptop.
Key Takeaways
- The main display is the screen that holds the Start button, the notification area, and most newly opened apps.
- Go to Settings > System > Display, select the monitor, then tick Make this my main display.
- The change applies instantly, with no restart needed.
- The checkbox only shows up when the selected monitor is not already the main one and the displays are set to extend.
Step-by-Step: How to Change Your Main Display in Windows 11
Use the Settings App
This works well for a desk with two monitors, or a laptop connected to an external screen. The key is to select the right monitor before touching the checkbox.
- Press Windows + I to open Settings.
- Click System in the left sidebar.
- Click Display.
- Click Identify to show a large number on each screen. The matching numbered tiles appear in the preview area at the top of the page.
- Click the tile for the monitor that should become the main display.
- Scroll down and expand the Multiple displays section.
- Check that the dropdown reads Extend these displays. If it shows another mode, select that option first.
- Tick the Make this my main display checkbox.
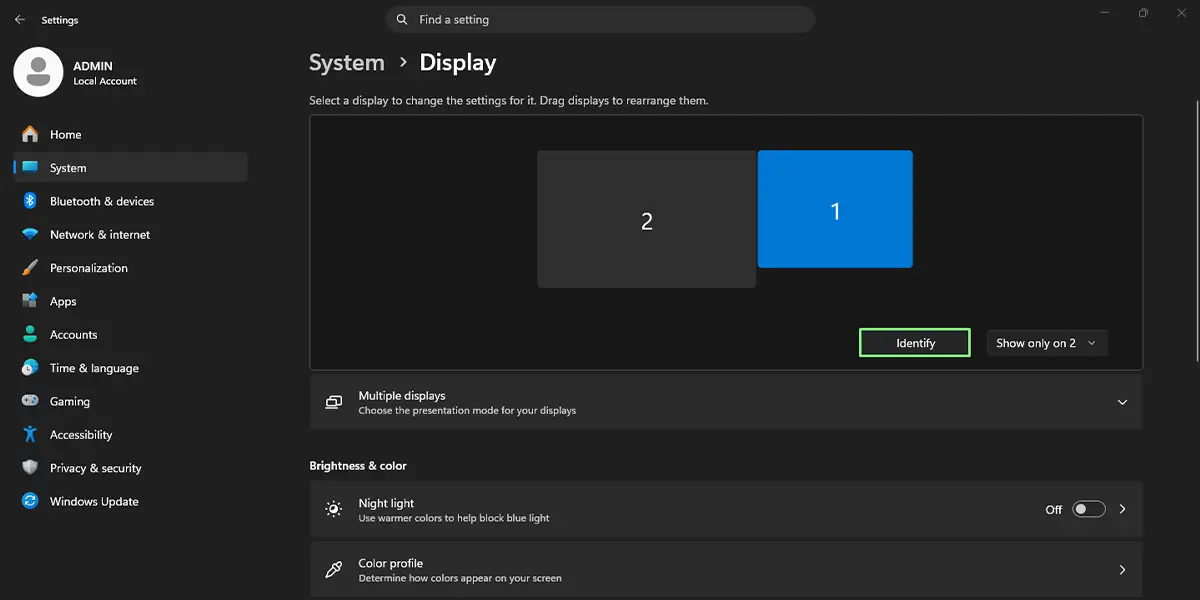
The taskbar and Start button jump to the chosen screen right away, and the display tiles in Settings update to show the new main monitor.
Tip: A quicker way into the same page is to right-click an empty spot on the desktop and choose Display settings. Pressing Windows + P opens the projection menu, which switches between duplicate, extend, and single-screen modes if the displays are not set to extend yet.
What Changes After Setting a New Main Display
Once the switch is made, the Start button and the notification area sit on the new main screen. Apps that open fresh, such as a browser launched from the Start menu, usually appear there too. Windows still remembers where some apps were last placed, so an app may reopen on the older screen once and then follow the new setup after being moved.
Tip: If the displays look swapped compared with how they sit on the desk, drag the tiles in the preview area at the top of the Display page so they match the physical layout. This keeps the mouse moving naturally from one screen to the other.
How to Undo or Reverse This Change
To go back, return to Settings > System > Display, click the tile for the original monitor, expand Multiple displays, and tick Make this my main display again. The taskbar moves back immediately.
Common Problems and Fixes
The ‘Make this my main display’ Checkbox Is Missing
This usually means the selected monitor is already the main display. Click the other tile in the preview area and check again. The option also stays hidden when the displays are duplicated, so open Multiple displays and choose Extend these displays.
Only One Display Appears in Settings
Check that the second monitor is powered on, set to the correct input, and firmly connected at both ends. Then expand Multiple displays and click Detect if it is shown. A laptop docked through an adapter or dock may need the cable reseated before Windows notices the screen.
The Main Display Switches Back After a Restart or Reconnect
This tends to happen when a monitor is turned off or a dock disconnects and reconnects, because Windows rebuilds the display layout. Turn the monitors on before signing in, then reapply the setting. Installing pending updates through Windows Update can also bring newer graphics drivers that handle reconnection more reliably.
The Wrong Screen Is Selected When Clicking the Tiles
Numbered tiles do not always match the order the monitors sit on the desk. Click Identify first, read the numbers shown on each screen, and select the tile with the same number.
Frequently Asked Questions
Does changing the main display work on Windows 11 Home?
Yes. The option is part of the Display settings page and is available on Home, Pro, and Enterprise editions.
Do I need to restart the PC after changing the main display?
No. The taskbar and Start button move to the new main screen as soon as the checkbox is ticked.
Is there a keyboard shortcut to change the main display?
There is no single shortcut for it. Pressing Windows + I opens Settings quickly, and Windows + P switches between duplicate, extend, and single-screen modes, but the main display itself is set with the checkbox on the Display page.
Why is the Make this my main display option missing?
Most often the selected monitor is already the main display, or the screens are set to duplicate instead of extend. Select the other monitor and switch to Extend these displays under Multiple displays.
Can the laptop screen stay as the main display with an external monitor connected?
Yes. Open Settings > System > Display, click the tile for the laptop screen, and tick Make this my main display. This is handy when the laptop is the screen used most often and the monitor is just extra space.
Does the main display affect where apps and games open?
Often, yes. New windows and many full-screen games open on the main display by default, though some apps remember the last screen they were used on.
Will changing the main display affect performance or battery life?
Choosing a different main display does not change performance by itself. Battery use depends on how many screens are active and how bright they are, not on which one is labeled main.
How can the right monitor be identified before picking it?
Go to Settings > System > Display and click Identify. A number appears on each screen, matching the numbered tiles in the preview area.