
Want to choose which GPU an app uses in Windows 11, so a game runs on the dedicated graphics card instead of the integrated one? The setting lives in the Settings app and takes less than a minute. It works on every edition and needs no administrator rights, but the PC or laptop must have two graphics processors, such as integrated graphics plus a dedicated card.
Key Takeaways
- Go to Settings > System > Display > Graphics to set a graphics preference for each app.
- Pick Power saving for the lower-power GPU, High performance for the stronger one, or Let Windows decide to restore the default.
- Close and reopen the app after saving so the new choice takes effect.
- PCs with only one GPU have nothing to switch between, so the choice makes no difference there.
Step-by-Step: How to Choose Which GPU an App Uses in Windows 11
Set the Graphics Preference in Settings
This works best for a gaming laptop, a creative PC running video or photo editors, or any machine where a demanding app keeps landing on the weaker graphics chip. The key is to set the preference for the exact app that needs it.
- Press Windows + I to open Settings.
- Click System in the left sidebar.
- Click Display.
- Scroll down to the Related settings area and click Graphics.
- Find the app in the list under Custom options for apps.
- Click the app, then click Options.
- Select Power saving, High performance, or the graphics card listed by name if one is shown.
- Click Save.
- Close the app completely and open it again.
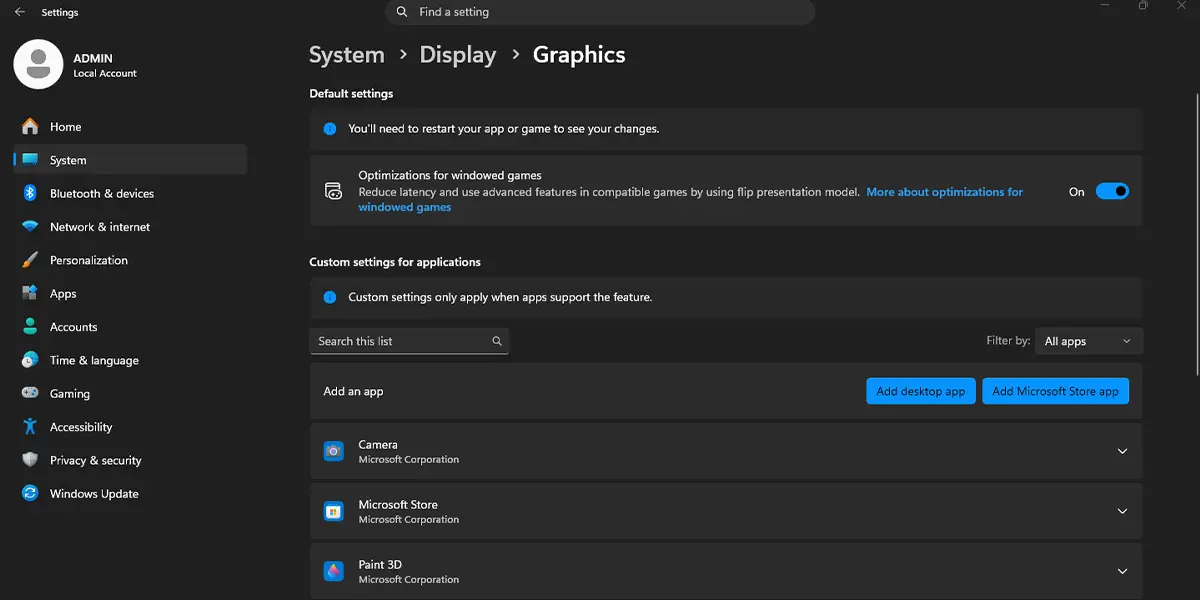
The Graphics page now shows the chosen option under the app name, and the app uses that GPU the next time it starts.
Tip: As a rule of thumb, Power saving points to the integrated GPU and High performance points to the dedicated one. On a laptop, High performance is ideal for games and editors while plugged in, and Power saving stretches battery life for lighter apps.
Add an App That Is Not in the List
Some apps do not appear on the Graphics page automatically, especially programs that were never launched or portable apps run from a folder. They can be added by hand.
- On the Graphics page, find the Add an app section.
- Choose Desktop app from the dropdown for regular programs, or Microsoft Store app for apps installed from the Store.
- For a desktop app, click Browse and select the program’s .exe file, then click Add.
- For a Store app, pick it from the list and click Add.
- Click the newly added app in the list, click Options, choose the GPU preference, and click Save.
The app now shows up under Custom options for apps with the chosen preference.
How to Confirm the App Is Using the Right GPU
A quick check in Task Manager shows whether the change worked, which is handy when a game still feels slow after the switch.
- Start the app and leave it running.
- Press Ctrl + Shift + Esc to open Task Manager.
- Stay on the Processes tab and right-click any column heading.
- Tick GPU engine to show which GPU each app uses.
The entry beside the app names the GPU in use, such as GPU 0 or GPU 1. The Performance tab lists each GPU by name, so the numbers can be matched to the right card.
How to Undo or Reverse This Change
To go back, open Settings > System > Display > Graphics, click the app, click Options, select Let Windows decide, and click Save. For an app that was added by hand, the Remove button clears it from the list completely.
Common Problems and Fixes
The App Still Uses the Wrong GPU After Saving
The preference is only read when the app starts. Close the app fully, check the system tray for a background copy, and launch it again. Some games and editors also have their own graphics adapter setting inside their options menu, which can override the Windows choice.
The Graphics Page Shows Only One GPU Option
This usually means the PC has a single graphics processor, so there is nothing to choose between. On a machine that should have two, a missing or outdated graphics driver is a common cause. Installing pending driver updates through Windows Update often brings the second GPU back.
The App Is Missing from the List
Apps that have not been opened yet may not be listed. Use the Add an app section on the Graphics page, pick the right app type, and add the program manually.
The Options Button Is Greyed Out or Does Nothing
On a work or school PC, an administrator may control graphics settings. Another cause is a driver that did not install correctly. Restarting the PC and then checking Windows Update for driver updates fixes most cases.
The Laptop Battery Drains Faster After the Change
Setting High performance sends the app to the stronger GPU, which uses more power. For apps that do not need the extra horsepower, switch back to Power saving or Let Windows decide.
Frequently Asked Questions
Does choosing a GPU for an app work on Windows 11 Home?
Yes. The Graphics page is part of the Display settings and is available on Home, Pro, and Enterprise editions.
Do I need to restart the PC after changing the GPU preference?
No restart is needed. Closing the app and opening it again is enough for the new preference to apply.
What is the difference between Power saving and High performance?
Power saving uses the lower-power GPU, usually the integrated one, which helps battery life. High performance uses the stronger GPU, usually the dedicated card, which suits games and heavy editing tools.
Why is there only one GPU to choose from?
The PC probably has just one graphics processor. A missing driver can also hide the second one, so check Windows Update for driver updates.
Can the setting be applied to Microsoft Store apps too?
Yes. Open Settings > System > Display > Graphics, choose Microsoft Store app under Add an app, pick the app, and set its preference the same way.
How can it be confirmed that the app is using the chosen GPU?
Open Task Manager with Ctrl + Shift + Esc, right-click a column heading on the Processes tab, and tick GPU engine. The entry beside the app shows which GPU it is using.
Will choosing High performance affect battery life?
It can. The stronger GPU draws more power, so a laptop on battery will usually run down faster when High performance is selected for a demanding app.
Why does the app ignore the setting?
The app was most likely still running when the preference was saved, or it has its own graphics adapter option that overrides the Windows setting. Close it completely, check its in-app options, and relaunch.