
Need to group dates by month in a PivotTable instead of scrolling through hundreds of daily rows? Excel can roll those dates up into clean monthly totals in about a minute. The steps below work in Excel for Microsoft 365 and recent desktop versions.
Key Takeaways
- Dates must be real Excel dates, with no blanks or text entries, before grouping will work.
- Right-click any date in the PivotTable and choose Group to open the Grouping dialog.
- Select both Months and Years so that January of one year does not merge with January of another.
- Refresh the PivotTable after adding new rows to the source data.
How to Group Dates by Month in a PivotTable
Prepare the Source Data
- Step 1: Check that the date column has a header, that every cell holds a real date, and that no cells are blank. A quick test is to change the column format to Number. Real dates turn into serial numbers such as 45292, while text stays unchanged.
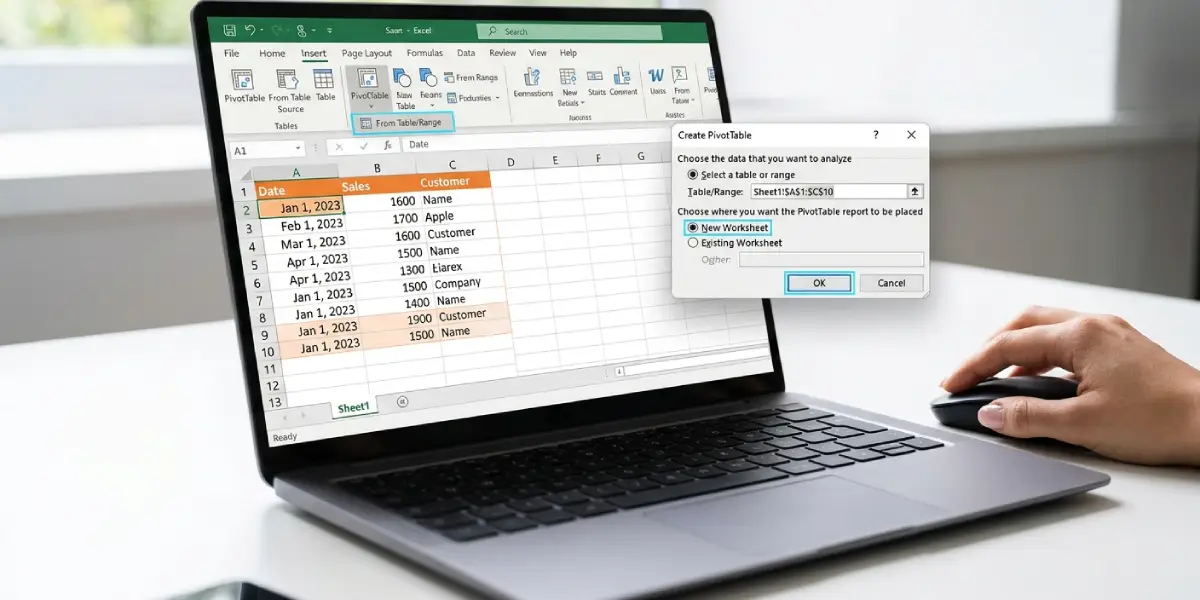
- Step 2: Click any cell inside the data, then go to the Insert tab and select PivotTable. Choose From Table/Range.
- Step 3: Confirm the data range, select New Worksheet, and click OK.
Build the PivotTable and Apply the Grouping
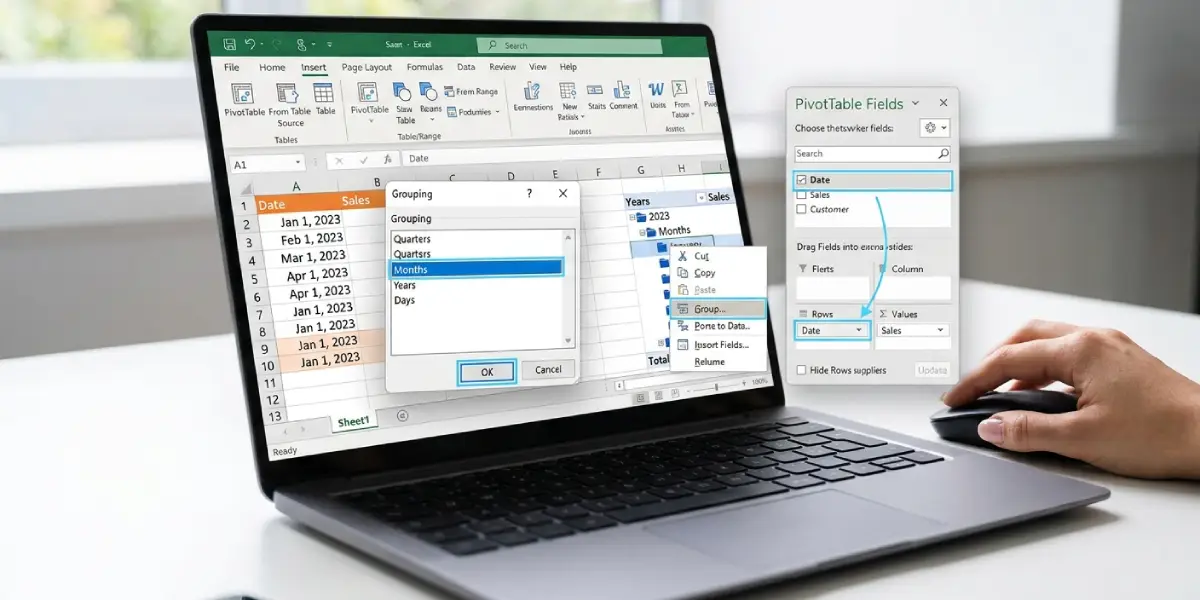
- Step 4: In the PivotTable Fields pane, drag the date field into the Rows area. Drag a numeric field, such as Sales or Quantity, into the Values area. Recent versions of Excel may group the dates automatically and add Months, Quarters, and Years fields. If that happens and the layout already shows months, the job is done.
- Step 5: If the dates still appear one per row, right-click any date in the first column of the PivotTable and choose Group.
- Step 6: In the Grouping dialog, click Months and Years so both are highlighted. Click Quarters or Days to turn them off if they are selected.
- Step 7: Click OK. The PivotTable now shows each year with its months nested underneath, and the values are totaled per month.
Tip: When the data covers only one year, select Months alone. The result is a plain list from January to December with no year level above it.
Keep the Grouping Up to Date
- Step 8: Before building the PivotTable, convert the source range to a table with Ctrl+T. New rows added to the table are then picked up automatically.
- Step 9: After adding or editing data, right-click anywhere in the PivotTable and choose Refresh. The monthly grouping updates with it.
Tip: To undo the grouping, right-click any grouped date and choose Ungroup. The original daily dates return immediately.
Common Problems and Fixes
Cannot Group That Selection
This message almost always means the date column contains a blank cell or a value Excel reads as text. Fill or delete the blank rows, convert text dates to real dates (Data tab, Text to Columns, Date format works well), then refresh the PivotTable and try the grouping again.
The Same Month From Different Years Is Combined
If every January total is stacked into a single row, only Months was selected. Right-click a date, choose Group, and click Years as well so both are highlighted.
The Group Option Is Missing or Greyed Out
Make sure the right-click lands on a date item in the row area, not on a total or a value cell. If the date field sits in the Values area, move it to Rows or Columns first.
Dates Are Not Grouping Automatically
Automatic grouping can be switched off in settings. Go to File, Options, Data, and make sure the box labeled Disable automatic grouping of Date/Time columns in PivotTables is cleared. Then rebuild the PivotTable, or group the dates manually with the steps above.
New Rows Do Not Appear in the Monthly Totals
The source range was probably not expanded. Convert the data to a table with Ctrl+T, update the PivotTable data source if needed, and refresh.
Frequently Asked Questions
Can a PivotTable group dates by month without showing the year?
Yes. In the Grouping dialog, select only Months. This works best when all the data falls within one calendar year.
Why does Excel say it cannot group that selection?
The date column likely contains blank cells or text values. Clean the column so every cell holds a real date, then refresh and group again.
How do I group dates by month and year at the same time?
Right-click a date in the PivotTable, choose Group, and select both Months and Years in the Grouping dialog. Click OK to apply.
How do I ungroup dates in a PivotTable?
Right-click any grouped date and choose Ungroup. Excel restores the original individual dates.
Why are my dates grouped automatically when I add them to Rows?
Recent versions of Excel group date fields automatically by default, usually adding Months, Quarters, and Years. The behavior can be turned off under File, Options, Data.
Do I need to refresh the PivotTable after adding new data?
Yes. Right-click the PivotTable and choose Refresh. If the new rows sit outside the original range, convert the source to a table with Ctrl+T or update the data source first.
How do I check that my dates are real dates and not text?
Change the format of the date column to Number. Real dates convert to serial numbers, while text stays exactly as typed. Text dates are also usually left-aligned by default.
Can the month grouping be changed to quarters later?
Yes. Right-click a grouped date, choose Group, and adjust the selection in the Grouping dialog. Select Quarters and Years, and deselect Months, then click OK.