
If photos look washed out, whites look yellow, or dark scenes lose detail, the quickest fix is to calibrate display color with the built-in tool in Windows 11. The Display Color Calibration wizard walks through gamma, brightness, contrast, and color balance in a few minutes. It works on Home, Pro, and Enterprise editions, though a work or school PC may restrict access to Color Management.
Key Takeaways
- The built-in tool is called Display Color Calibration, and it works on every edition of Windows 11.
- The easiest route is Settings > System > Display > Advanced display > Display adapter properties > Color Management > Advanced > Calibrate display.
- The wizard adjusts gamma, brightness, contrast, and color balance in that order.
- Typing dccw in the Run box opens the same wizard in seconds.
- The result can be switched off at any time by turning off the Use Windows display calibration option.
How to Calibrate Display Color in Windows 11 Step by Step
Method 1: Use the Settings App
- Press Windows + I to open Settings.
- Go to Settings > System > Display.
- Scroll down and click Advanced display.
- If more than one monitor is connected, pick the screen to calibrate from the drop-down at the top of the page.
- Click Display adapter properties for Display 1 (the number matches the selected screen).
- In the properties window, open the Color Management tab.
- Click the Color Management button.
- In the new window, open the Advanced tab.
- Under Display Calibration, click Calibrate display. The Display Color Calibration wizard opens full of instructions.
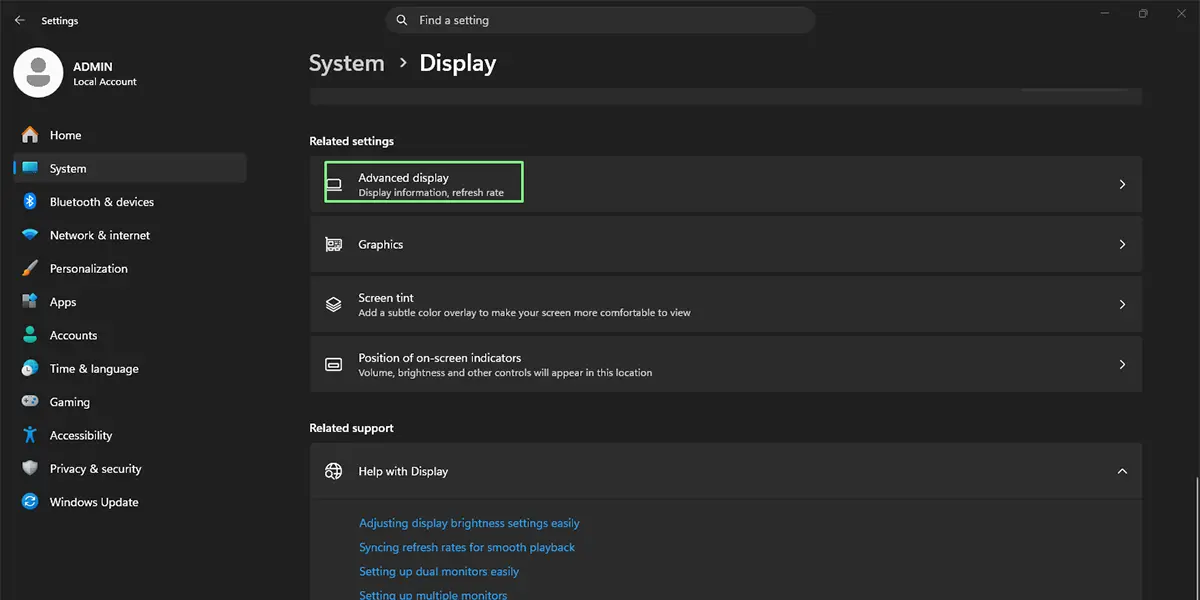
Tip: Turn off Night light before starting, because a warm screen tint will throw off the color balance step. Find it at Settings > System > Display > Night light.
Method 2: Use Windows Search
- Click the Search box on the taskbar, or press Windows + S.
- Type Calibrate display color.
- Click the matching result. The wizard opens right away.
Method 3: Use the Run Box or a Command
- Press Windows + R to open the Run box.
- Type the command below and press Enter.
dccw
The same command works in Command Prompt or PowerShell, and an elevated (administrator) window is not required.
Walk Through the Calibration Wizard
Once the wizard is open, the steps are the same no matter which method was used. Take a moment to move the wizard window onto the screen being calibrated if it opens somewhere else.
- On the welcome page, click Next.
- Read the basic color settings page, make sure the monitor’s own color controls are at defaults, and click Next.
- On the gamma page, drag the slider until the small dots in the middle of each circle are as faint as possible, then click Next.
- On the brightness page, adjust the screen so the suit in the sample image is visible without the shirt turning gray, then click Next. Laptop screens often cannot change this setting, and the Skip Brightness and Contrast Adjustment button lets the wizard move on.
- On the contrast page, adjust the screen so the shirt details stay visible without the white going dull, then click Next.
- On the color balance page, drag the Red, Green, and Blue sliders until the gray bars look neutral with no tint, then click Next.
- On the final page, click Current calibration and Previous calibration to compare the screen before and after. The change should be easy to spot, such as whites looking cleaner.
- Click Finish to keep the new calibration, or Cancel to discard it.
Tip: Calibrate in the room lighting normally used for work. Most people find that a dim room and a sunny room give very different results, and the sliders look most accurate in typical daily conditions.
How to Undo or Reverse This Change
To switch the calibration off without deleting it, reopen Color Management using the steps in Method 1, go to the Advanced tab, and clear the Use Windows display calibration checkbox. The screen returns to its default look right away. To remove the saved profile completely, open the Devices tab, select the display, pick the newly created profile in the list, and click Remove.
Common Problems and Fixes
The Calibrate display button is missing or greyed out
This usually happens on a work or school PC where an administrator has restricted color settings, or when a display driver is missing or generic. Install the latest graphics driver from Windows Update or the PC maker, then reopen Color Management. Running dccw from the Run box is also worth a try.
The wizard opens on the wrong monitor
With two or more screens, the wizard can appear on a screen different from the one being tuned. Close it, pick the correct display on the Advanced display page, and start again. Each monitor needs its own calibration.
The colors look the same after finishing
Open Color Management, go to the Advanced tab, and make sure Use Windows display calibration is checked. Then run the wizard again and click Finish instead of Cancel on the last page.
The brightness and contrast pages do not respond
Many laptop screens do not expose these controls to the wizard. Use Skip Brightness and Contrast Adjustment and continue with color balance, which still makes a visible difference.
The screen still looks too warm or too cool
Check whether Night light is switched on at Settings > System > Display > Night light. Turn it off and run the wizard again for a clean result.
Frequently Asked Questions
Does Display Color Calibration work on Windows 11 Home?
Yes. The tool is included in Home, Pro, and Enterprise editions, and the steps are the same on all of them.
Does Windows 11 need a restart after calibrating the display?
No. The new calibration applies as soon as Finish is clicked, so a restart is not needed.
What is the command to open the display calibration tool?
The command is dccw. Type it into the Run box, Command Prompt, or PowerShell, and the wizard opens. Administrator rights are not required.
Is there a keyboard shortcut for display calibration?
There is no single dedicated shortcut. The fastest keyboard route is to press Windows + R, type dccw, and press Enter.
Does calibrating the display affect battery life or performance?
No noticeable effect. The calibration adjusts how colors are shown on the screen and does not add any meaningful load on the processor or battery.
Can a laptop screen be calibrated with the built-in tool?
Yes. The brightness and contrast steps may be unavailable on many laptop panels, and the wizard allows them to be skipped while the gamma and color balance steps still work.
How can the calibration be turned off again?
Go to Settings > System > Display > Advanced display > Display adapter properties > Color Management > Color Management > Advanced and clear the Use Windows display calibration checkbox.
Does each monitor need its own calibration?
Yes. Each screen has its own color behavior, so pick the display on the Advanced display page and run the wizard once per monitor.
Is the built-in tool as accurate as a hardware colorimeter?
The wizard relies on visual judgment, so it is ideal for everyday improvements such as cleaner whites and better shadow detail. Color-critical work, such as professional photo or print editing, needs measurement hardware.