
Knowing how to replace a laptop keyboard can save a device that would otherwise sit unused because of sticky, unresponsive, or missing keys. This guide walks through the entire process, from picking the correct replacement part to reassembling the laptop so it types like new again.
Key Takeaways
- A failing laptop keyboard can often be replaced at home with basic tools and about 30 to 60 minutes of careful work.
- The exact replacement keyboard must match the laptop’s make, model, and keyboard layout, since even small revisions can change the connector type.
- Most modern laptops use a ribbon cable and a small connector locking flap rather than screws holding the keyboard itself in place.
- Static discharge and forcing a stuck connector are the two most common causes of accidental damage during this repair.
- Testing the new keyboard before fully reassembling the laptop saves time if something needs adjusting.
Before You Start
A little preparation prevents most of the problems people run into during a keyboard swap. Power down the laptop completely and unplug the charger. If the battery is removable, take it out. For laptops with an internal battery, disconnecting the battery connector from the motherboard once the case is open adds an extra layer of protection against a short circuit. Touch a bare metal surface, such as the laptop’s chassis or a grounded object, before handling any internal components to discharge static electricity.
Gather the following before opening the case:
- A replacement keyboard that matches the exact laptop model and layout
- A small Phillips screwdriver set with precision bits
- Plastic pry tools or spudgers to avoid scratching the case or damaging clips
- A small tray or magnetic mat to keep screws organized
- Tweezers for handling small ribbon cable connectors
Tip: Photograph each stage of disassembly with a phone camera. It becomes a quick visual reference during reassembly, especially for laptops with several similar-looking screws of different lengths.
How to Replace a Laptop Keyboard Step by Step
Removing the Old Keyboard
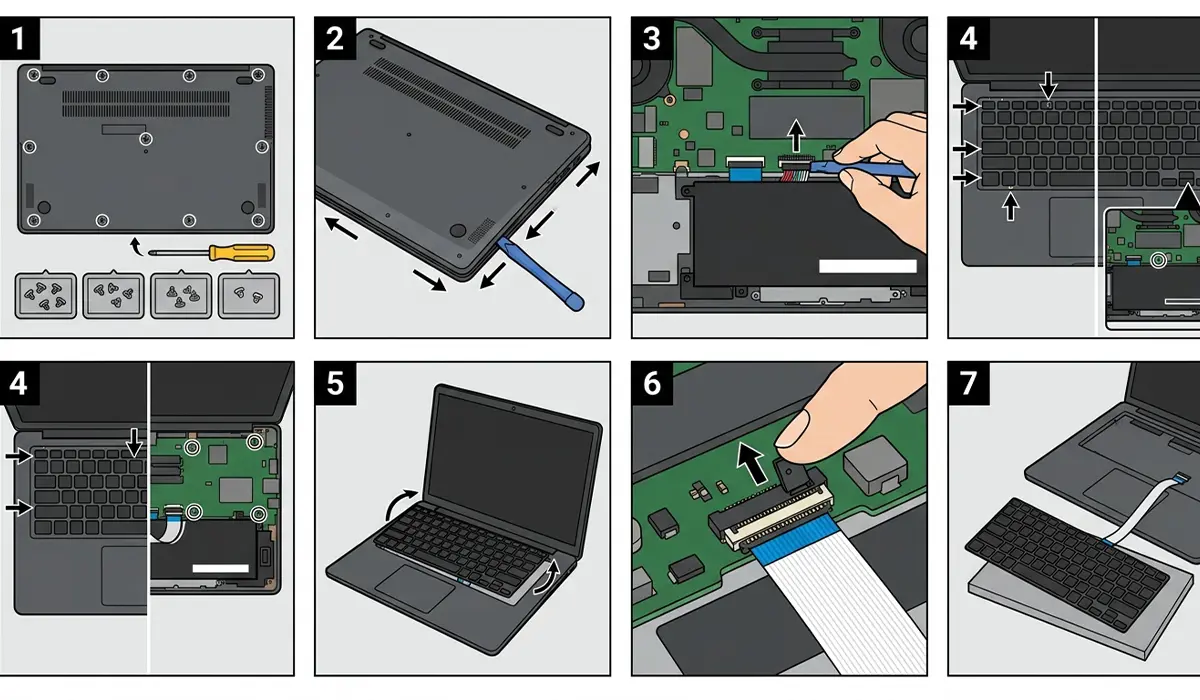
- Step 1: Flip the laptop over and remove the bottom panel screws, keeping them separated by location since laptops often mix screw lengths.
- Step 2: Gently pry the bottom panel loose using a plastic tool, working around the edges rather than prying from one spot to avoid cracking the plastic.
- Step 3: Locate the battery connector on the motherboard and disconnect it if the battery is not removable, using a pry tool to lift the connector straight up rather than pulling on the wires.
- Step 4: Identify how the keyboard is secured. Some laptops have keyboard retention screws accessible from the bottom, while others require removing the top case or palm rest assembly.
- Step 5: Once the keyboard is loose, gently lift it enough to access the ribbon cable connector, which usually sits under a small locking flap on the motherboard.
- Step 6: Flip the locking flap up with a fingernail or pry tool, then slide the ribbon cable out. Never pull the cable at an angle, since the thin conductors inside can tear.
- Step 7: Remove the old keyboard completely and set it aside.
Installing the New Keyboard
- Step 8: Slide the new keyboard’s ribbon cable into the connector, checking that it seats fully and sits straight, not tilted to one side.
- Step 9: Press the locking flap back down until it clicks or sits flush, securing the ribbon cable in place.
- Step 10: Reconnect the battery connector if it was disconnected earlier, and power on the laptop briefly to test that every key registers correctly before closing the case. Most laptops can be tested this way even with the bottom panel off.
- Step 11: Once testing confirms the keyboard works, power the laptop off again, seat the keyboard fully into its mounting position, and replace any retention screws.
- Step 12: Reattach the bottom panel, starting the screws by hand before tightening them to avoid cross-threading.
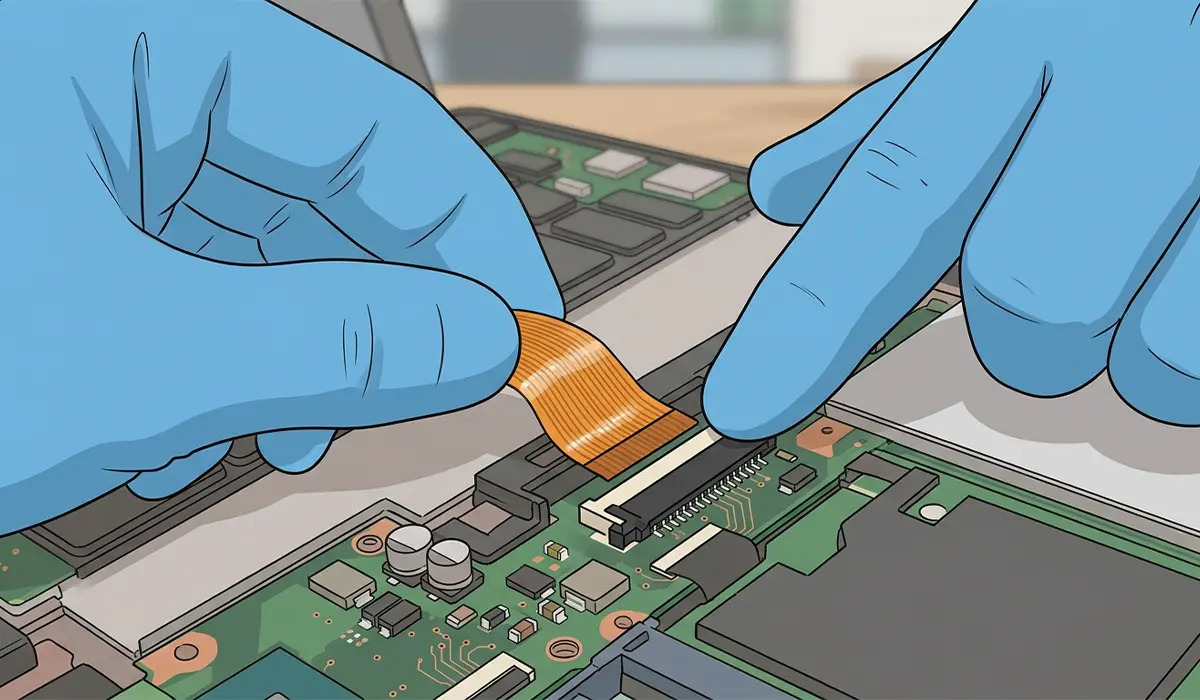
Tip: If a few keys do not register during testing, the ribbon cable connector is almost always the cause. Reseating it firmly resolves the issue in most cases before any other troubleshooting is needed.
Common Problems and Fixes
New Keyboard Does Not Respond at All
This usually points to the ribbon cable not being fully seated or the locking flap not closing all the way. Reopen the case, disconnect the cable, check for bent or damaged pins, and reinsert it evenly before locking the flap down again.
Only Some Keys Work
Partial key failure often means the ribbon cable sits slightly crooked in the connector. Straighten the cable, reseat it, and confirm the flap closes evenly across its full width rather than just on one side.
Laptop Will Not Power On After Reassembly
Check that the battery connector reconnected properly and that no stray screw or tool is resting against the motherboard, which can cause a short. Disconnect the battery, inspect the area around the keyboard connector for pinched wires, then reconnect and try again.
Keys Feel Loose or Wobbly
This typically means the keyboard was not seated fully into its frame before the screws went back in. Remove the panel, lift the keyboard slightly, and press it down evenly along all edges before resecuring it.
Trackpad or Other Components Stop Working
Since many laptops route several ribbon cables through the same area, a nearby connector may have loosened during the keyboard swap. Reopen the case and check that every other internal cable is still fully seated, not just the keyboard’s.
Frequently Asked Questions
How much does it cost to replace a laptop keyboard at home versus a repair shop?
A replacement keyboard part is generally far less expensive than a shop’s total repair cost, which includes both parts and labor. Doing the swap independently mainly requires the part itself and basic tools already on hand.
How long does replacing a laptop keyboard take?
Most models take between 30 minutes and an hour, depending on how many components need to come out to reach the keyboard mounting points.
Do all laptop keyboards use a ribbon cable connection?
The vast majority of modern laptops use a flat ribbon cable and a locking flap connector. Some older or specialty models may use a different connector style, so checking a repair manual for the specific model beforehand is worthwhile.
Can a laptop keyboard be replaced without removing the battery?
It is safer to disconnect the battery whenever the internals are exposed, since it eliminates the risk of a short circuit if a tool or screw brushes against the motherboard.
Will replacing the keyboard void the laptop’s warranty?
Opening the case on a laptop still under warranty can affect coverage on some models. Checking the manufacturer’s warranty terms first, or letting an authorized service center handle it, avoids that risk.
What should be done if the replacement keyboard does not match the layout?
The keyboard should be returned or exchanged rather than installed. Layouts vary by region and even by specific model revision, so confirming compatibility using the exact model number before ordering prevents this problem.
Is it normal for a few keys to feel different right after installation?
A slightly different key feel immediately after installation is common and usually settles within the first day of regular typing as the mechanism beds in.
What is the safest way to remove the old keyboard’s ribbon cable?
Lift the locking flap fully first, then slide the cable straight out without pulling at an angle. Forcing it sideways is the most frequent cause of torn ribbon cables.
When should a laptop keyboard replacement be left to a professional?
If the laptop has a unibody design where the keyboard is fused to the palm rest, or if disassembly involves removing the display or motherboard to reach the keyboard, a professional repair technician is the safer option.
How can it be confirmed that the new keyboard is working correctly before final reassembly?
Powering the laptop on with the bottom panel still off, then typing each key into a text field or using an online keyboard tester, confirms every key registers before the case is closed back up.
