
Learning how to disable an unused audio device in Windows 11 keeps the sound menu clean and stops audio from landing on the wrong speakers or headset. The steps work on Home, Pro, and Enterprise editions. Method 3 needs administrator rights.
Key Takeaways
- The quickest route is Settings > System > Sound > All sound devices, then choose the device and click Don’t allow.
- The classic Sound window (opened with Windows + R and the command mmsys.cpl) lets a device be disabled with a right-click.
- Device Manager can switch off the hardware itself, but it needs administrator rights and affects every output on that device.
- A disabled device is not removed. It can be switched back on at any time.
Step-by-Step Guide to Disable an Unused Audio Device in Windows 11
Method 1: Use the Settings App
- Press Windows + I to open Settings.
- Click System in the left sidebar, then click Sound.
- Scroll down to the Advanced section and click All sound devices.
- Under Output devices (speakers, headphones, monitors) or Input devices (microphones), click the device that is no longer needed.
- Find the line Allow apps and Windows to use this device for audio and click Don’t allow.
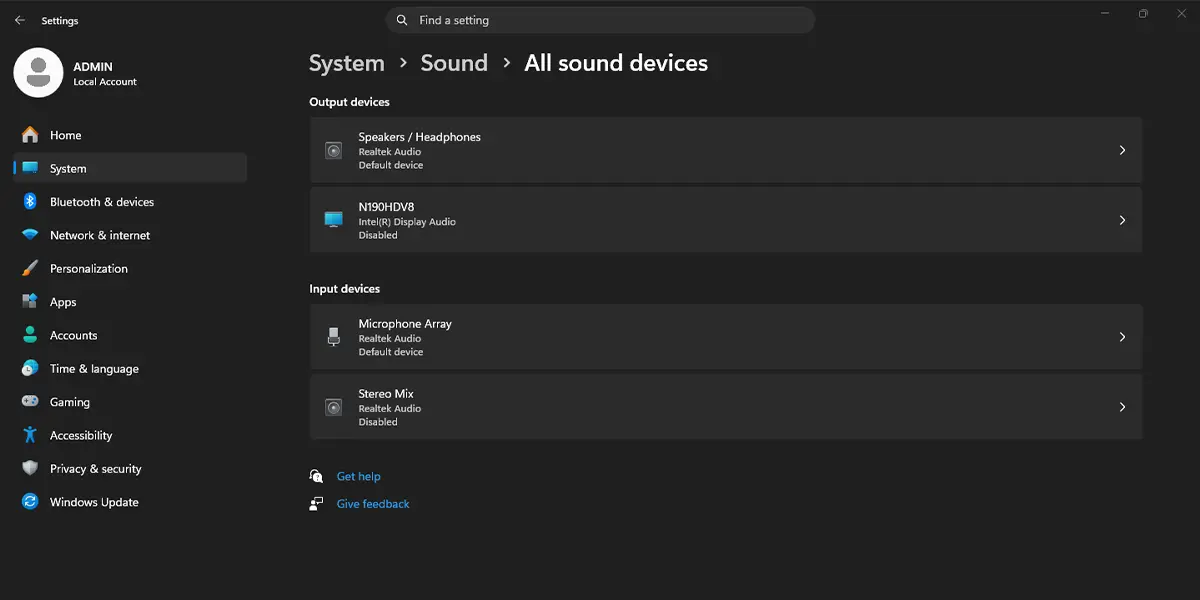
The device stops appearing as a choice in the sound menu, and apps can no longer send audio to it. This is handy when a monitor with built-in speakers keeps grabbing the sound every time it is plugged in.
Tip: Press Windows + Ctrl + V to open the sound output picker quickly and confirm the unwanted device is gone from the list.
Method 2: Use the Classic Sound Window
- Press Windows + R to open the Run box.
- Type mmsys.cpl and press Enter. The Sound window opens.
- Click the Playback tab for speakers and headphones, or the Recording tab for microphones.
- Right-click the unused device.
- Click Disable.
The device icon turns grey and its status changes to Disabled. If a disabled device is not visible later, right-click an empty area of the list and tick Show Disabled Devices.
Method 3: Use Device Manager
This method switches off the audio hardware or driver itself, so it requires an administrator account. Be careful with it, because disabling a whole sound controller turns off every speaker or jack connected to it.
- Press Windows + X and click Device Manager.
- Expand Audio inputs and outputs to see individual speakers and microphones, or expand Sound, video and game controllers to see the sound hardware itself.
- Right-click the unused device.
- Click Disable device.
- Click Yes when the confirmation message appears.
The device icon gains a small down arrow, which shows it is switched off.
Tip: On a laptop, disable the individual entry under Audio inputs and outputs rather than the main sound controller, so the built-in speakers and headphone jack keep working.
How to Undo or Reverse This Change
To bring the device back through Settings, go to Settings > System > Sound > All sound devices, click the device, and choose Allow. In the classic Sound window, tick Show Disabled Devices, right-click the device, and click Enable. In Device Manager, right-click the device and click Enable device. The device returns to the sound menu right away.
Common Problems and Fixes
The Device Is Not Listed
Check that the device is plugged in and powered on, since a disconnected USB headset or Bluetooth speaker may not appear. In the classic Sound window, right-click an empty space and tick Show Disabled Devices and Show Disconnected Devices.
The Disable Option Is Greyed Out or Missing
This usually happens on a work or school PC where settings are managed by an organization. In Device Manager, the option also needs an administrator account. Sign in with an admin account or contact the person who manages the PC.
Sound Stopped Working After Disabling a Device
The wrong device was probably switched off, or the whole sound controller was disabled. Re-enable the device using the steps in the undo section, then open Settings > System > Sound and pick the correct output under Output.
The Device Is Still Used by an App
Some apps keep a device selected until they are restarted. Close the app and open it again, or choose a different output inside the app’s own audio settings.
Frequently Asked Questions
Does disabling an audio device uninstall its driver?
No. The driver stays installed, and the device is only switched off. It can be turned back on at any time.
Does this work on Windows 11 Home?
Yes. The Settings app, the classic Sound window, and Device Manager are all available on Home, Pro, and Enterprise editions.
Do I need to restart the computer after disabling an audio device?
Usually not. The change takes effect right away. If an app still shows the device, close and reopen that app.
Do I need administrator rights?
Device Manager requires administrator rights. The Settings app and the classic Sound window are the simpler choice for everyday use.
Will disabling an unused audio device improve performance or battery life?
The effect is small. The main benefit is a tidier sound menu and fewer chances of audio going to the wrong device.
Is there a keyboard shortcut to disable an audio device?
No single shortcut disables a device. Windows + R followed by mmsys.cpl opens the Sound window quickly, where the device can be disabled with a right-click.
Why is the disabled device still showing in the list?
The classic Sound window can display disabled devices when Show Disabled Devices is ticked. A disabled device is shown in grey with a status of Disabled.
Can a microphone be disabled the same way?
Yes. Use the Input devices list in Settings > System > Sound > All sound devices, or the Recording tab in the classic Sound window.
Will the device come back after unplugging and reconnecting it?
A disabled device generally stays disabled while it is reconnected. To use it again, enable it with the undo steps above.