
Learning how to clean a mechanical keyboard properly keeps every switch feeling crisp and stops dust, crumbs, and skin oils from building up under the keycaps. A neglected board does not just look grimy – it can develop mushy keypresses, sticky stabilizers, and even intermittent double-typing. This guide walks through a safe, thorough cleaning process that works on nearly any mechanical keyboard, from a budget office board to a high-end custom build.
Key Takeaways
- Most buildup lives under the keycaps and around the stabilizers, not on the surface, so keycap removal is essential for a deep clean.
- Compressed air and a soft brush handle loose debris, while isopropyl alcohol handles oils and grime on plastic surfaces.
- Switches themselves should only be opened or lubed by someone comfortable with basic keyboard modding, since not every switch is designed to be user-serviceable.
- Letting keycaps and the case dry completely before reassembly prevents moisture from reaching the switches and PCB.
- A light cleaning every few weeks prevents the kind of heavy buildup that eventually affects key feel and reliability.
Before You Start
A little prep work makes the difference between a quick, safe cleaning session and an accidental repair job. Take a few minutes to get set up correctly before touching anything.
- Unplug the keyboard from the computer, or turn off and disconnect a wireless keyboard, before disassembly begins.
- Work on a flat, well-lit surface with room to lay out keycaps in order, or take a quick photo of the layout first.
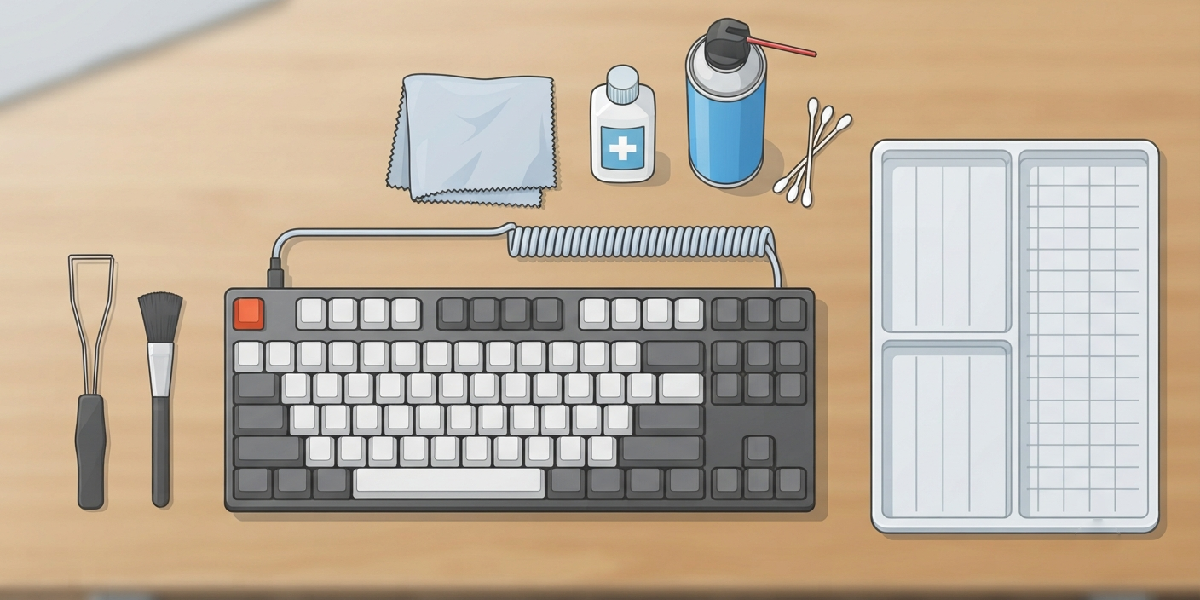
- Gather the tools: a keycap puller (wire or plastic loop style), a switch puller if hot-swap switches will be removed, a soft-bristle brush, compressed air, 90 percent or higher isopropyl alcohol, cotton swabs, and a lint-free or microfiber cloth.
- Avoid water, household glass cleaner, or any solvent stronger than isopropyl alcohol, since these can damage keycap legends, switch housings, or the PCB.
- If the keyboard uses a removable battery or is under active warranty, check the manufacturer’s guidance before opening the case, since disassembly can void coverage on some models.
How to Clean a Mechanical Keyboard Step by Step
This process moves from the easiest, lowest-risk steps to the more detailed ones, so it works whether the goal is a quick refresh or a full deep clean.
Step 1: Shake Out Loose Debris
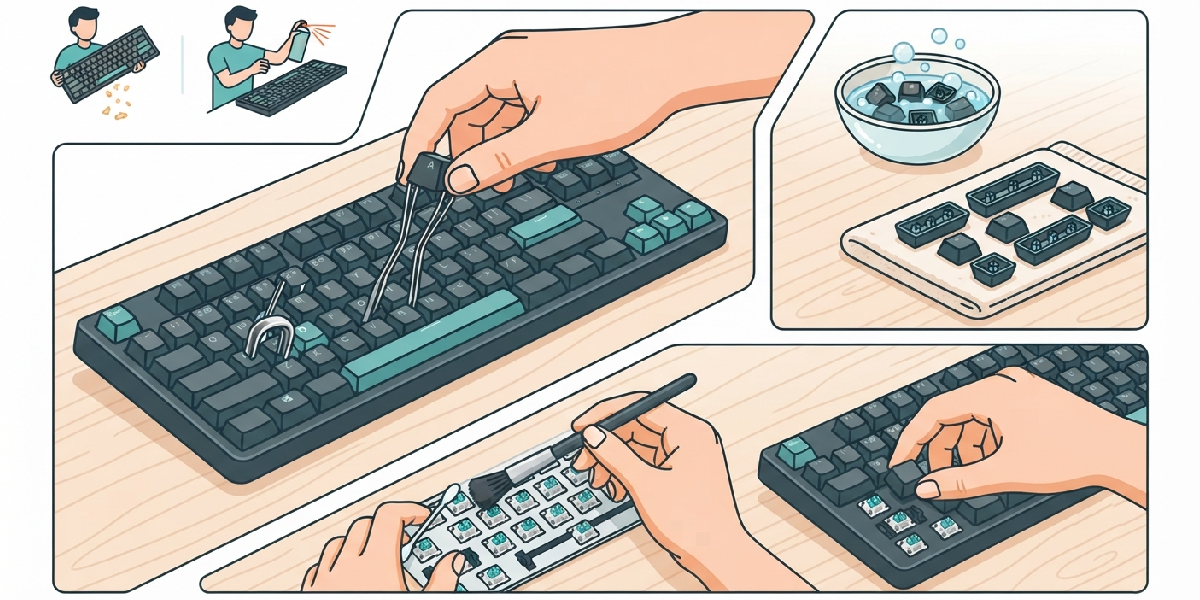
- Turn the keyboard upside down and gently shake it over a trash can or sink. This dislodges crumbs, hair, and loose dust that would otherwise get pushed deeper into the switches during later steps.
Step 2: Blow Out the Switches
- Hold the keyboard at an angle and use short bursts of compressed air between the keycaps to clear out fine dust. Angling the can helps push debris out rather than further into the switch housing.
Step 3: Remove the Keycaps
- Slide the keycap puller under each cap and pull straight up with even pressure, working row by row. On larger keys like the spacebar and shift keys, check for stabilizer wires before pulling to avoid bending them.
Step 4: Soak and Wipe the Keycaps
- Place the keycaps in warm water with a small amount of mild dish soap and let them sit for 15 to 20 minutes, then agitate gently and rinse with clean water. For a faster method, wipe each keycap with a cloth dampened in isopropyl alcohol instead of soaking.
Step 5: Dry the Keycaps Completely
- Lay the keycaps on a towel, opening-side down, and let them air dry fully for several hours before reassembly. Any trapped moisture inside a keycap can drip onto a switch later and cause corrosion or a sticky keypress.
Step 6: Clean the Exposed Switches and Plate
- Dip a soft brush lightly in isopropyl alcohol and sweep across the now-exposed switch housings and plate to lift oils and dust. Use cotton swabs dampened with alcohol for tighter spots around the stabilizers, and avoid letting liquid pool inside any switch.
Step 7: Wipe Down the Case
- Wipe the outer case, frame, and any exposed PCB edges with a microfiber cloth lightly dampened in isopropyl alcohol. This removes fingerprint oils and grime without leaving streaks or residue behind.
Step 8: Reassemble the Keyboard
- Once every part is fully dry, press each keycap firmly back onto its matching switch, double-checking the layout against the earlier reference photo. Test each key afterward to confirm smooth, even keypresses across the board.
Tip: Clean in batches of one row or section at a time rather than pulling every keycap at once, especially the first time. This makes it far easier to keep track of placement and avoid mixing up similarly sized keys.
Common Problems and Fixes
- A key feels mushy after cleaning: This usually means moisture is still trapped under the keycap or inside the switch. Remove the keycap again and let it air dry for a longer period before reinstalling.
- A stabilized key (spacebar, enter, shift) rattles or sticks: Stabilizer wires or housings likely still have old lubricant residue mixed with dust. Clean the stabilizer housing and wire with a swab and alcohol, then apply a small amount of fresh dielectric grease or a lubricant made for stabilizers.
- A switch double-types or misses presses after cleaning: Liquid may have reached the internal contacts. Let the keyboard sit unplugged for at least 24 hours to fully dry before testing again, and avoid using compressed air with excessive alcohol residue still present.
- Keycap legends look faded or worn after washing: Aggressive scrubbing or prolonged soaking can wear down certain printed or lower-quality legends. Stick to gentle wiping for keycaps with painted or pad-printed legends rather than extended soaking.
- The keyboard does not respond at all after reassembly: Check that every keycap is seated fully on its switch stem and that no cable was disconnected during cleaning. If the board still will not respond, disconnect it, wait a few minutes, and reconnect it before further troubleshooting.
Frequently Asked Questions
How often should a mechanical keyboard be cleaned?
A quick surface clean every one to two weeks and a deeper keycap-off clean every few months is a reasonable routine for most users, though heavy use or eating near the keyboard calls for more frequent attention.
Can a mechanical keyboard be cleaned without removing the keycaps?
A basic clean with compressed air and a lightly dampened cloth can handle surface dust and smudges, but it will not remove buildup trapped under the keycaps or around the stabilizers.
Is it safe to wash mechanical keyboard keycaps in water?
Yes, most keycaps can be safely soaked in warm water with mild soap, then rinsed and fully air dried, as long as the keyboard’s PCB and switches stay separate from the water.
What alcohol percentage works best for cleaning a keyboard?
Isopropyl alcohol at 90 percent or higher works best because it evaporates quickly and leaves minimal residue, reducing the risk of moisture reaching sensitive electrical components.
Can switches be cleaned without desoldering them?
On hot-swap keyboards, switches can be pulled with a switch puller and cleaned externally without any soldering. On soldered boards, cleaning is generally limited to the exposed plate and switch housing from the outside.
Why do keys feel scratchy even after cleaning?
Scratchiness often comes from the internal parts of the switch rather than surface dust, and it typically requires opening and lubricating the switch itself, which is a more advanced step than routine cleaning.
Is compressed air safe to use directly on switches?
Yes, short controlled bursts are safe and effective for clearing dust from between and around keycaps, though holding the can too close or using excessive pressure is unnecessary and can push debris deeper into tight spots.
Can a keyboard be damaged by cleaning it incorrectly?
Yes, using too much liquid, water instead of isopropyl alcohol, or reassembling before parts are fully dry can lead to sticky keys, corrosion, or unresponsive switches over time.
Should the whole keyboard be disassembled down to the PCB for a routine clean?
Full disassembly down to the PCB is rarely necessary for routine maintenance and adds risk of misplacing parts or damaging connectors. That level of teardown is better reserved for a genuine deep clean or a repair, and anyone unsure about handling the PCB or soldered connections should let a professional handle that part.
What is the difference between cleaning a keyboard and lubing the switches?
Cleaning removes dust, oils, and debris from the keyboard’s surfaces and switch exterior, while lubing applies a thin layer of lubricant inside the switch to smooth its movement. Cleaning is routine maintenance, while lubing is an optional modification for improving feel and sound.
