
Knowing how to test your microphone in Windows 11 saves a lot of awkward moments before a video call, a recording session, or a game chat. The built-in tools show live input levels and can play your voice back. This works on every Windows 11 edition, needs no administrator rights, and only requires a microphone that is already connected or built into the laptop.
Key Takeaways
- The quickest test is under Settings > System > Sound, where the input level bar moves as you speak.
- The Start test button on the microphone’s properties page gives a clear result in a few seconds.
- The classic Sound window and the Sound Recorder app let you see levels or hear your own voice.
- If nothing registers, check the selected device, the mute state, and the microphone privacy setting.
How to Test Your Microphone in Windows 11: Step-by-Step Guide
Method 1: Use the Settings App
This is the easiest route for most people, and it works for built-in laptop microphones, USB microphones, and headsets alike.
- Press Windows + I to open Settings.
- Click System in the left sidebar.
- Click Sound.
- Scroll down to the Input section and select the microphone you want to check.
- Speak at a normal volume. The level bar next to the microphone moves while sound is detected.
- Click the microphone name to open its properties page.
- Under Test your microphone, click Start test.
- Speak for a few seconds, then click Stop test. A result appears showing the input level that was picked up.
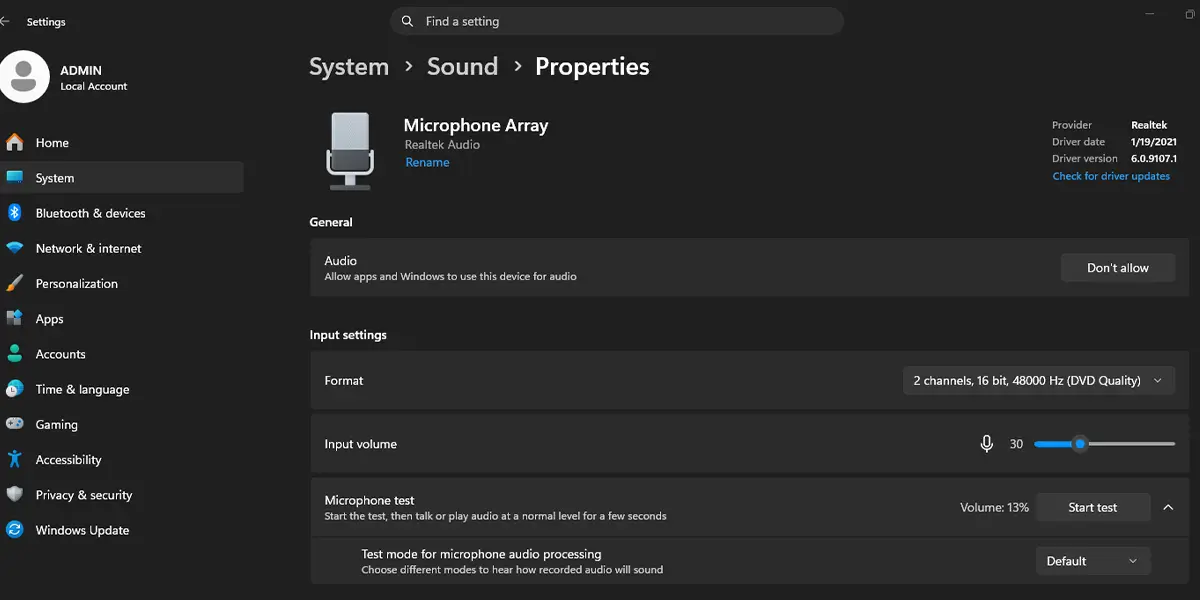
Tip: Right-click the speaker icon in the taskbar and choose Sound settings to jump straight to this page.
If the bar barely moves, drag the Input volume slider on the same properties page to the right and run the test again. Most people find that a normal speaking voice should move the bar well past the first quarter.
Method 2: Use the Classic Sound Window
This older window is handy when the Settings page does not list a device or when the sound should be played back through the speakers.
- Press Windows + R to open the Run box.
- Type the following command and press Enter. It does not need to run as administrator.
mmsys.cpl
- Click the Recording tab.
- Speak into the microphone and watch the green bars to the right of its name. They rise and fall with your voice.
- To hear yourself, double-click the microphone, open the Listen tab, tick Listen to this device, and click Apply.
- Click OK when finished.
Tip: Wear headphones for the playback test. Speakers placed near the microphone can cause a loud squeal.
Method 3: Record Yourself With Sound Recorder
A short recording is the best proof of what other people will actually hear on a call.
- Click Start, type Sound Recorder, and open the app.
- Click the round Record button.
- Say a few sentences, such as the opening of a meeting.
- Click the Stop button.
- Click Play to listen back. The recording should sound clear, with no heavy hiss or cut-off words.
How to Undo or Reverse This Change
Testing does not change anything by itself, but the playback option in Method 2 stays on until it is switched off. Press Windows + R, type mmsys.cpl, open the Recording tab, double-click the microphone, go to the Listen tab, untick Listen to this device, and click OK. If the Input volume slider was raised during testing, it can be dragged back to its earlier position on the same Settings page.
Common Problems and Fixes
The Microphone Is Not Listed Under Input
Unplug and reconnect a USB or 3.5 mm microphone, then reopen Settings > System > Sound. For a Bluetooth headset, confirm it shows as connected. In the classic Sound window, right-click an empty area of the Recording tab, tick Show Disabled Devices, then right-click the microphone and choose Enable.
The Level Bar Does Not Move
Check that the correct microphone is selected in the Input section. Next, make sure it is not muted at the hardware level, since many headsets and laptops have a mute switch or key. Then raise the Input volume slider on the properties page.
Apps Cannot Hear the Microphone
Open Settings > Privacy & security > Microphone. Make sure Microphone access is on and that Let apps access your microphone is on. On a work or school PC, an organization policy can block these switches, and only the IT team can change them.
The Recording Sounds Quiet or Distorted
Move the microphone closer, keep it away from the keyboard, and set Input volume to a middle value rather than the maximum. Very high input volume often causes crackling.
Frequently Asked Questions
Does testing a microphone work on Windows 11 Home?
Yes. Every method in this guide works on Windows 11 Home, Pro, and Enterprise.
Do I need administrator rights to test the microphone?
No. A standard user account can use the Settings page, the classic Sound window, and Sound Recorder.
Why is the level bar not moving when I speak?
The most common causes are the wrong input device being selected, a muted microphone, a very low input volume, or microphone access being turned off under Settings > Privacy & security > Microphone.
How can I hear my own voice while testing?
Turn on Listen to this device in the microphone’s properties from the classic Sound window, or make a quick recording in Sound Recorder and play it back.
Can I test a Bluetooth headset microphone the same way?
Yes. Once the headset is connected, it appears in the Input section under Settings > System > Sound, and the same test steps apply.
Does the test need a restart?
No. The results appear right away, and no restart is needed after changing the input volume or selecting another microphone.
Is there a quick way to open the sound controls?
Press Windows + R, type mmsys.cpl, and press Enter to open the classic Sound window. For the modern page, press Windows + I and go to System > Sound.
Does a short microphone test affect battery life?
A test lasting a few seconds uses very little power, so it makes no noticeable difference on a laptop running on battery.