
Loud commercials, whisper-quiet dialogue, and sudden explosions are a common annoyance, and the built-in fix is simple. To turn on loudness equalization in Windows 11, enable one checkbox on the Enhancements tab of the sound device properties. This feature is offered by the audio driver, so it appears only on devices whose driver includes it, and no administrator rights are needed.
Key Takeaways
- Loudness Equalization evens out volume differences so loud and quiet moments sound closer together.
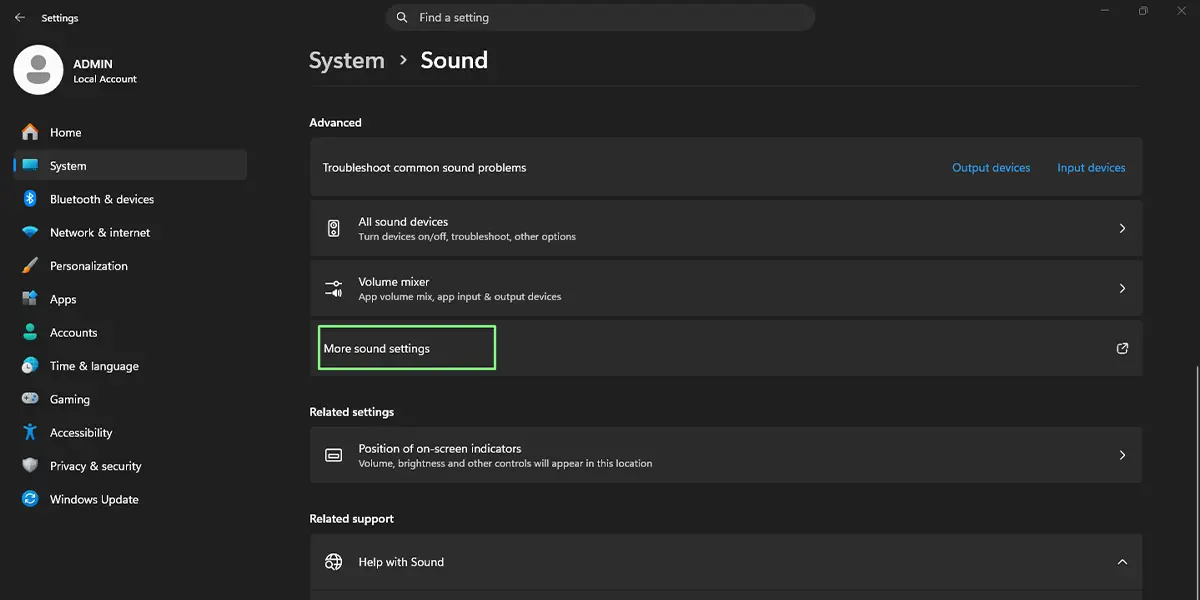
- The fastest route is Settings > System > Sound > More sound settings > Playback > Properties > Enhancements.
- Tick the Loudness Equalization checkbox, then click Apply.
- The option is set per playback device, so headphones and speakers each need their own setting.
- If the Enhancements tab or the checkbox is missing, the audio driver does not offer it.
Step-by-Step Guide to Turn On Loudness Equalization in Windows 11
Method 1: Use the Settings App
- Press Windows + I to open Settings.
- Click System in the left sidebar, then click Sound.
- Scroll down to the Advanced section and click More sound settings. A classic Sound window opens.
- Stay on the Playback tab and select the device currently in use, such as Speakers or Headphones. The default device shows a green check mark.
- Click Properties.
- Open the Enhancements tab.
- Tick the Loudness Equalization checkbox.
- Click Apply, then click OK.
Playback now sounds more even. Quiet speech in a film comes forward and sudden loud scenes feel less jarring.
Tip: Before closing the window, select Loudness Equalization in the list and click Settings if the button is available. The Release Time slider controls how quickly the effect reacts. A lower number reacts faster, while a higher number gives smoother changes.
Method 2: Use Control Panel
- Click Start, type Control Panel, and open it.
- Set View by to Large icons or Small icons.
- Click Sound.
- On the Playback tab, double-click the active speakers or headphones.
- Open the Enhancements tab.
- Tick Loudness Equalization, then click Apply and OK.
This is the same window as in Method 1, so the result is identical. It suits readers who already work from Control Panel.
Method 3: Use the Run Command
- Press Windows + R to open the Run box.
- Type the command below and press Enter.
mmsys.cpl
- On the Playback tab, double-click the device in use.
- Open the Enhancements tab, tick Loudness Equalization, and click Apply, then OK.
Tip: This command opens the Sound window directly, which saves several clicks if the setting is adjusted often, for example when switching between a laptop speaker and a headset.
How to Undo or Reverse This Change
To switch the effect off, repeat any method above, open the Enhancements tab, and untick Loudness Equalization. Click Apply and then OK. Ticking Disable all enhancements, if it is shown, turns off every effect for that device at once. The sound returns to its natural dynamic range right away.
Common Problems and Fixes
The Enhancements Tab Is Missing
Some audio drivers do not provide an Enhancements tab. This is common with generic or basic drivers. Installing the latest audio driver from the PC or laptop manufacturer through Windows Update or the manufacturer’s support page often brings the tab back. Then reopen the device properties and check again.
Loudness Equalization Is Not in the List
The tab can be present while the list shows other effects only. In that case, the driver does not support this effect for the selected device. Check that the correct device is selected, since a laptop may offer it for built-in speakers but not for a headset or HDMI monitor.
The Effect Has No Audible Result
Confirm the checkbox is ticked for the device that is actually playing sound. Plugging in headphones or connecting a second monitor can change the default device. If the device properties page in Settings > System > Sound shows an Audio enhancements setting turned off, switch it on and check the Enhancements tab again.
The Setting Resets After a Restart or Driver Update
A driver update can reset audio effects to their defaults. Open the Enhancements tab again, tick Loudness Equalization, and click Apply. If it keeps resetting, reinstalling the audio driver usually settles it.
Frequently Asked Questions
Does loudness equalization work on Windows 11 Home?
Yes. The feature depends on the audio driver, not the Windows edition, so Home and Pro behave the same way.
Do I need administrator rights to turn it on?
No. A standard user account can change this setting for the playback device.
Does it need a restart to take effect?
No. The change applies after clicking Apply, although an app that is already playing audio may need to be paused and resumed.
Why is the Loudness Equalization option missing?
The audio driver does not offer it for that device. Updating the driver from the PC or laptop manufacturer can add it, but some devices never support it.
Does it apply to all speakers and headphones?
No. The setting is saved per playback device, so each speaker, headset, or monitor needs its own change.
Will it affect battery life or performance?
The effect is lightweight, and most people will not notice any difference in battery life or speed on a laptop.
What does the Release Time setting do?
Release Time controls how quickly volume levels are smoothed after a loud sound. Lower values react faster, and higher values give a more gradual change.
Is there a keyboard shortcut for this?
There is no dedicated shortcut for the checkbox. Pressing Windows + R and running mmsys.cpl opens the Sound window quickly, and the Enhancements tab is two clicks away.