
Knowing how to turn off exclusive mode for audio devices in Windows 11 fixes a common annoyance: one app grabs your speakers or headset and every other app goes silent. The setting is available on all editions of Windows 11, including Home and Pro, and it appears for any playback or recording device whose driver supports it. The change takes less than a minute and does not need a restart.
Key Takeaways
- Exclusive mode lets one app take full control of a sound device, which can mute or block every other app.
- The fastest route is Settings > System > Sound > More sound settings, then the device’s Properties > Advanced tab.
- Clear the box named Allow applications to take exclusive control of this device to turn the feature off.
- The change applies to one device at a time, so repeat it for each speaker, headset, or microphone that needs it.
How to Turn Off Exclusive Mode for Audio Devices in Windows 11: Step-by-Step Guide
Method 1: Use the Settings App
- Press Windows + I to open Settings.
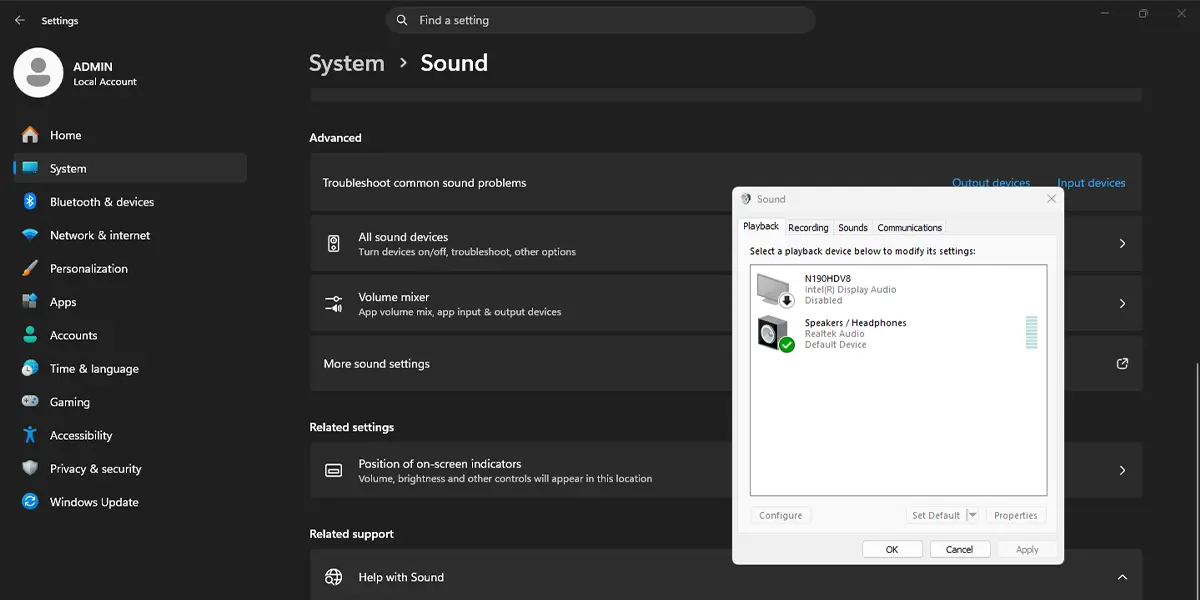
- Go to Settings > System > Sound.
- Scroll down to the Advanced section and click More sound settings. The classic Sound window opens.
- Stay on the Playback tab for speakers or headphones. Switch to the Recording tab for a microphone.
- Click the device you want to change, then click Properties.
- Open the Advanced tab.
- Under Exclusive Mode, clear the check box named Allow applications to take exclusive control of this device.
- Click Apply, then click OK.
- Click OK again to close the Sound window.
After the box is cleared, the second option, Give exclusive mode applications priority, turns grey automatically because it only works when the first option is on. Audio from several apps can now play through the device at the same time.
Tip: A system with more than one sound device needs these steps repeated for each one. A USB headset and the built-in speakers, for example, keep separate exclusive mode settings.
Method 2: Use Control Panel
- Click the Start button, type Control Panel, and press Enter.
- Set View by in the top-right corner to Large icons or Small icons.
- Click Sound.
- Select the device on the Playback or Recording tab, then click Properties.
- Open the Advanced tab.
- Clear Allow applications to take exclusive control of this device.
- Click Apply, then OK.
This route ends in the same Properties window as Method 1, so the result is identical. It suits readers who already keep Control Panel handy.
Method 3: Use the Run Command
- Press Windows + R to open the Run box.
- Type the following command and press Enter. It does not need an elevated window.
mmsys.cpl
- The Sound window opens straight away. Select your device and click Properties.
- Open the Advanced tab and clear Allow applications to take exclusive control of this device.
- Click Apply, then OK.
Tip: This is the quickest way to reach the Sound window if the setting needs changing on several devices. It skips the Settings app entirely.
How to Undo or Reverse This Change
To turn exclusive mode back on, repeat any method above, open the device’s Advanced tab, and select Allow applications to take exclusive control of this device again. Select Give exclusive mode applications priority too if that behavior is wanted, then click Apply and OK.
Common Problems and Fixes
The Advanced tab or the Exclusive Mode options are missing
The options come from the device driver, so some devices do not show them. Open Device Manager, expand Sound, video and game controllers, and check that the device is listed without a warning icon. Installing the latest driver from the PC or device maker usually brings the tab back.
The check boxes are greyed out
A greyed-out box usually points to a driver limitation or a device managed by work or school. On a work PC, an administrator may control audio settings, so the change has to come from the IT team.
The device is not listed in the Sound window
Right-click an empty area of the device list and select Show Disabled Devices. A device that was switched off earlier appears there and can be selected like any other.
One app still blocks the sound of other apps
Some audio and music apps have their own audio output option that takes a device exclusively. Open that app’s audio or output settings and turn off any exclusive or direct output choice, then restart the app.
The setting reverts after a restart or an update
Driver updates can reset audio properties to their defaults. Reopen the device’s Advanced tab, clear the exclusive mode check box again, and click Apply.
Frequently Asked Questions
What does turning off exclusive mode actually do?
It stops any single app from taking full control of a sound device. Windows then mixes the audio from all open apps, so a video call, a browser tab, and a music player can all make sound at once.
Does turning off exclusive mode need a restart?
No. The change takes effect after clicking Apply or OK. If an app that was already playing sound still behaves the same way, close and reopen that app.
Does this work on Windows 11 Home?
Yes. The Sound window and its Advanced tab are available on Home, Pro, and Enterprise editions.
Do I need administrator rights to change it?
The steps in this guide do not use an elevated window. On a work or school PC, device settings may be restricted by the organization, which can grey out the options.
Why is the Advanced tab missing for my headset or speakers?
The tab depends on what the audio driver exposes. Updating the audio driver from the PC or device maker is the most reliable fix, and a different USB port can also help for USB devices.
Is there a keyboard shortcut to open the Sound window?
Press Windows + R, type mmsys.cpl, and press Enter. That opens the Sound window directly, and the rest of the steps follow from there.
Does turning it off affect battery life or performance?
The effect is negligible for everyday use. The main difference is that apps share the device instead of one app controlling it.
Do I have to turn it off for every audio device?
Yes. Each playback and recording device has its own Exclusive Mode settings, so the steps need repeating for every device that causes trouble.