
Troubleshooting microphone privacy settings in Windows 11 is usually the fastest fix when an app says no microphone was found, or when people on a call simply cannot hear you. Windows 11 has several layers of microphone permission, and if any one of them is switched off, the mic stays silent even though the hardware works perfectly. The Settings app steps below work on every edition of Windows 11, while the Group Policy check applies only to Pro, Enterprise and Education and needs an administrator account.
Key Takeaways
- Most blocked microphones are fixed at Settings > Privacy & security > Microphone by turning on Microphone access, Let apps access your microphone and Let desktop apps access your microphone.
- Microsoft Store apps such as Microsoft Teams, Outlook and Copilot each have their own switch, while browsers and other desktop programs share one switch.
- The microphone itself can be blocked separately at Settings > System > Sound, where the device must be set to Allow.
- Greyed-out toggles usually mean the PC is managed by work or school, or a Group Policy is forcing the setting.
- After changing a permission, close and reopen the app so it picks up the new setting.
Troubleshooting Microphone Privacy Settings in Windows 11: Step-by-Step
Work through the methods in order. Method 1 solves the problem for most people, Method 2 catches a microphone that has been switched off at the device level, and Method 3 is for PCs where the toggles refuse to change.
Method 1: Check Microphone Permissions in the Settings App
- Press Windows + I to open Settings.
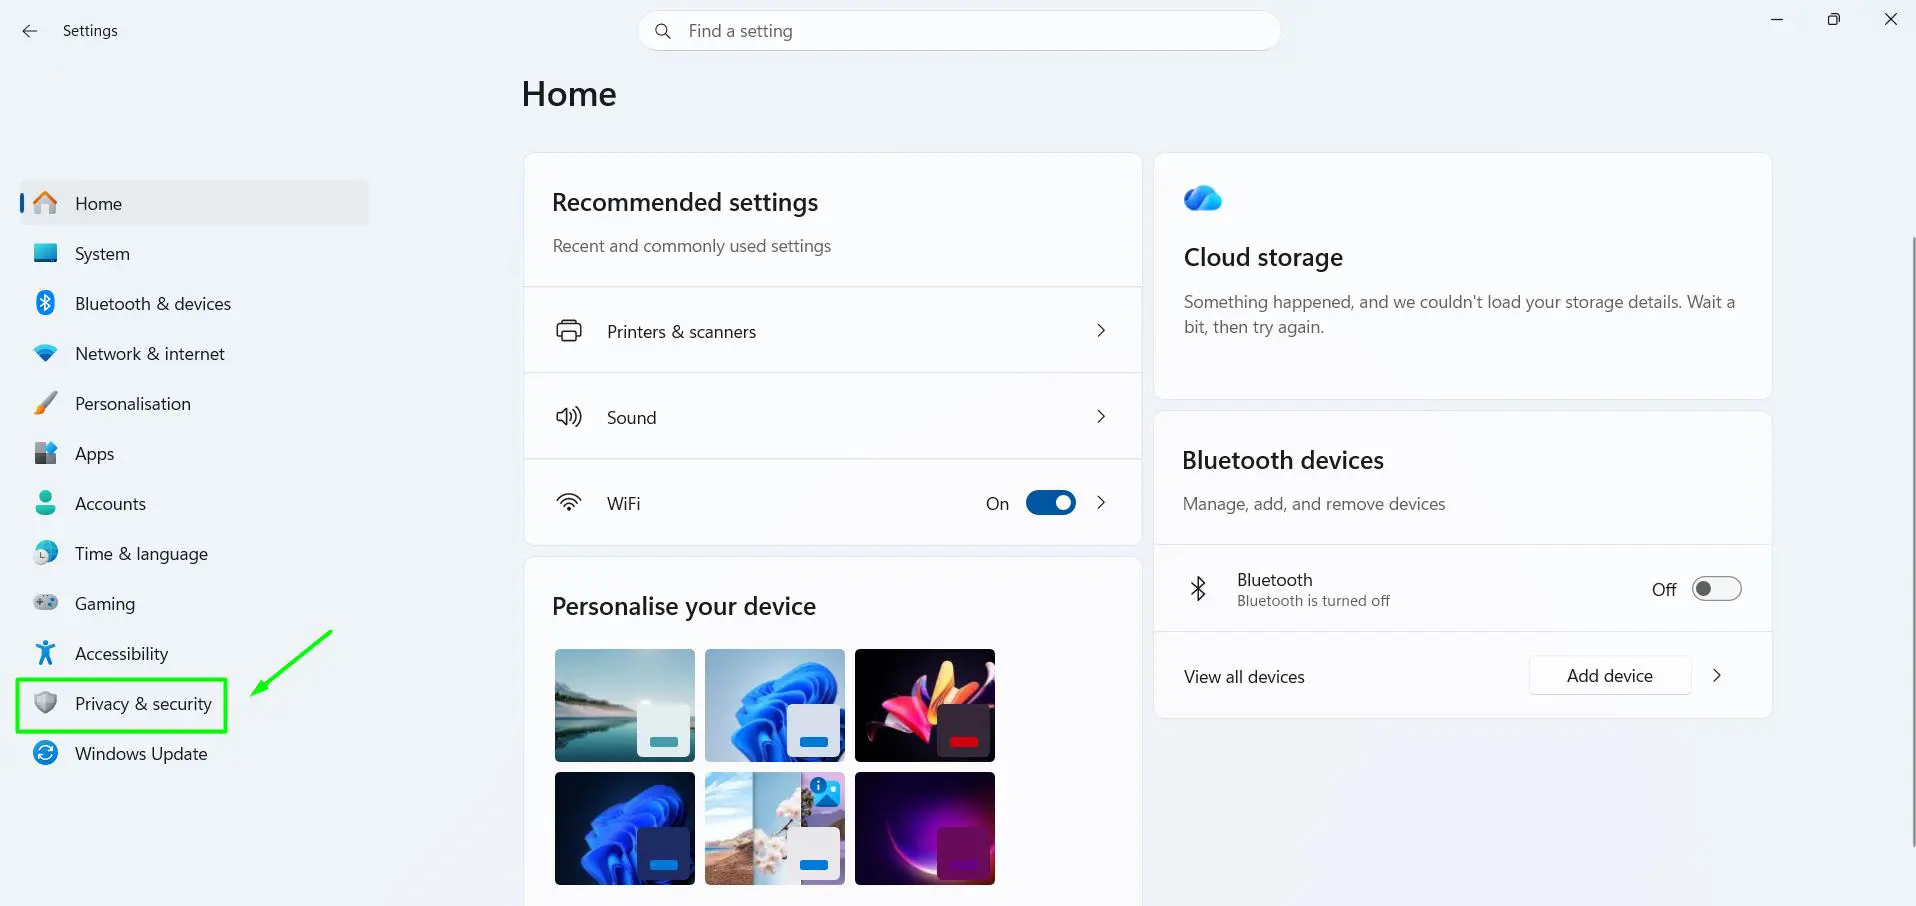
- Select Privacy & security in the left pane.
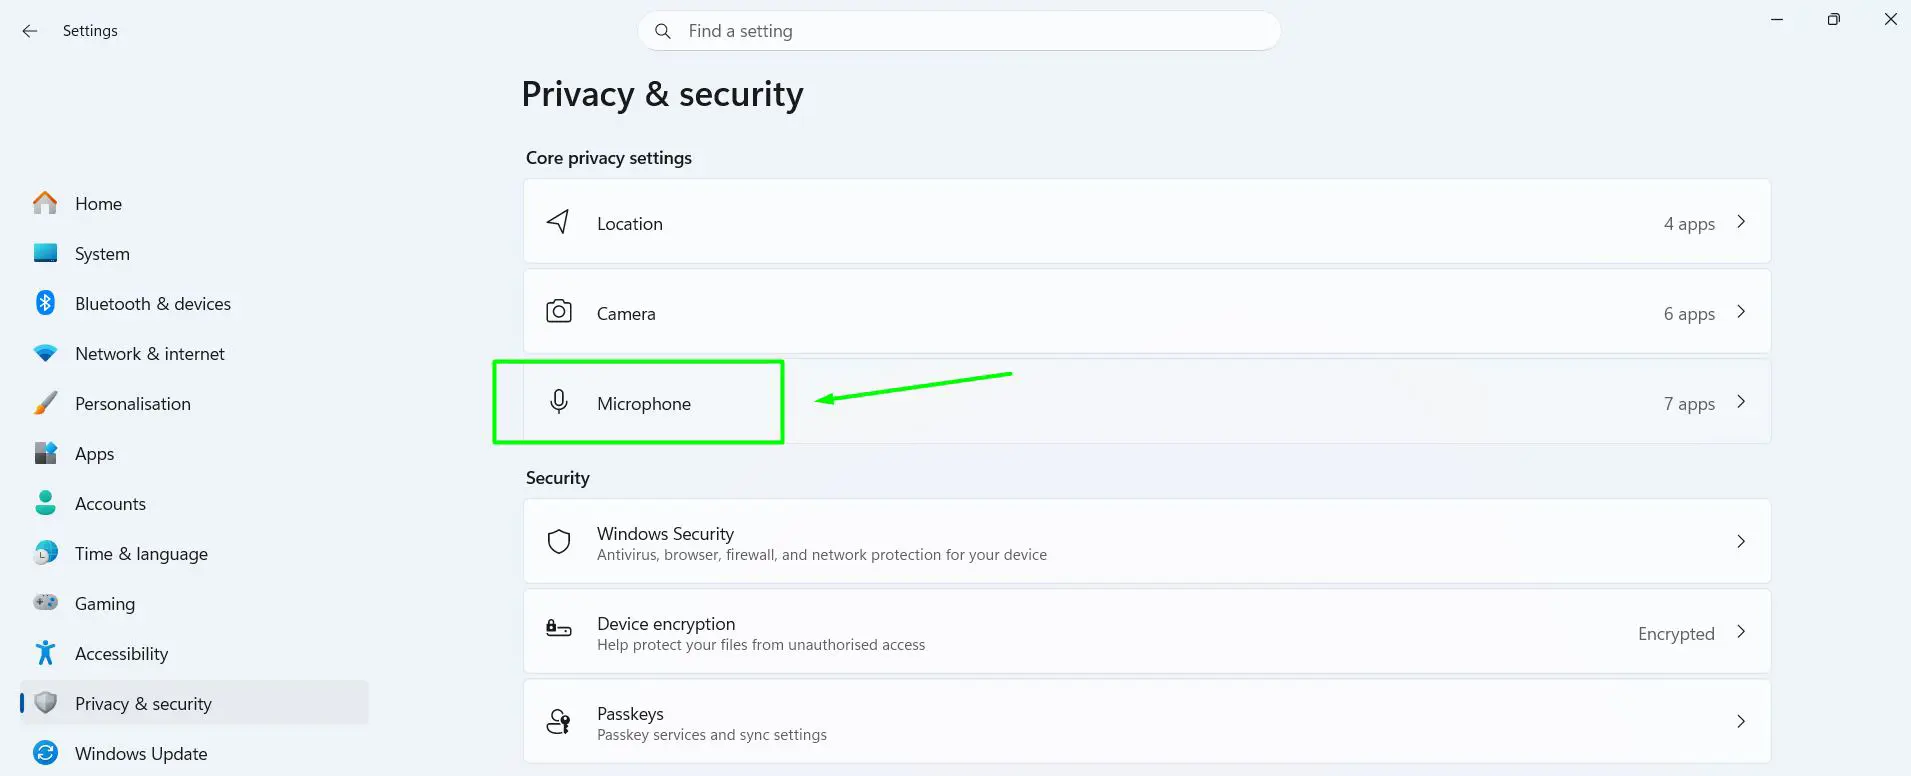
- Under Core privacy settings at the top of the page, select Microphone. The number beside it, such as 7 apps, shows how many apps have asked to use the mic.
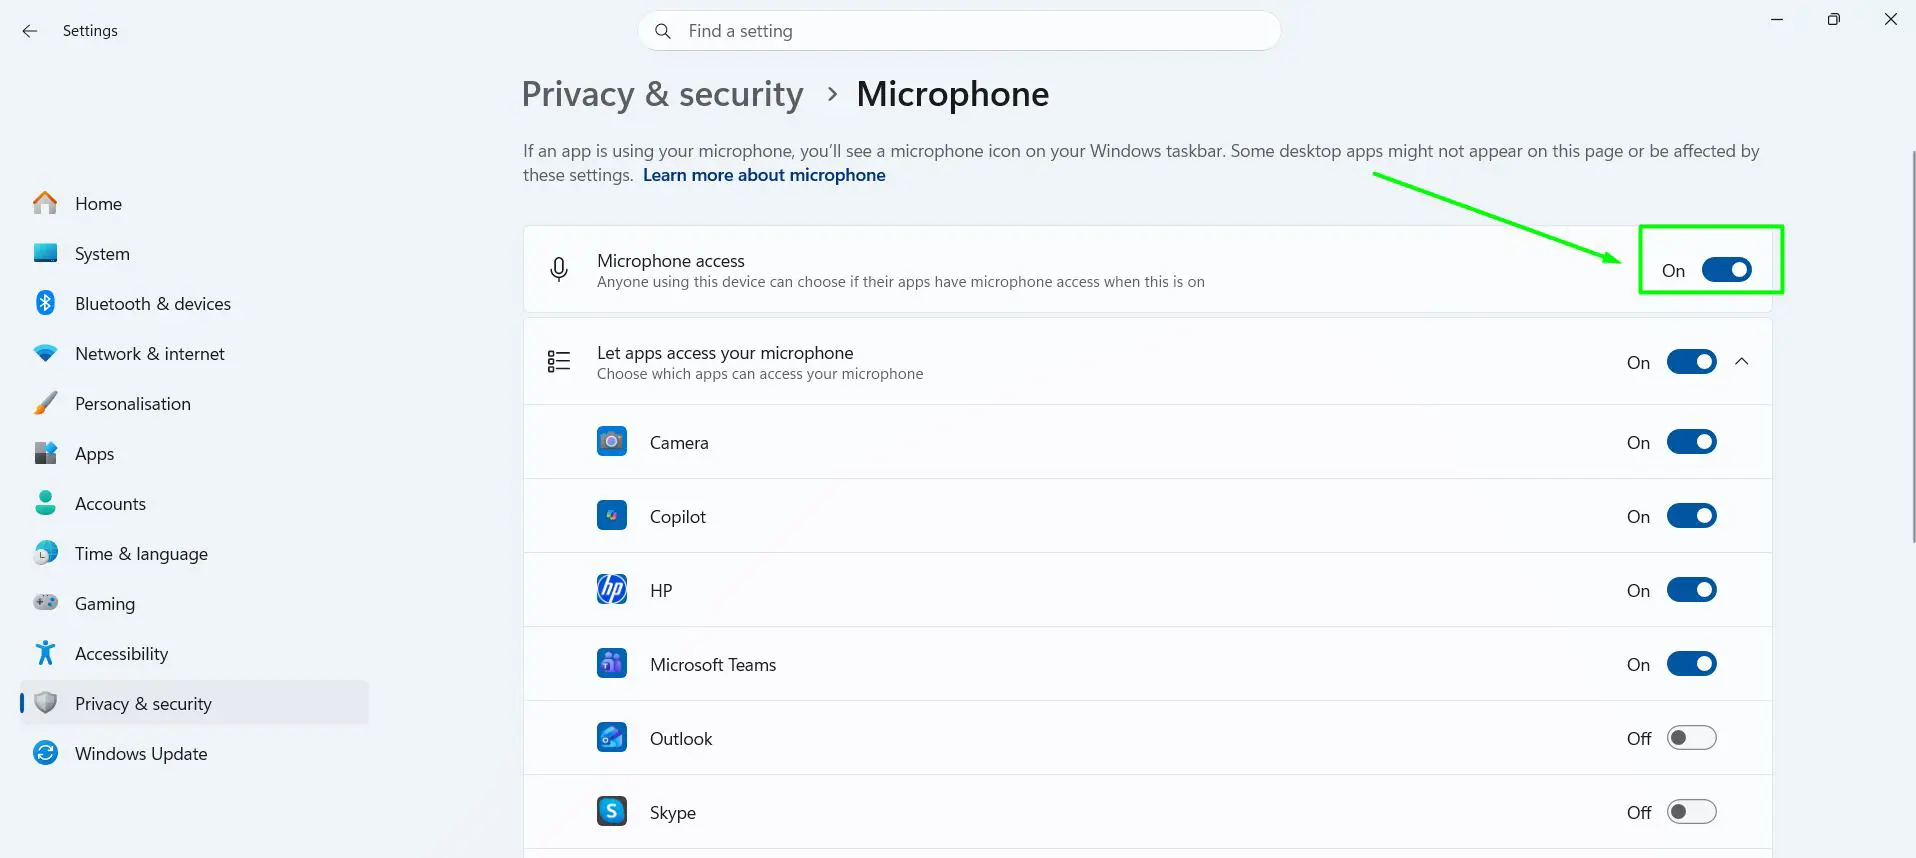
- Turn on Microphone access. The line beneath it reads ‘Anyone using this device can choose if their apps have microphone access when this is on’. While this switch is off, every other option on the page stays greyed out and no app can use the mic.
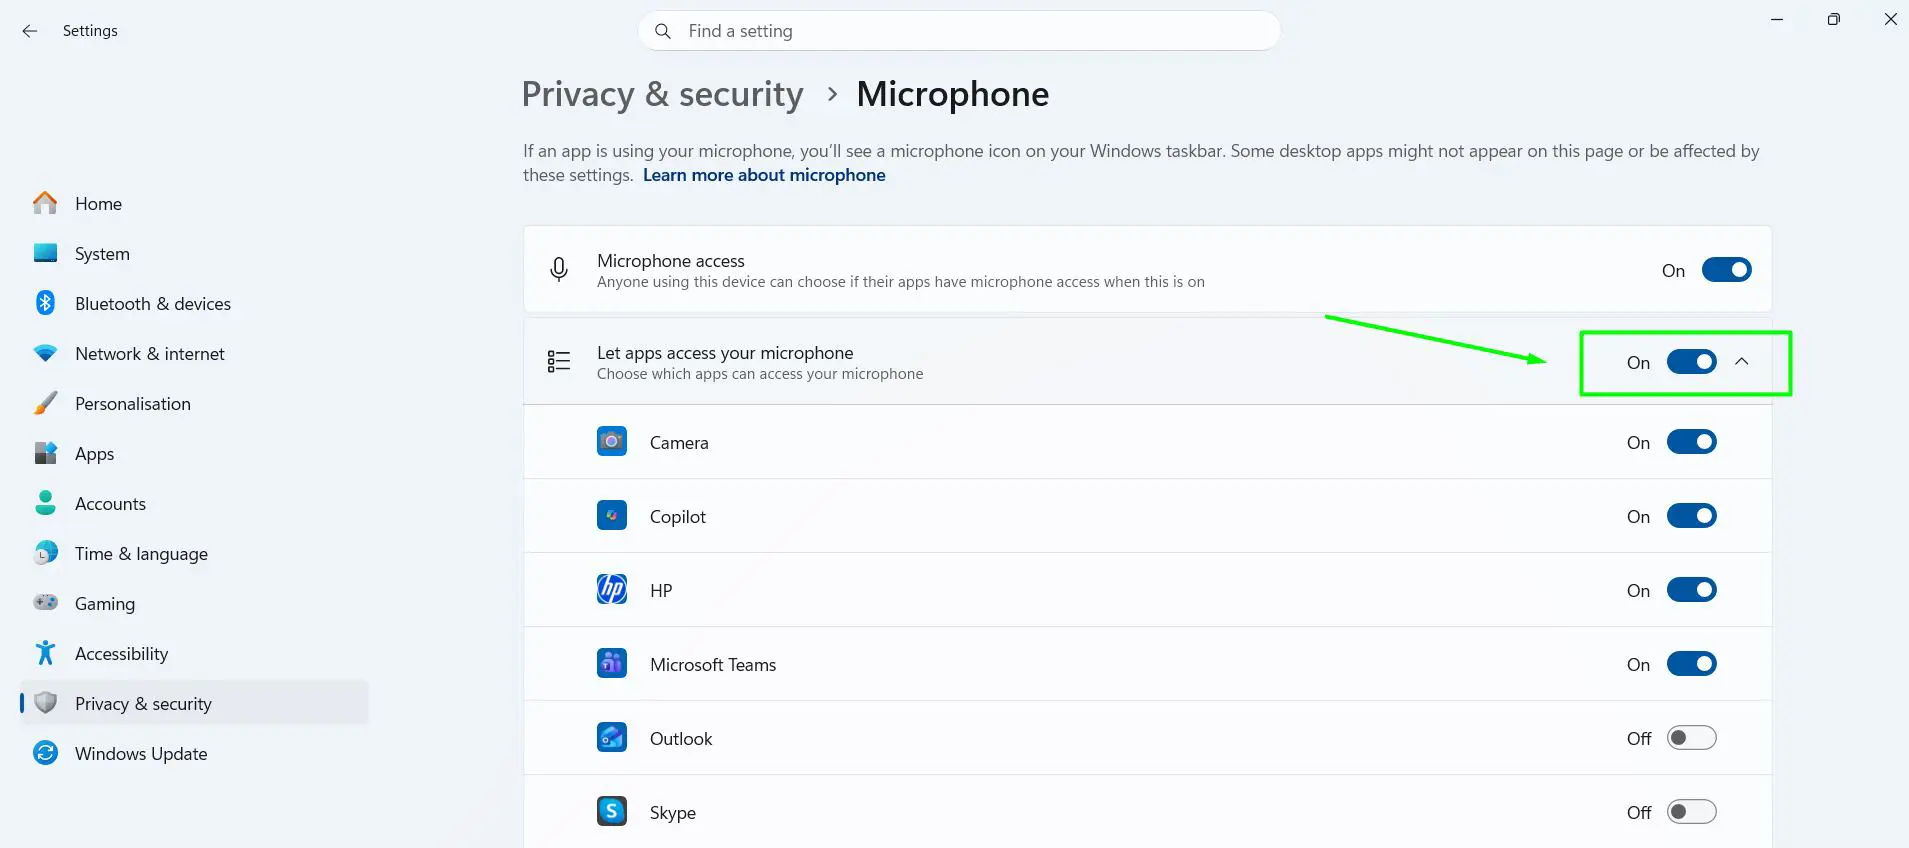
- Turn on Let apps access your microphone. If the app list below it is hidden, select the arrow on the right side of the row to expand it.
- Find the app that cannot hear you, such as Microsoft Teams, Outlook, Copilot or Sound Recorder, and turn on its switch. The label next to the switch changes from Off to On.
- Scroll down and turn on Let desktop apps access your microphone. This one switch covers browsers, games and other programs installed from the web.
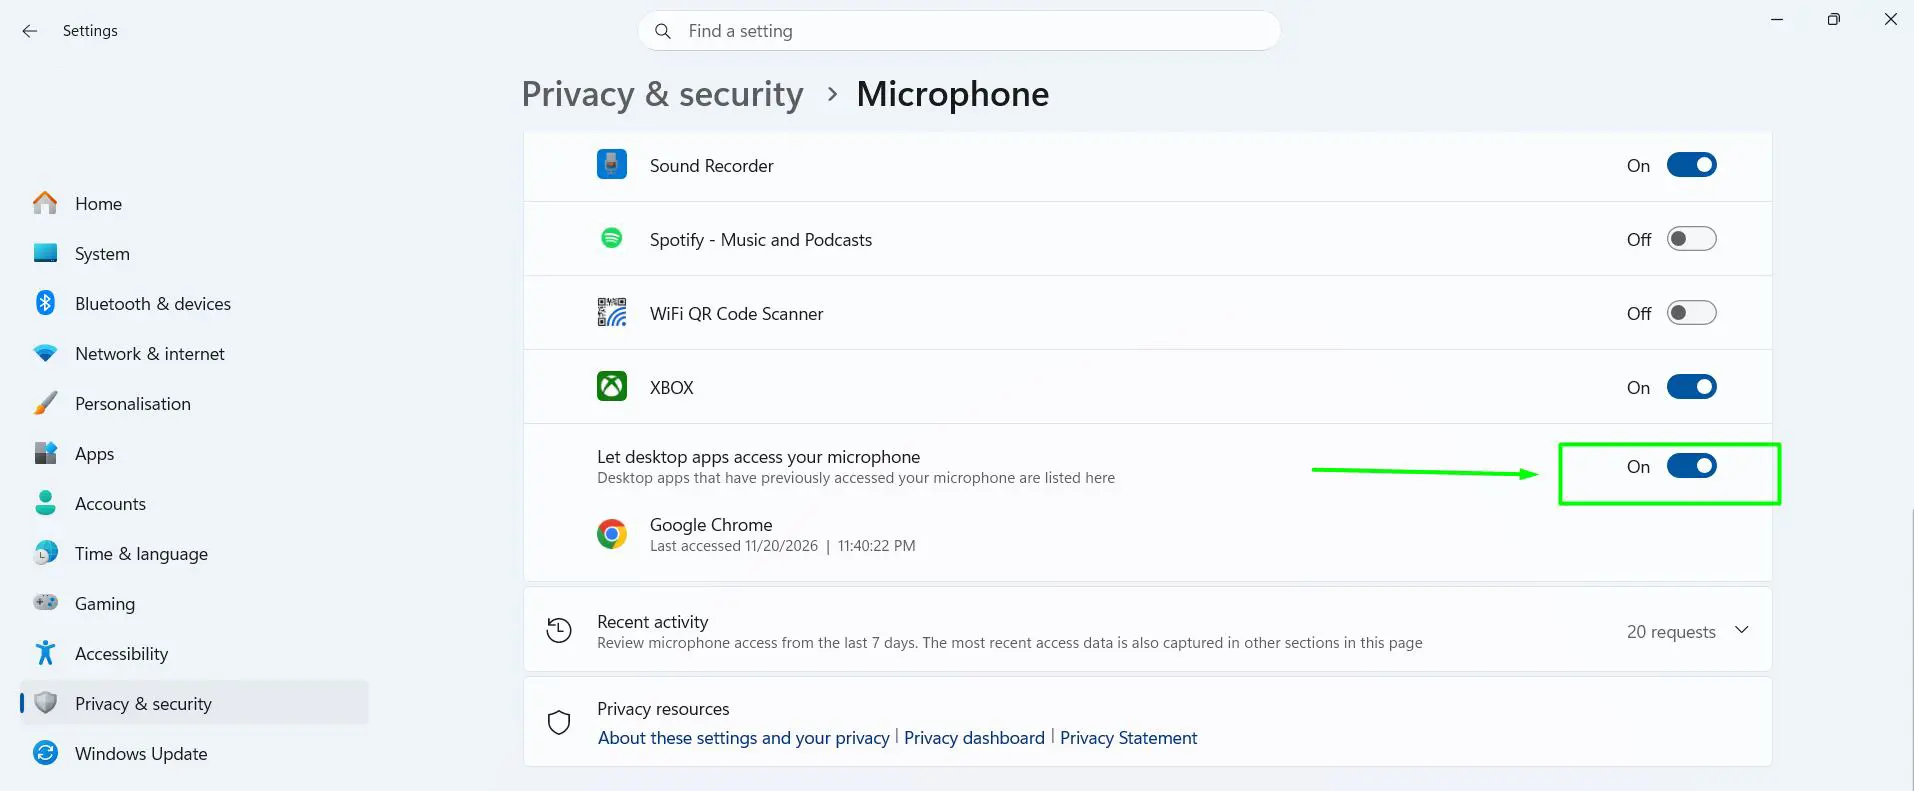
- Close the app completely, open it again and use the microphone in the app.
- Go back to the Microphone page. A Last accessed line with the date and time now appears under the app’s name, confirming that Windows let it reach the microphone.
A common case is a PC where Teams is switched on but Outlook is off. Teams calls work fine, while joining the same meeting or recording audio from Outlook gets nothing. Each app in this list has its own permission, so check the exact app that is failing rather than assuming one switch covers them all.
Tip: To jump straight to this page, press Windows + R, type ms-settings:privacy-microphone and press Enter. It saves a few clicks when helping someone over the phone.
Method 2: Allow the Microphone in Sound Settings
Windows 11 can also switch off a single microphone at the device level. When that happens, the privacy page can look perfect while the mic still does nothing.
- Press Windows + I and go to Settings > System > Sound.
- Under Input, find your microphone in Choose a device for speaking or recording and select it so it becomes the active input.
- Select the arrow beside the microphone to open its Properties page.
- Look at the Audio setting near the top, which reads Allow apps and Windows to use this device for audio. If the button next to it says Allow, the mic is blocked – select Allow to turn it back on. When the button shows Don’t allow, the microphone is already enabled.
- Under Input settings, select Start test and speak normally. A moving level bar confirms that Windows hears you.
This matters most on laptops used with a headset or webcam mic. A laptop can have two or three microphones listed here, and the one your call app uses may be the one that is set to blocked.
Tip: A microphone icon appears in the notification area on the taskbar whenever an app is using the mic. Hover over it to see exactly which app is listening, which is a quick way to confirm the fix worked.
Method 3: Check Group Policy for a Forced Block (Pro, Enterprise and Education)
If the toggles in Method 1 are greyed out or keep switching back, a Group Policy may be forcing the microphone off. This method needs an administrator account, and the Local Group Policy Editor is not available on Windows 11 Home. On a work or school PC, contact the IT department instead, because the policy is usually set on purpose. Group Policy changes affect the whole system, so creating a restore point first is a sensible precaution.
- Press Windows + R, type gpedit.msc and press Enter. Select Yes if User Account Control asks for permission.
- Go to Computer Configuration > Administrative Templates > Windows Components > App Privacy.
- Double-click Let Windows apps access the microphone.
- If the policy is set to Enabled with Force Deny as the default for all apps, this is what is blocking the microphone. Select Not Configured.
- Select Apply, then OK.
- Restart the PC, then return to Settings > Privacy & security > Microphone. The toggles should now be available to change.
How to Undo or Reverse This Change
To block the microphone again, go back to Settings > Privacy & security > Microphone and turn off the switch for the specific Store app, or turn off Let desktop apps access your microphone to block all desktop programs at once. To shut off every app, turn off Microphone access. To disable a single microphone entirely, open its Properties page under Settings > System > Sound and select Don’t allow. Any Group Policy you cleared can be set back to Enabled with the original option.
Common Problems and Fixes
The Microphone Toggles Are Greyed Out
First check that Microphone access at the top of the page is on, since every other toggle is locked while it is off. If the page shows a message that some settings are managed by your organization, a work account, school account or Group Policy is controlling microphone access. On a personal PC, use Method 3 to clear the policy. On a work PC, ask IT to change it.
The App Is Not in the List
The list under Let apps access your microphone shows only Microsoft Store apps, which on many PCs now includes Microsoft Teams, Outlook and Copilot. Programs installed from the web are not toggled one by one – they depend on Let desktop apps access your microphone. As the note at the top of the Microphone page says, some desktop apps might not appear on the page at all, or might not be affected by these settings.
Permissions Are On but the App Still Cannot Hear You
Close the app fully and reopen it, because many apps check permissions only at launch. Then check the microphone’s Allow setting in Method 2 and make sure the correct mic is selected under Input. On many laptops, a microphone mute key on the keyboard or a physical switch on a headset can also cut the mic off. If the key has an indicator light, make sure it shows the mic is unmuted.
Settings Switch Back After a Restart or Update
Permissions that will not stay on usually point to a policy being reapplied at startup, either a local Group Policy or a management profile from work or school. Check Method 3, and on a managed device ask the administrator. Also confirm you are changing the setting under the account that uses the app, since permissions for Store apps and desktop apps can differ between user accounts on a shared family computer.
A Website Still Cannot Use the Microphone
Browsers have their own permission for each website on top of the Windows setting. In Microsoft Edge, select the lock icon to the left of the address bar, open the site permissions and set Microphone to Allow, then reload the page. The Windows switch Let desktop apps access your microphone must also be on for any browser to reach the mic.
Frequently Asked Questions
Do these steps work on Windows 11 Home?
Yes. The Settings app and Sound settings steps work on every edition, including Home. Only the Group Policy check needs Windows 11 Pro, Enterprise or Education.
Do I need to restart my PC after changing microphone privacy settings?
No restart is needed for the Settings app changes. Closing and reopening the affected app is usually enough. A restart is only recommended after changing a Group Policy.
Why can’t I turn off the microphone for one desktop app only?
In the current release of Windows 11, desktop apps share a single switch called Let desktop apps access your microphone. Individual on/off switches are only available for Microsoft Store apps.
How can I see which apps have used my microphone?
Open Settings > Privacy & security > Microphone. Store apps that recently used the mic show a Last accessed date and time under their name, and the microphone icon on the taskbar shows which app is listening right now.
Does turning off Microphone access affect other accounts on the PC?
Yes. Microphone access is a device-wide switch, so turning it off blocks the microphone for every user account on that computer, not just yours.
Why does my microphone show Don’t allow in Sound settings?
That button is what you select to disable the mic, so seeing Don’t allow means the microphone is currently enabled. If the button says Allow, the device is blocked and selecting Allow turns it back on.
Is there a quick shortcut to the microphone privacy page?
Press Windows + R, type ms-settings:privacy-microphone and press Enter. Settings opens directly on the Microphone page.
Why did my microphone stop working after a Windows update?
An update can occasionally change permissions or the default input device. Recheck the three switches on the Microphone privacy page, confirm the correct mic is selected under Input in Sound settings and make sure it is set to Allow.