
Quick Answer: To connect a wireless printer to Windows, first join the printer to your Wi-Fi from its own control panel. Then on your PC, open Settings > Bluetooth & devices > Printers & scanners (on Windows 10, Settings > Devices > Printers & scanners), click Add device, select your printer, and click Add device again. Windows installs it in seconds. If the printer doesn’t show up, add it by its IP address.
Connecting a wireless printer to Windows should take two minutes. Sometimes it does. Other times the printer is nowhere to be found, or it shows up once and then sits there saying “offline.”
Here’s the thing: the printer is almost never broken. Most of the time it’s on a different Wi-Fi band than your computer, or Windows simply can’t spot it on the network. Both are easy to fix.
The methods below are listed from easiest to most hands-on. Start at the top and stop as soon as the printer works.
Which Method Should You Use?
| Method | Best For | Difficulty | Time |
|---|---|---|---|
| 1. Windows Settings | Most people. Try this first. | Very easy | 2 min |
| 2. Printer brand app | Guided setup, plus ink levels and scanning | Very easy | 5 min |
| 3. Temporary USB cable | Printers with no screen or buttons for Wi-Fi | Easy | 5 min |
| 4. Wi-Fi Direct | No router, or the router is down | Easy | 3 min |
| 5. IP address | Printer won’t show up or keeps going offline | Moderate | 4 min |
| 6. Shared from another PC | Older USB printer attached to a desktop | Moderate | 3 min |
| 7. Bluetooth | Small portable and photo printers | Easy | 3 min |
First: Put the Printer on Your Wi-Fi
Windows can’t do this part for you. The printer has to join your Wi-Fi on its own first.
- Step 1: Turn the printer on and let it finish starting up.
- Step 2: On the printer’s screen, open Settings, Network, or Wireless Setup.
- Step 3: Pick your Wi-Fi name from the list.
- Step 4: Type in your Wi-Fi password.
- Step 5: Wait for a steady Wi-Fi light or a “Connected” message.
Shortcut: If your router has a WPS button, press it, then press the WPS button on the printer within two minutes. No password needed. Some newer routers have WPS turned off, so skip this if it doesn’t work.
The 2.4GHz catch: Most home printers only work on 2.4GHz Wi-Fi. If your router shows two network names (one for 2.4GHz, one for 5GHz), make sure your PC and printer are on the same one while you set things up. This one mismatch is behind most “printer not found” headaches.
Method 1: Add the Printer in Windows Settings
This is the easiest way, and it works for most people.
- Step 1: Press Windows + I to open Settings.
- Step 2: Click Bluetooth & devices (Windows 11) or Devices (Windows 10).
- Step 3: Click Printers & scanners.
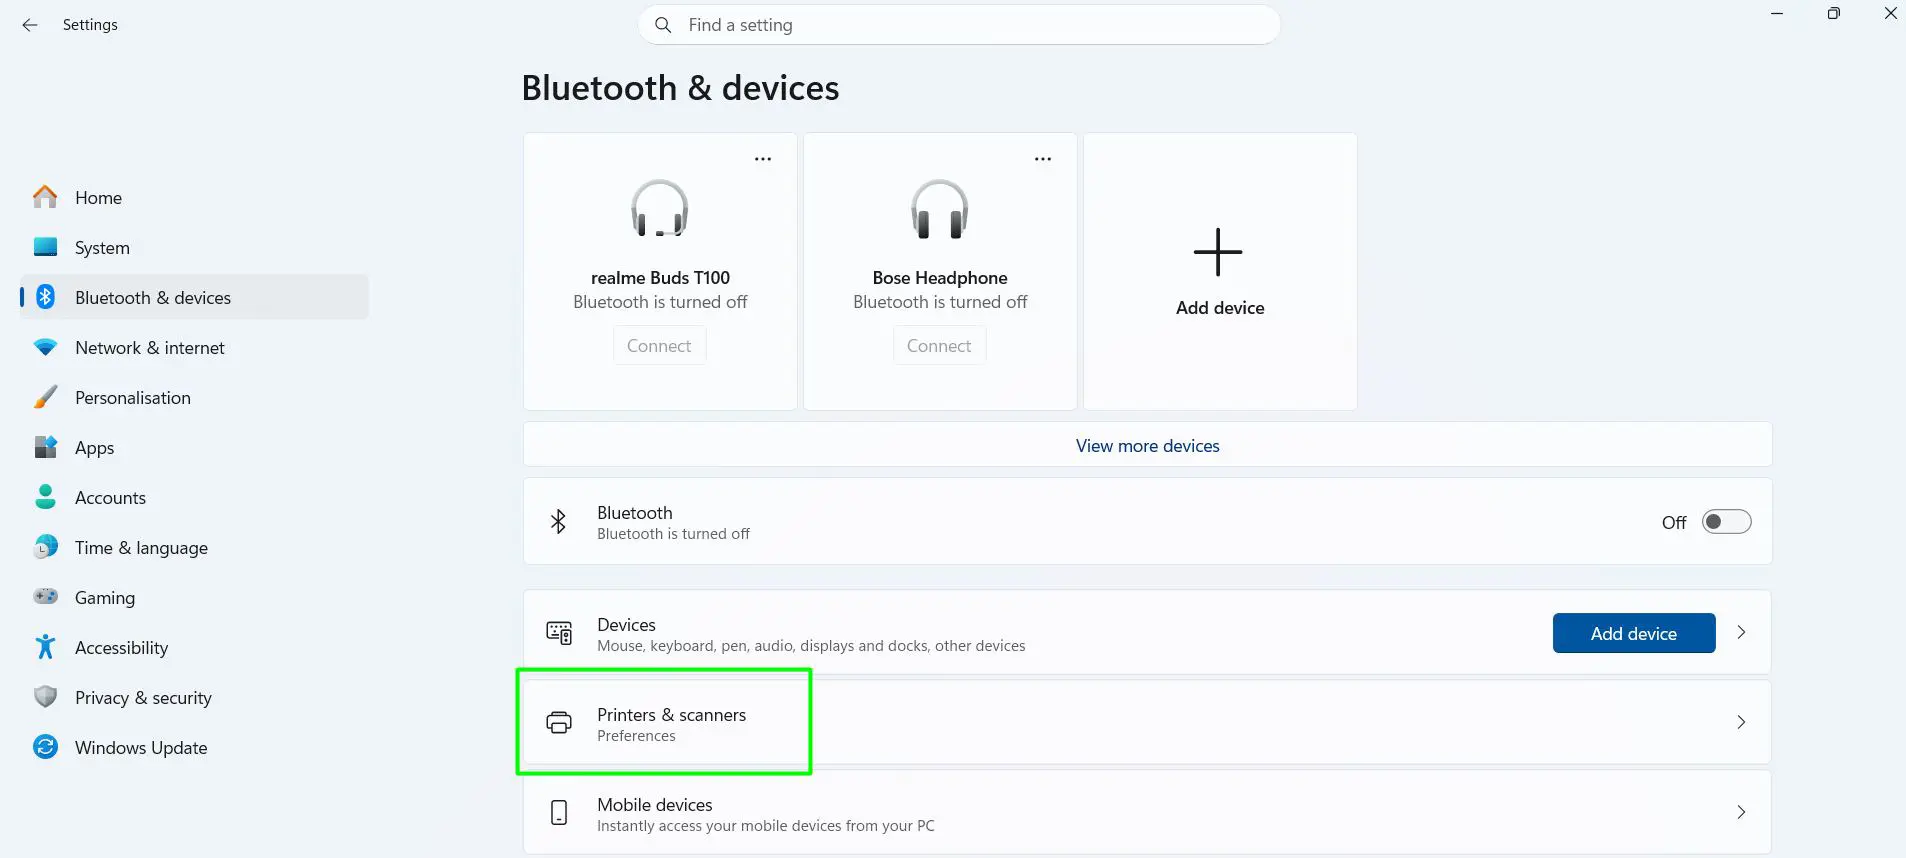
- Step 4: Click Add device.
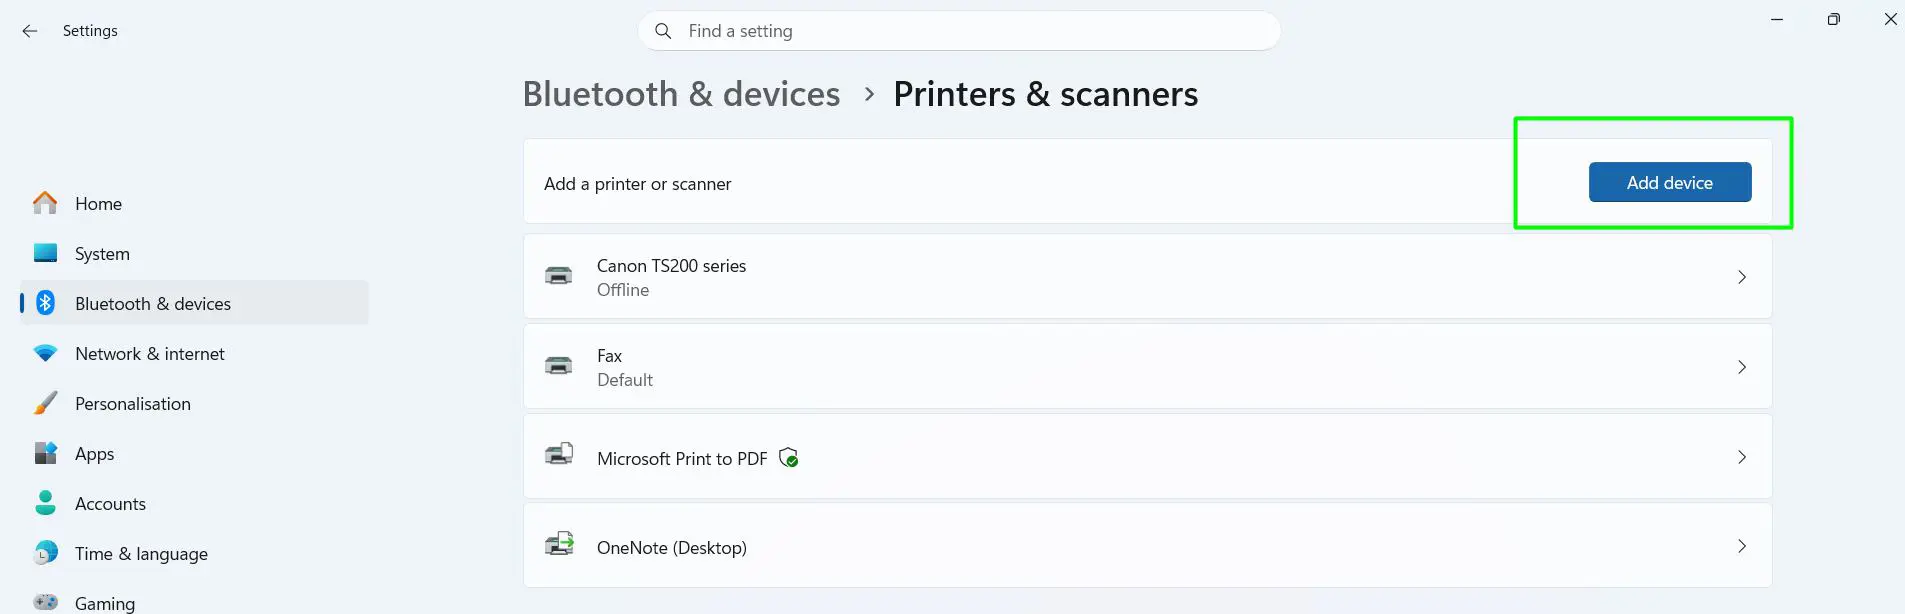
- Step 5: Wait about 15 seconds for your printer to appear.
- Step 6: Click the printer, then click Add device.
On Windows 11, most printers install with a built-in driver, so there’s nothing to download.
Printer not showing up after two tries? Skip ahead to Method 5.
Method 2: Use Your Printer Brand’s App
Most people find that the brand’s app is the friendliest option. It walks you through setup, then gives you extras like ink levels, scanning, and firmware updates.
- Step 1: Open the Microsoft Store.
- Step 2: Search for your brand’s app:
- HP: HP Smart
- Canon: Canon PRINT
- Epson: Epson Smart Panel
- Brother: Brother iPrint&Scan
- Step 3: Click Get to install it.
- Step 4: Open the app and follow the on-screen setup.
Not in the Store? Go to the support page on your printer brand’s official website, search your model number (printed on a label on the printer), and download the Windows software from there. Avoid third-party “driver updater” sites.
Method 3: Use a USB Cable Just for Setup
Some budget printers have no screen, so there’s no way to type a Wi-Fi password into them. A USB cable solves that.
- Step 1: Connect the printer to your PC with a USB cable.
- Step 2: Wait for Windows to finish installing it.
- Step 3: Open your printer brand’s app (see Method 2).
- Step 4: Choose the wireless or Wi-Fi setup option and select your network.
- Step 5: Once the printer says it’s connected to Wi-Fi, unplug the cable.
If the printer now appears twice in your list, remove the USB version.
Method 4: Connect with Wi-Fi Direct (No Router)
Many printers can create their own small Wi-Fi network. Handy when the router is down or you’re somewhere without one.
- Step 1: On the printer, turn on Wi-Fi Direct (usually under Settings or Network).
- Step 2: Note the network name and password shown on the printer.
- Step 3: On your PC, click the Wi-Fi icon in the taskbar and join that network.
- Step 4: Enter the password.
- Step 5: Go to Printers & scanners > Add device and add the printer.
Your PC won’t have internet while connected this way. Switch back to your normal Wi-Fi when you’re done.
Method 5: Add the Printer by IP Address
When Windows just can’t find the printer, this method nearly always works. It skips the search and points Windows straight at the printer.
- Step 1: Find the printer’s IP address. The easiest way is to print a network configuration page from the printer’s Settings or Reports menu. The IP looks like 192.168.1.25.
- Step 2: On your PC, open Settings > Bluetooth & devices > Printers & scanners.
- Step 3: Click Add device, wait for the scan to end, then click Add manually.
- Step 4: Select Add a printer using an IP address or hostname, then click Next.
- Step 5: Set Device type to TCP/IP Device.
- Step 6: Type the IP address and click Next.
- Step 7: Name the printer and click Finish.
If Windows asks you to pick a driver, choose Microsoft as the manufacturer, then Microsoft IPP Class Driver. It works with almost every modern network printer.
Method 6: Use a Printer Shared from Another PC
Have an older USB-only printer plugged into a desktop? Share it so your laptop can use it over Wi-Fi.
On the PC the printer is plugged into:
- Step 1: Open Settings > Bluetooth & devices > Printers & scanners and click the printer.
- Step 2: Click Printer properties, then open the Sharing tab.
- Step 3: Tick Share this printer and give it a short name with no spaces.
- Step 4: Note the PC’s name under Settings > System > About.
On the laptop:
- Step 5: Go to Printers & scanners > Add device > Add manually.
- Step 6: Choose Select a shared printer by name.
- Step 7: Type two backslashes, the PC name, one backslash, then the share name.
- Step 8: Click Next and finish.
The main PC has to be on and awake for this to work.
Method 7: Connect by Bluetooth (Portable Printers)
Small photo and label printers often use Bluetooth. It’s slower than Wi-Fi, but simple.
- Step 1: Put the printer in pairing mode (usually hold the Bluetooth button until the light flashes).
- Step 2: On your PC, open Settings > Bluetooth & devices and make sure Bluetooth is on.
- Step 3: Click Add device, then Bluetooth.
- Step 4: Select the printer and follow the prompts.
Keep the printer within about 30 feet of the computer.
Print a Test Page
Check it now, not five minutes before a deadline.
- Step 1: Open Printers & scanners and click your printer.
- Step 2: Click Printer properties.
- Step 3: Click Print Test Page.
If a page comes out, you’re all set.
Set It as Your Default Printer
- Step 1: Go to Settings > Bluetooth & devices > Printers & scanners.
- Step 2: Turn off Let Windows manage my default printer.
- Step 3: Click your printer, then click Set as default.
What Changed for Printers in Windows 11 in 2026
Microsoft is moving away from brand-specific printer drivers. Windows 11 now relies on one built-in driver that speaks a standard printing language (IPP), so most newer printers set up with no download at all.
The key dates:
- January 2026: Microsoft stopped adding new third-party printer drivers to Windows Update.
- July 2026: Windows began preferring its built-in driver over the manufacturer’s when both are available.
- 2027: Third-party driver updates move to security fixes only.
What this means for you: basic printing just works. But if you need scanning, special paper sizes, or ink levels, install your printer brand’s app (Method 2) on top.
Windows 10 users are still on the older driver system, so the brand’s software matters more there. Windows 10 also reached end of support in October 2025.
Tips for a Smooth, Stable Connection
- Match the Wi-Fi name. Your PC and printer must be on the exact same network name, not just the same router.
- Avoid the guest network. Guest Wi-Fi blocks devices from seeing each other. Keep the printer on your main network.
- Set your Wi-Fi to Private. In Settings > Network & internet > Wi-Fi, click your network and choose Private. Windows hides devices on Public networks.
- Give the printer a fixed address. Reserve its IP in your router settings or set a static IP on the printer. This stops most “printer offline” problems for good.
- Uncheck “Use Printer Offline.” If the printer shows offline, open its print queue, click the Printer menu, and make sure this option isn’t ticked.
- Check protected print mode after updates. If your printer vanished after a Windows update, look under Printers & scanners > Printer preferences and turn off Windows protected print mode, then add the printer again.
- Keep it close to the router. Thick walls and metal furniture weaken the signal fast.
- Update the printer’s firmware. A quick update through the brand’s app once or twice a year fixes a lot of Wi-Fi drop-outs.
- Plan ahead before renaming Wi-Fi. Changing your network name or password means setting up the printer’s Wi-Fi again.
Frequently Asked Questions
How do I connect a wireless printer to Windows 11 without a USB cable?
Connect the printer to Wi-Fi from its own control panel. Then open Settings > Bluetooth & devices > Printers & scanners, click Add device, select the printer, and click Add device again. Windows handles the rest.
Why can’t my computer find my wireless printer?
The most common reason is that the printer and PC are on different Wi-Fi networks, often the 2.4GHz and 5GHz versions of the same router. Other causes are a guest network or a Wi-Fi profile set to Public. If everything checks out, add the printer by IP address.
Why does my wireless printer keep saying offline?
Usually the router gave the printer a new IP address and Windows is still looking at the old one. Reserve the printer’s address in your router or set a static IP on the printer. Also make sure Use Printer Offline isn’t ticked in the print queue.
How do I find my printer’s IP address?
Print a network configuration page from the printer’s Settings or Reports menu. The IP address is listed on it. You can also find it in your router’s list of connected devices.
Can I connect a wireless printer without a router?
Yes, if the printer supports Wi-Fi Direct. Turn it on at the printer, then join the network it shows from your PC. You won’t have internet while connected, so switch back afterward.
Do I need to install a driver for my wireless printer?
Usually not on Windows 11. Most printers install with the built-in Windows driver automatically. Install your printer brand’s app only if you need scanning, ink levels, or advanced print settings.
Why did my printer disappear after a Windows update?
Windows protected print mode may have been turned on, which hides older printers. Turn it off under Printers & scanners > Printer preferences, restart, and add the printer again.
How do I connect a wireless printer to Windows 10?
The steps are almost the same as Windows 11. Go to Settings > Devices > Printers & scanners and click Add a printer or scanner. Installing your printer brand’s software is more helpful on Windows 10.
Can more than one computer use the same wireless printer?
Yes. Any computer on the same Wi-Fi can add and use it. Each one only needs to go through the setup once. Phones and tablets can print to it too.
