
Knowing how to safely eject USB devices is the simplest way to protect the files on a flash drive, external hard drive, or SD card reader. Pulling a drive out mid-write is a bit like yanking a book out of someone’s hands while they are still writing in it – the page may end up half finished. This guide covers the correct method on Windows, Mac, and Linux, plus what to do when the system refuses to let go of the drive.
Key Takeaways
- Ejecting tells the operating system to finish all pending writes and release the drive before power is cut.
- On Windows, use the ‘Safely Remove Hardware and Eject Media’ icon in the system tray or right-click the drive in File Explorer.
- On a Mac, click the eject icon beside the drive in Finder or drag the drive icon to the Trash.
- If the system says the drive is in use, close any open files, folders, and sync or scan tasks, then try again.
- Wait for the activity light to stop blinking and for the eject confirmation before unplugging.
Before You Start
No tools are needed for this task, only a few seconds of preparation. Make sure any copy, move, or backup job has finished, and close documents, media players, or apps that were opened from the drive. For external hard drives with moving platters, never pull the cable or move the drive while it is still spinning down. Opening files directly from a USB drive and editing them is the most common reason an eject gets blocked.
How to Safely Eject USB Devices on Windows
Windows offers two reliable routes. The system tray method works on both Windows 10 and Windows 11, and the File Explorer method is often quicker once a window is already open.
Method 1: Use the System Tray Icon
- Step 1: Look at the right side of the taskbar for the small USB icon named ‘Safely Remove Hardware and Eject Media’. If it is not visible, click the small up arrow to show hidden icons.
- Step 2: Click the icon to open a list of connected removable devices.
- Step 3: Select the device to eject. Pick the entry that matches the drive name or brand.
- Step 4: Wait for the message that says the device can be safely removed.
- Step 5: Unplug the drive by gripping the connector itself, not the cable.
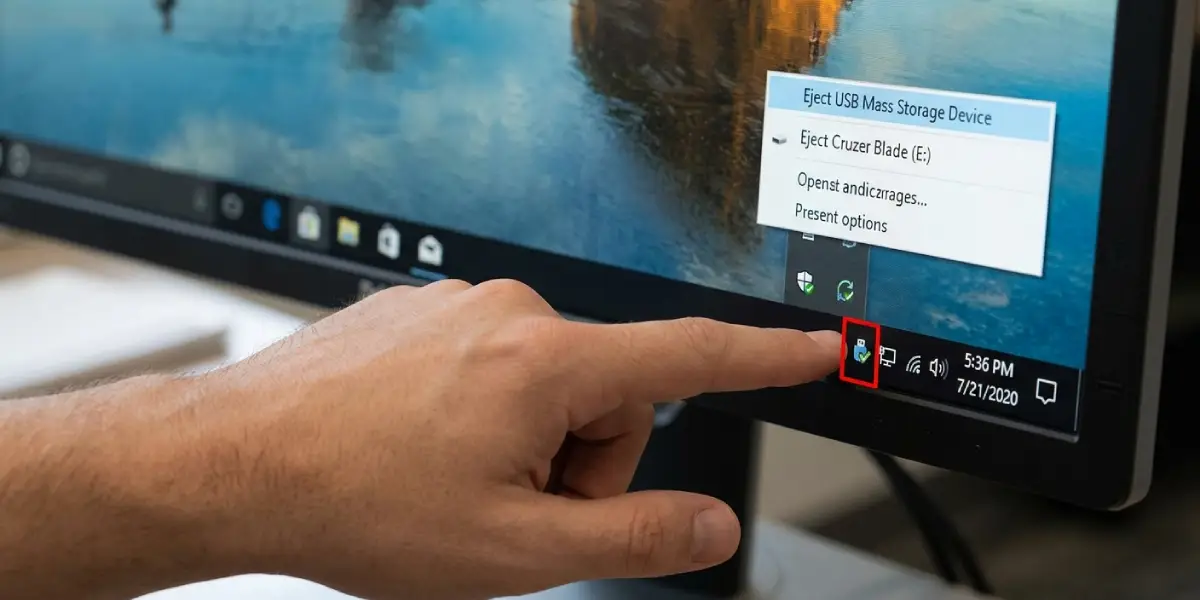
Tip: Click the drive name rather than the generic USB entry. Choosing the wrong one can eject a different device, such as a wireless mouse receiver.
Method 2: Use File Explorer
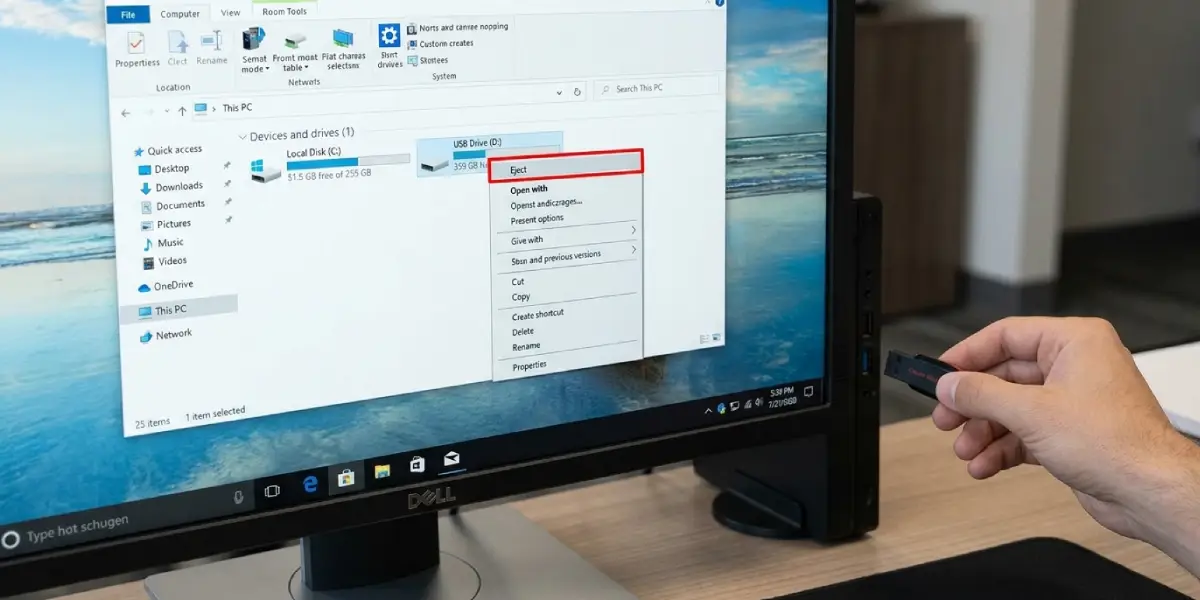
- Step 1: Open File Explorer and select This PC from the left sidebar.
- Step 2: Right-click the USB drive under Devices and drives.
- Step 3: Choose Eject from the menu. On Windows 11, Eject may appear directly in the first menu or under Show more options.
- Step 4: Wait for the drive to disappear from the list, then unplug it.
How to Safely Eject USB Devices on a Mac
- Step 1: Make sure all files from the drive are closed and any Finder windows showing its contents are finished with.
- Step 2: Open Finder and find the drive in the sidebar under Locations, or locate its icon on the desktop.
- Step 3: Click the small eject symbol beside the drive name. Alternatively, right-click the drive and choose Eject, or drag the drive icon to the Trash, which changes into an eject symbol while dragging.
- Step 4: Wait until the drive disappears from Finder, then unplug it.
Tip: A Mac that shows a ‘Disk Not Ejected Properly’ notification has detected an earlier unsafe removal. Make sure to eject normally from then on and scan the drive for errors if files seem missing.
How to Safely Eject USB Devices on Linux
Using the File Manager
Most desktop environments such as GNOME, KDE, and Xfce show an eject icon beside the drive in the file manager sidebar. Click it, wait for the drive to vanish, and unplug it. Right-clicking the drive and selecting Unmount or Safely Remove achieves the same result.
Using the Terminal
- Step 1: Run lsblk to identify the drive and its mount point, for example sdb1.
- Step 2: Type umount followed by the mount point or device path, such as umount /dev/sdb1, and press Enter.
- Step 3: Optionally, run udisksctl power-off -b /dev/sdb to power the drive down. Use the base device name without a partition number.
- Step 4: Unplug the drive once the command finishes without an error.
Common Problems and Fixes
Windows Says the Device Is Currently in Use
This message means a program or background task still has a file open on the drive. Close any folders, documents, or media players linked to it. Check that antivirus scans, cloud backup tools, and search indexing are not touching the drive, then try ejecting again. If the message persists, restart the computer and eject once it has booted.
The Eject Icon Is Missing From the Taskbar
The icon is often tucked into the hidden icons menu. If it is absent entirely, use the File Explorer method instead, which does not depend on the tray icon. In Windows settings, the taskbar area also lets the icon be switched back on.
Mac Reports the Disk Cannot Be Ejected Because It Is in Use
Close every app that may be reading from the drive, including Preview, media apps, and backup software. Click Eject again. When macOS offers a Force Eject option, use it only as a last resort, since unsaved data may be lost.
The Drive Was Pulled Out Without Ejecting
Reconnect it and let the system finish any automatic repair prompt. On Windows, right-click the drive, open Properties, select the Tools tab, and run Error checking. On a Mac, open Disk Utility, select the drive, and run First Aid. Copy important files off the drive soon afterward, since repeated unsafe removals can lead to real corruption.
The Drive Still Blinks After Ejecting
Some drives keep a light active until power is removed, and others finish internal housekeeping for a moment. If the operating system has confirmed that the removal is safe, the drive can be unplugged. A drive that keeps working heavily after an eject message deserves a second try before any cable is pulled.
Frequently Asked Questions
Do USB flash drives really need to be ejected?
Yes, ejecting is still the safest habit. Even when the system uses settings that reduce risk, files and file system information can still be in the middle of an update when a drive is pulled.
What happens if a USB drive is unplugged without ejecting?
Often nothing visible happens, but there is a real chance of lost files, an unreadable drive, or file system errors, especially if data was being copied or saved at that moment.
Is Quick Removal on Windows the same as safe removal?
No. Quick Removal is a policy that limits the risk of data loss by keeping write caching off for the drive, but it does not guarantee that every operation has finished. Ejecting remains the correct step.
How long should the system take to eject a USB drive?
Usually only a few seconds. A large copy job or a slow drive may need longer, and the safe-to-remove message is the signal that it is done.
Why does the system say the USB device is in use?
Some program, window, or background process still has a file or folder on the drive open. Closing those items, including backup, antivirus, or sync tasks, normally clears the message.
Should external hard drives be ejected differently from flash drives?
The ejecting steps are the same, but external hard drives with spinning platters also need a moment to spin down. Avoid moving them until the activity has stopped.
Do phones and cameras need to be ejected from a computer?
Phones and cameras in file transfer mode usually appear as portable devices rather than drives, so there may be no eject option. Wait until all transfers have finished, then unplug the cable. If an eject option appears, use it.
Can a USB drive be damaged by not ejecting it often?
Repeated unsafe removals mainly risk corrupting the data and file system rather than damaging the hardware itself. Scanning the drive for errors after any unsafe removal is a good precaution.
