
Quick Answer:
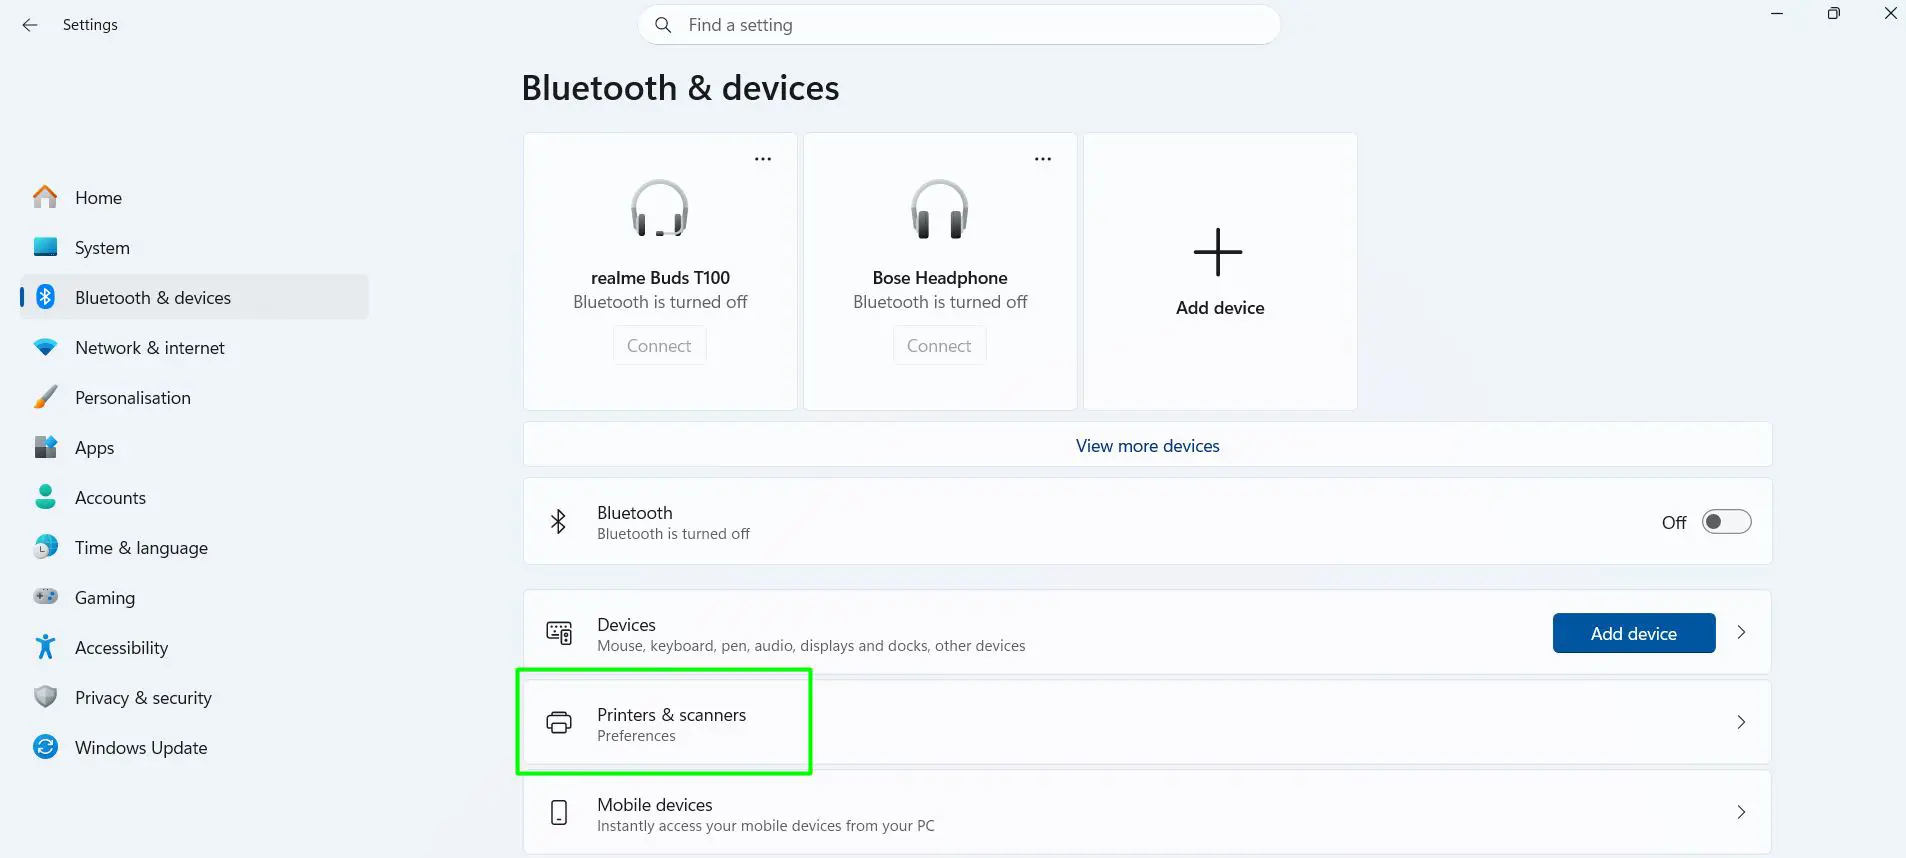
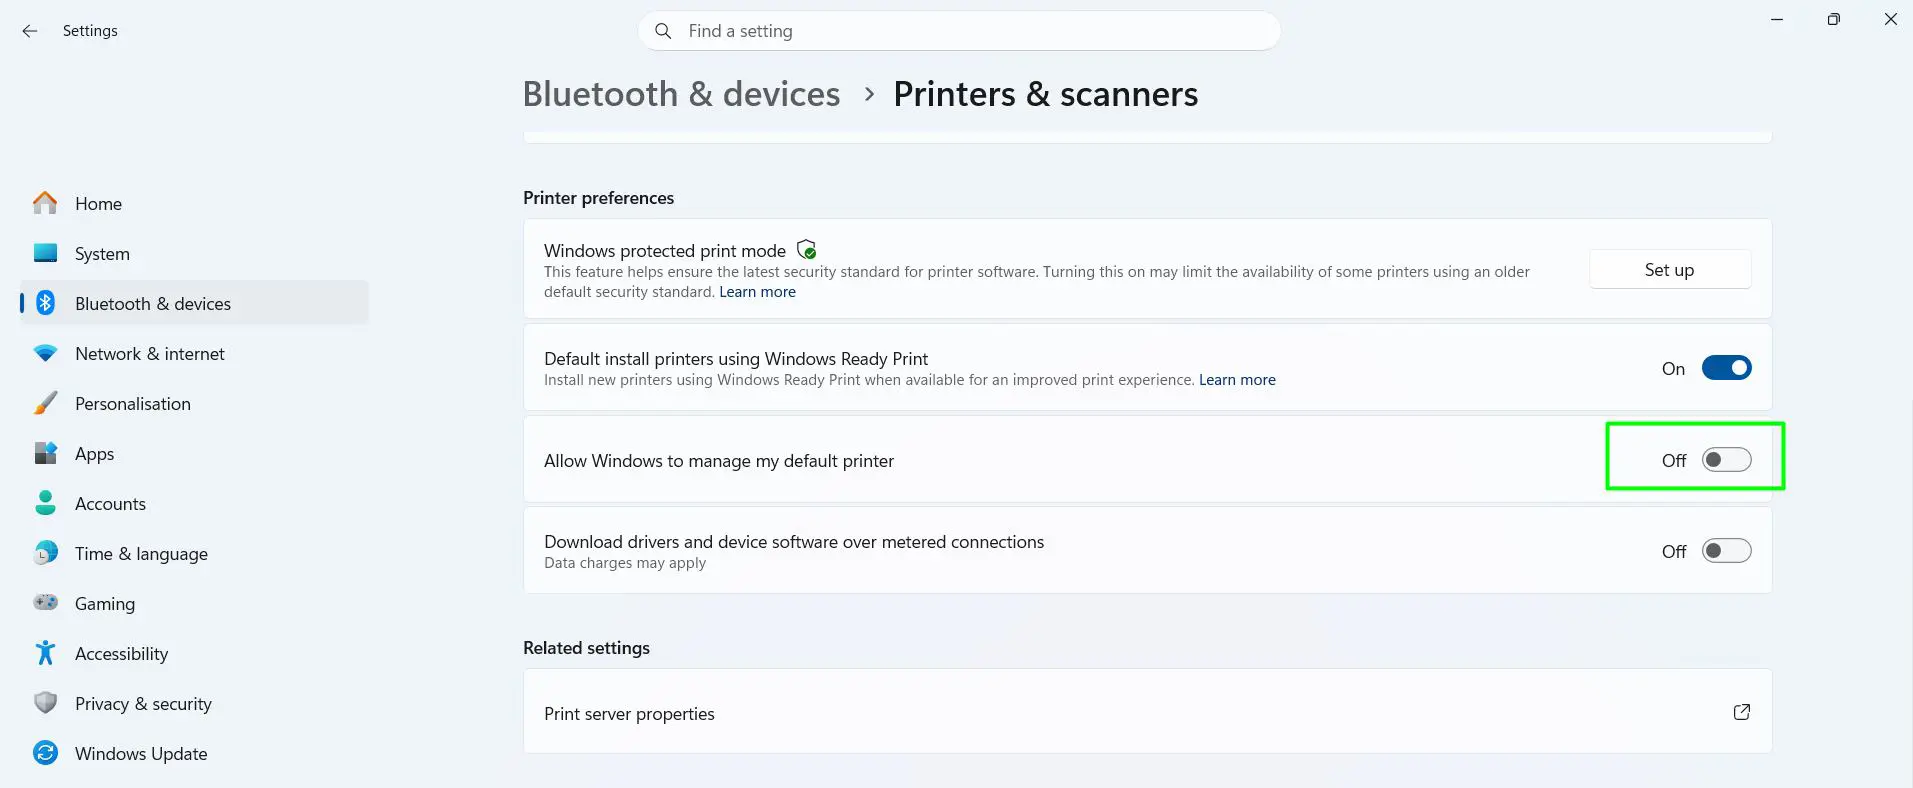
- To set your preferred default printer in Windows 11, press Windows key + I, go to Bluetooth & devices > Printers & scanners, turn off “Allow Windows to manage my default printer,” click your printer, and select Set as default.
- On Windows 10, go to Settings > Devices > Printers & scanners, uncheck “Let Windows manage my default printer,” click your printer, choose Manage, then Set as default.
- Prefer a command? Run
rundll32 printui.dll,PrintUIEntry /y /n "Your Printer Name"in Command Prompt.
Your default printer is the one Windows picks automatically every time you hit Print. Here’s the thing: Windows likes to switch it on its own, based on whichever printer you used last. That’s why your documents sometimes end up on the wrong printer, in the wrong room, or as a PDF you never meant to create. The good news is that it takes less than a minute to set your preferred default printer in Windows and make it stay that way.
Tested on Windows 11 26H2 and Windows 10 22H2. Last updated November 2026.
This guide covers five ways to set your preferred default printer, how to check that it worked, how to set a default for other users and Remote Desktop sessions, how to stop individual apps from overriding your choice, and what to do if your default printer won’t stay set.
What Is a Default Printer in Windows?
The default printer is the printer Windows selects automatically when you print from any app, like Word, Excel, Chrome, Edge, Outlook, or a PDF reader. You can still pick a different printer in the print window, but the default is what you get if you just press Print, or when an app prints without showing a print window at all (for example, the quick print button in some programs or right-clicking a file and choosing Print).
Each Windows user account has one default printer. It can be a USB printer, a Wi-Fi or network printer, a shared printer on another PC, or even a virtual printer like Microsoft Print to PDF.
Before You Start
A few quick checks will save you time:
- Make sure the printer is installed. Windows can only make a printer the default if it already appears in Printers & scanners. If it doesn’t, see our guide on how to connect a wireless printer to Windows first.
- Turn the printer on. An offline printer can still be set as default, but you won’t be able to test it.
- Know its exact name. If you plan to use Command Prompt or PowerShell, you’ll need the name exactly as Windows shows it, including spaces, brackets, and capital letters.
- Sign in to the right account. The default printer is saved per user, so set it while signed in as the person who will be printing.
Which Method Should You Use?
| Method | Best For | Difficulty |
|---|---|---|
| Settings app | Most people on Windows 11 and 10 | Easy |
| Printers folder / Control Panel | When Settings won’t cooperate | Easy |
| Command Prompt | A quick one-line change or a desktop shortcut | Medium |
| PowerShell | Scripts or managing several PCs | Medium |
| Print dialog | Choosing a printer for one print job only | Easy |
| Group Policy / Registry | Stopping Windows from ever changing your default | Advanced |
Why Your Default Printer Keeps Switching
Windows has a feature that manages your default printer for you. It sounds helpful, but it means the printer you used most recently becomes the new default, even if you only used it once.
It also remembers printers by network location. If you carry a laptop between home and the office, Windows may switch to whichever printer you last used on that network. That’s handy for some people but confusing for most.
Other common reasons your default changes include:
- The printer was offline when Windows started, so it fell back to another printer.
- A driver or Windows update reinstalled the printer under a new name, such as “(Copy 1).”
- Windows added network printers automatically because “Set up network connected devices automatically” is turned on.
- Your organization controls printers through Group Policy, Intune, or a logon script on a work or school PC.
- You connected through Remote Desktop, which can make your local printer the default inside the remote session.
The key is to turn automatic management off first. Once it’s off, the printer you choose stays put.
Method 1: Use the Settings App (Easiest)
This is the simplest way to set your preferred default printer, and it works for most people.
Windows 11
- Press Windows key + I to open Settings.
- Click Bluetooth & devices, then Printers & scanners.
- Scroll down to Printer preferences and turn off “Allow Windows to manage my default printer.”
- Scroll back up and click the printer you want.
- Click Set as default.
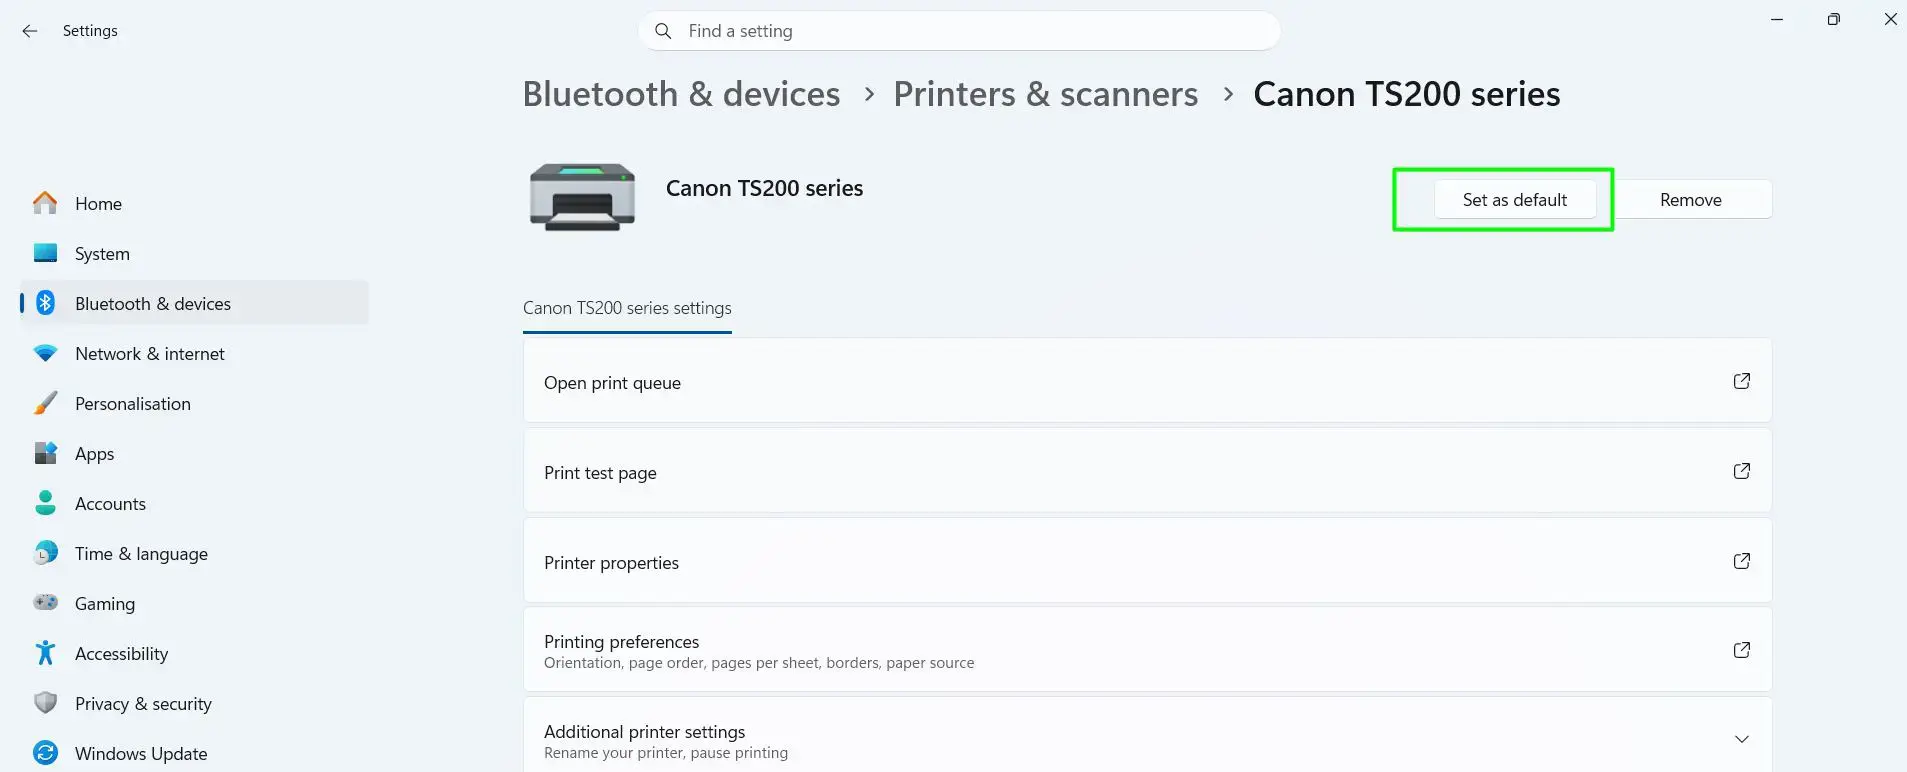
You’ll see the word Default under the printer’s name when it worked.
Shortcut: Press Windows key + R, type ms-settings:printers, and press Enter to jump straight to Printers & scanners on both Windows 11 and Windows 10.
Windows 10
- Press Windows key + I and click Devices.
- Click Printers & scanners on the left.
- Uncheck “Let Windows manage my default printer.”
- Click your printer, then click Manage.
- Click Set as default.
Under the printer’s name, the status will change to Default.
Test Your New Default Printer
- On the same printer page in Settings, click Print test page (on Windows 10, it’s on the Manage page).
- Open any app, press Ctrl + P, and check that your printer is already selected.
If the test page prints and the right printer shows up in the print window, you’re all set. If the test page gets stuck, learn how to check the current print jobs in the queue on Windows and clear anything that’s blocking it.
Method 2: Use the Printers Folder
This is a quick backup if the Settings app gives you trouble. It also works on older builds of Windows.
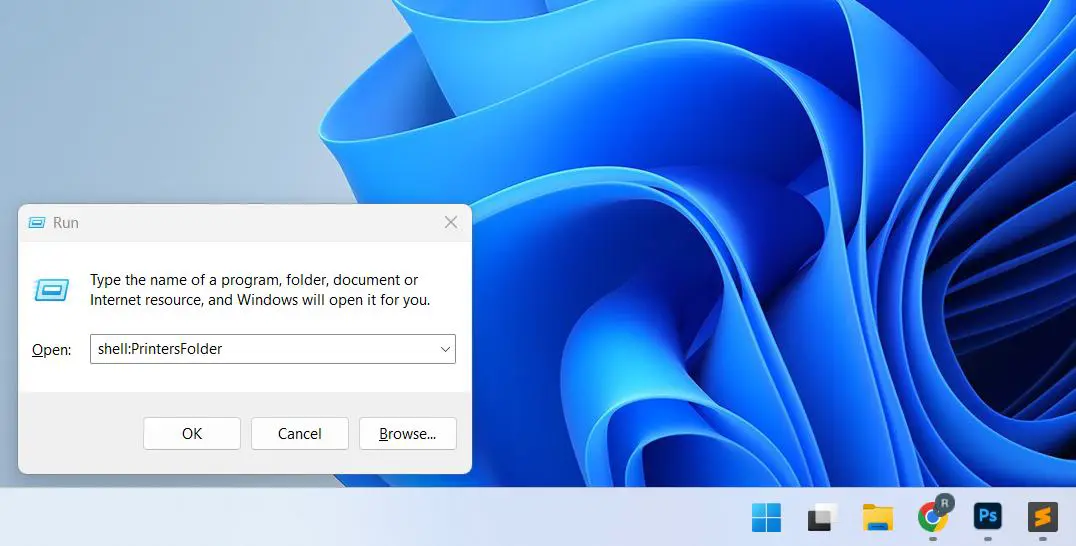
- Press Windows key + R.
- Type
shell:PrintersFolderand press Enter.
- Right-click your printer and choose Set as default printer.
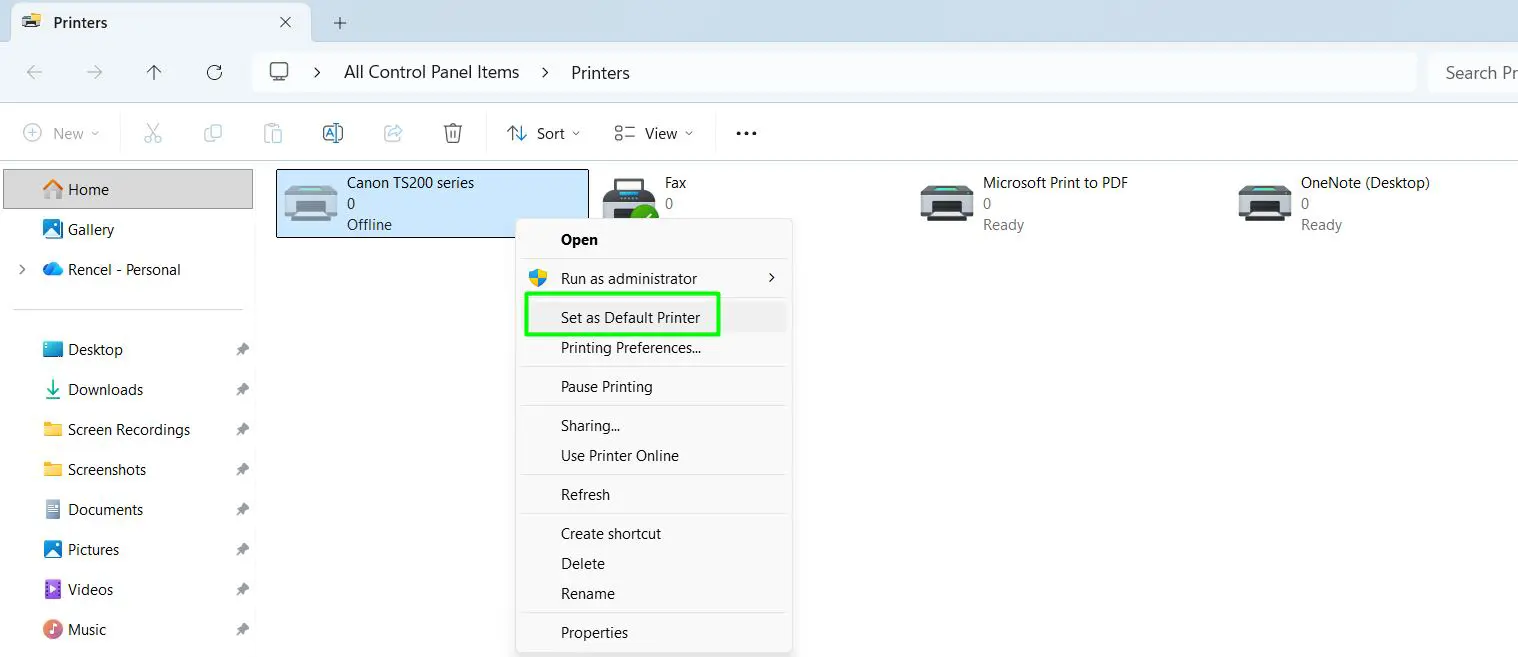
- If a message pops up saying Windows will stop managing your default printer, click OK to continue.
A green check mark appears on your printer once it’s set.
Prefer Control Panel?
- Click Start, type
Control Panel, and open it. - Go to Hardware and Sound > Devices and Printers.
- Right-click your printer and choose Set as default printer.
On newer Windows 11 versions, Devices and Printers may open the Settings app instead. If that happens, follow Method 1 or use the shell:PrintersFolder shortcut above.
Method 3: Use Command Prompt

Handy if you’re comfortable typing a single command.
- Click Start, type
cmd, and open Command Prompt. You don’t need to run it as administrator. - Type this command, swapping in your printer’s exact name:
rundll32 printui.dll,PrintUIEntry /y /n "Your Printer Name" - Press Enter.
If you get an error, the printer name probably doesn’t match. Copy it exactly as it appears in Printers & scanners, including spaces and capital letters. For a shared printer on another computer, use the full network path, for example "\\OfficePC\HP LaserJet".
Make a one-click shortcut: If you switch between two printers a lot (for example, a color printer and a black-and-white laser), you can create a desktop shortcut for each one.
- Right-click an empty area of your desktop and choose New > Shortcut.
- Paste
rundll32 printui.dll,PrintUIEntry /y /n "Your Printer Name"as the location and click Next. - Name it something like Default: Office Laser and click Finish.
Double-click the shortcut any time to make that printer your default. Turn off automatic management first, or Windows may switch it back after your next print.
Method 4: Use PowerShell
Best for people who like scripts or manage several PCs.
- Click Start, type
PowerShell, and open it. Don’t run it as administrator, because the default printer is saved to the account you’re signed in with. - See your exact printer names by running:
Get-Printer | Select-Object -ExpandProperty Name - Set the default by running this, using your printer’s name:
(New-Object -ComObject WScript.Network).SetDefaultPrinter("Your Printer Name")
Alternative command: If the one above doesn’t work, try this instead:
Get-CimInstance Win32_Printer -Filter "Name='Your Printer Name'" | Invoke-CimMethod -MethodName SetDefaultPrinter
Good to know:
- The built-in
Set-Printercmdlet can’t change the default printer, which is why the commands above use a different approach. - The old
wmic printercommand is deprecated and is no longer installed by default on recent Windows 11 versions, so stick with PowerShell. - If the printer name contains an apostrophe, the
Get-CimInstancecommand may fail. Use theWScript.Networkcommand instead.
Method 5: Choose a Printer in the Print Dialog (One-Time)
Use this if you only want a different printer for a single document and don’t want to change your default.
- In the app you’re printing from, press Ctrl + P.
- Pick the printer you want from the Printer drop-down menu.
- Click Print.
This doesn’t change your Windows default printer. Some apps, like Word and Chrome, may remember this choice for next time, though. See the section on apps that ignore your default below.
How to Check Which Printer Is Your Default
- Settings: Open Bluetooth & devices > Printers & scanners (or Devices > Printers & scanners on Windows 10). Your default shows the word Default under its name.
- Printers folder: Open
shell:PrintersFolder. The default printer has a green check mark. - PowerShell: Run
Get-CimInstance Win32_Printer -Filter "Default=True" | Select-Object Name. - Print dialog: Press Ctrl + P in Notepad. It always opens with the Windows default printer selected, which makes it a reliable test.
How to Set a Default Printer for Other Users or Several PCs
Windows saves the default printer separately for each user account. There’s no single switch that sets it for everyone on a PC, but there are a few reliable ways to do it.
Other Users on the Same PC
- Sign in to the other user’s account.
- Make sure the printer appears in Printers & scanners. Printers installed by an administrator are usually available to every account.
- Turn off automatic management and click Set as default, just like in Method 1.
Every User at Sign-In (Logon Script)
For a family PC, a classroom, or a shared front-desk computer, you can make the default apply automatically each time someone signs in.
- Open Notepad and paste:
rundll32 printui.dll,PrintUIEntry /y /n "Your Printer Name" - Save it as set-default-printer.bat.
- Press Windows key + R, type
shell:common startup, and press Enter. You’ll need administrator approval for this folder. - Copy the .bat file into the folder that opens.
The script runs for every user each time they sign in, so the default always comes back to your chosen printer.
Office and IT Networks
- Group Policy Preferences: In User Configuration > Preferences > Control Panel Settings > Printers, add a shared printer and tick Set this printer as the default printer.
- Microsoft Intune or another management tool: Deploy the printer and run the PowerShell command from Method 4 as a user-context script.
- Print servers: Use the full share path, such as
\\PrintServer\Finance-Laser, in your scripts.
Default Printer in Remote Desktop Sessions
When you connect to another computer with Remote Desktop, your local printers are redirected into the session, and your local default printer usually becomes the default there too. To control this:
- Keep your local default: In the Remote Desktop Connection app, click Show Options > Local Resources and make sure Printers is checked.
- Use the remote PC’s own default instead: An administrator can enable the policy Do not set default client printer to be default printer in a session under Computer Configuration > Administrative Templates > Windows Components > Remote Desktop Services > Remote Desktop Session Host > Printer Redirection.
- Change it for one session: Inside the remote session, open Printers & scanners and set a default as usual. It may reset the next time you connect.
Apps That Ignore Your Default Printer
Windows sets the default, but some apps keep their own memory. If one program keeps choosing another printer, here’s what to do.
- Microsoft Word, Excel, and PowerPoint: Office uses the Windows default when the app opens, then remembers the last printer you picked until you close it. Close and reopen the app after changing your default.
- Google Chrome and Microsoft Edge: The print preview remembers the last destination you used, including Save as PDF. Choose your printer once in the Destination or Printer menu and it will usually stick. In a managed workplace, IT can turn on the PrintPreviewUseSystemDefaultPrinter policy so the browser always starts with the Windows default.
- Adobe Acrobat and PDF readers: These usually follow the Windows default, but some remember the last printer used. Pick your printer once in the print window.
- Accounting, label, and receipt software: Programs like QuickBooks or shipping-label tools often have their own printer setup screen. Look for Printer Setup in the program’s File or Settings menu.
Default Printer Won’t Set or Keeps Changing? Try These Fixes
Work through these in order. Most people are fixed by the first one or two.
1. Turn Off Automatic Default Printer Management
This is the cause most of the time. In Printers & scanners, make sure “Allow Windows to manage my default printer” (Windows 11) or “Let Windows manage my default printer” (Windows 10) is off. Then set your printer again.
2. “Set as Default” Is Missing or Grayed Out
The button is hidden while automatic management is on. Turn it off, close Settings, open it again, and click your printer. On a work or school PC, your IT team may control this setting, so you may need to ask them.
3. Your Printer Isn’t in the List
Windows can only set a printer as default after it has been added.
- Make sure the printer is on and connected by USB or to the same Wi-Fi network as your PC.
- In Printers & scanners, click Add device (or Add a printer or scanner on Windows 10).
- If it doesn’t show up, click Add manually or “The printer that I want isn’t listed” and follow the prompts.
- Install the printer software from your printer maker’s website (HP, Canon, Epson, Brother, and so on) if Windows still can’t find it.
For a full walkthrough, see how to connect a wireless printer easily in Windows.
4. Default Printer Resets After a Restart
Your printer may be going offline when your PC starts, so Windows falls back to another printer. Make sure the printer is turned on before your PC, and give a Wi-Fi printer a fixed IP address (a DHCP reservation) in your router if it keeps dropping off the network. Turning off the printer’s deep sleep or eco mode can also help it stay visible.
5. Clear the Print Queue and Restart the Print Spooler
The Print Spooler handles everything you print. A stuck job or a frozen spooler can stop changes from saving.
- Cancel any stuck jobs first. Here’s how to view and clear current print jobs in the queue.
- Press Windows key + R, type
services.msc, and press Enter. - Scroll to Print Spooler.
- Right-click it and choose Restart.
- Set your default printer again.
Faster option: Open Command Prompt as administrator and run net stop spooler, then net start spooler.
6. Remove Duplicate or Old Printers
If your printer appears twice, for example “HP OfficeJet” and “HP OfficeJet (Copy 1),” one is often USB and the other Wi-Fi. Set the one that matches how the printer connects now, and remove the other. Delete printers you no longer own so Windows can’t switch to them.
7. Stop Windows From Adding Network Printers Automatically
If new printers keep appearing and taking over as default, Windows may be installing every printer it finds on your network.
- Open Settings > Network & internet > Advanced network settings > Advanced sharing settings (on Windows 10, open Control Panel > Network and Sharing Center > Change advanced sharing settings).
- Under Network discovery, turn off Set up network connected devices automatically.
- Remove any unwanted printers from Printers & scanners.
8. Check Windows Protected Print Mode
Recent versions of Windows 11 include Windows protected print mode, which only allows printers that work with Microsoft’s built-in driver. If you turned it on, printers that need a manufacturer driver may disappear or stop working, and Windows may pick a different default. Check the setting at the bottom of Printers & scanners. Turn it off if your printer needs its own driver, then add the printer again.
9. Update or Reinstall the Printer Driver
A broken driver can stop a printer from staying default. Remove the printer in Printers & scanners, restart your PC, download the latest driver from the printer maker’s website, and add the printer again.
10. Run the Printer Troubleshooter
- Windows 11: Go to Settings > System > Troubleshoot > Other troubleshooters and click Run next to Printer. On the newest builds, this opens the Get Help app, which runs the same checks.
- Windows 10: Go to Settings > Update & Security > Troubleshoot > Additional troubleshooters > Printer and click Run the troubleshooter.
Also install any pending updates in Windows Update, since Microsoft often fixes printer bugs that way.
11. Check Group Policy (Windows Pro, Enterprise, and Education)
- Press Windows key + R, type
gpedit.msc, and press Enter. - Go to User Configuration > Administrative Templates > Control Panel > Printers.
- Double-click Turn off Windows default printer management, choose Enabled, and click OK.
This stops Windows from changing your default printer for good, even after updates. While you’re there, check that no other printer policy is set by your organization.
12. Use the Registry (Advanced, Windows Home)
Windows Home doesn’t have Group Policy, but you can make the same change in the registry. Back up the registry first, because a wrong edit can cause problems.
- Press Windows key + R, type
regedit, and press Enter. - Go to
HKEY_CURRENT_USER\Software\Microsoft\Windows NT\CurrentVersion\Windows - Double-click LegacyDefaultPrinterMode and set its value to 1. If it isn’t there, right-click an empty area, choose New > DWORD (32-bit) Value, and name it
LegacyDefaultPrinterMode. - Sign out and back in, then set your default printer again.
A value of 1 means Windows won’t manage your default printer. A value of 0 turns automatic management back on. In the same key, the Device value shows the name of your current default printer.
13. Create a New User Profile
If nothing else works, your user profile’s printer settings may be damaged. Create a new local account in Settings > Accounts > Other users, sign in, and try setting the default there. If it sticks in the new account, the problem is your old profile.
Common Error Messages and What They Mean
| Message | What It Means | Fix |
|---|---|---|
| “Operation could not be completed (error 0x00000709)” | Windows couldn’t save the new default | Restart the Print Spooler, sign out and back in, then try again. If it continues, use the registry fix above. |
| “Unable to find printer” (Command Prompt) | The printer name doesn’t match | Copy the exact name from Printers & scanners or from Get-Printer. |
| “Setting this printer as default means Windows will stop managing your default printer” | A normal notice, not an error | Click OK. |
| “Some settings are managed by your organization” | Group Policy or Intune controls printers | Contact your IT team. |
| Printer shows “Offline” | Windows can’t reach the printer | Check power, cables, and Wi-Fi, then restart the printer and PC. |
How to Let Windows Manage Your Default Printer Again
Changed your mind? Go back to Printers & scanners and turn “Allow Windows to manage my default printer” back on (or check “Let Windows manage my default printer” on Windows 10). Windows will go back to using the printer you used most recently. If you used Group Policy or the registry, set the policy back to Not Configured or change LegacyDefaultPrinterMode to 0.
This setting suits people who move a laptop between home and the office every day and want each location’s printer chosen for them.
Tips to Keep Your Preferred Default Printer Set
- Always turn off automatic management first. Most people find that this one toggle fixes the problem for good.
- Skip the virtual printers. Microsoft Print to PDF, Microsoft XPS Document Writer, Fax, and OneNote show up in the list but don’t print on paper.
- Pick the right entry if your printer shows up twice. One is often USB and the other is Wi-Fi. Choose the one that matches how your printer connects right now.
- Delete old printers you no longer use. A shorter list means fewer chances of picking the wrong one.
- Give your printer a clear name. In the printer’s Printer properties, rename it to something like “Upstairs Color” so it’s easy to spot.
- Give a Wi-Fi printer a fixed IP address. This stops it from dropping off the network and losing its default status.
- Do a quick test. Press Ctrl + P in any app and see which printer is selected.
- Set it for each user account. The default printer is saved per account, so other users on the same PC need to set their own.
- Check the app itself. Some programs remember the last printer you picked. If one app keeps choosing another printer, select yours once inside that app’s print window.
- Recheck after big Windows updates. Feature updates can occasionally reinstall printers or reset settings.
- No restart needed. The change works right away, so you can print immediately.
Frequently Asked Questions
How do I set my default printer in Windows 11?
Open Settings > Bluetooth & devices > Printers & scanners, turn off “Allow Windows to manage my default printer,” click your printer, and select Set as default.
How do I set my default printer in Windows 10?
Go to Settings > Devices > Printers & scanners, uncheck “Let Windows manage my default printer,” click your printer, choose Manage, then Set as default.
Why does Windows keep changing my default printer?
Windows is set to use the printer you used most recently, and on laptops it can also switch based on your network location. Turn off “Allow Windows to manage my default printer” and set your preferred printer again.
Why is the “Set as default” button missing or grayed out?
Automatic printer management is still on. Turn it off in Printers & scanners, then select your printer again. On a work or school PC, your organization may control this setting.
How do I check which printer is my default?
Open Settings > Bluetooth & devices > Printers & scanners. Your default printer shows the word Default under its name.
Can I set my default printer with a command?
Yes. In Command Prompt, run rundll32 printui.dll,PrintUIEntry /y /n "Your Printer Name" using your printer’s exact name.
Do I need to restart my PC after changing the default printer?
No. The new default works right away. Only the registry method needs you to sign out and back in.
Why does my default printer change after a restart?
The printer was probably offline when Windows started, so Windows picked another one. Turn the printer on before your PC, give a Wi-Fi printer a fixed IP address, and turn off automatic management.
Why doesn’t my printer appear in Printers & scanners?
It hasn’t been added to Windows yet, or it’s off or not connected. Turn it on, check the USB cable or Wi-Fi, then click Add device. If it still doesn’t appear, install the driver from the printer maker’s website.
Can I set a wireless or network printer as my default?
Yes. Once the printer is added to Windows, select it in Printers & scanners and click Set as default, just like a USB printer.
Can I make an HP, Canon, Epson, or Brother printer my default?
Yes. The steps are the same for every printer brand. As long as the printer shows up in Printers & scanners, you can set it as default.
Do these steps work on Dell, HP, Lenovo, ASUS, and Acer laptops?
Yes. Setting a default printer is a Windows feature, so it works the same way on any brand of laptop or desktop running Windows 11 or 10.
Can I have two default printers at the same time?
No. Windows allows one default printer per user account. You can still choose any other printer manually when you print, or create desktop shortcuts to switch quickly.
Does the default printer apply to every user on my PC?
No. Each Windows user account has its own default printer, so every user sets theirs separately. An administrator can use a sign-in script to set it for everyone.
Why does Word or Chrome still print to a different printer?
Some apps remember the last printer you used. Pick your preferred printer once in that app’s print window, and it should stick. For Office apps, close and reopen the app after changing your default.
Can I make Microsoft Print to PDF my default printer?
Yes. Select Microsoft Print to PDF in Printers & scanners and click Set as default. Every print job will then save as a PDF instead of printing on paper.
How do I set the default printer in a Remote Desktop session?
Remote Desktop usually makes your local default printer the default in the session. Inside the session, you can set a different default in Printers & scanners, or an administrator can turn off this behavior with Group Policy.
How do I stop Windows from adding printers on its own?
Turn off Set up network connected devices automatically under Network discovery in Advanced sharing settings, then remove any printers you don’t want.
Final Thoughts
For most people, it only takes two clicks to set your preferred default printer: turn off “Allow Windows to manage my default printer,” then click Set as default on the printer you want. If it still won’t stay set, work through the fixes above in order. One of them will almost always solve it.