
Learning to use and modify Styles in Word is the fastest way to keep headings, body text, and captions looking consistent across a document. Instead of formatting each paragraph by hand, one style change updates every paragraph that uses it. The steps below cover applying a style, changing it, and saving the result.
Key Takeaways
- Styles are applied from the Styles gallery on the Home tab or from the Styles pane.
- Right-clicking a style and choosing Modify changes every paragraph that uses it.
- Update to Match Selection copies formatting from a paragraph you already adjusted.
- Choosing New documents based on this template saves the change for future files.
- Clear All removes leftover manual formatting that blocks a style from working.
Step-by-Step Guide to Use and Modify Styles in Word
Apply a Style to Text
- Step 1: Click inside the paragraph you want to format. For a single word or phrase, select it first. A paragraph style applies to the whole paragraph no matter how much of it is selected.
- Step 2: Open the Home tab and find the Styles group. The gallery shows common styles such as Normal, Heading 1, Heading 2, and Title.
- Step 3: Click the style you want. The formatting changes immediately. To see more choices, click the small More arrow at the bottom right of the gallery.
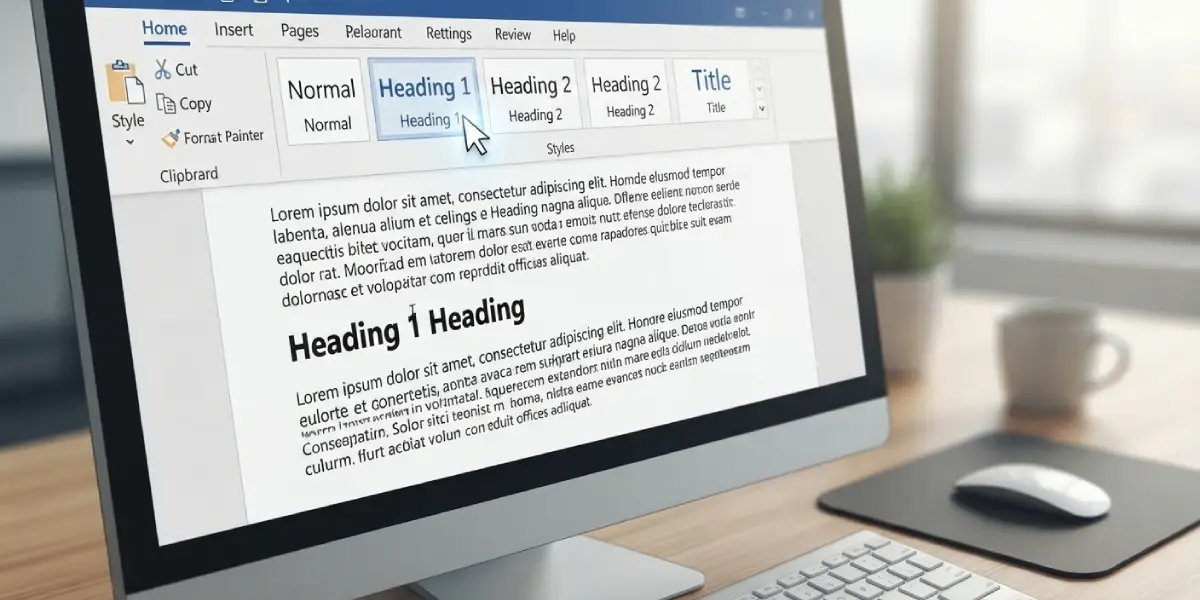
Tip: Use Ctrl+Alt+1, Ctrl+Alt+2, and Ctrl+Alt+3 to apply Heading 1, Heading 2, and Heading 3 without leaving the keyboard. Ctrl+Shift+N switches a paragraph back to Normal.
Open the Styles Pane for the Full List
- Step 4: On the Home tab, click the small dialog launcher arrow at the bottom right corner of the Styles group. The shortcut Ctrl+Alt+Shift+S opens the same pane.
- Step 5: Click Options at the bottom of the pane and use Select styles to show to choose between Recommended, In use, In current document, or All styles. Choosing In current document is handy when hunting for a style already used in a long file.
Modify an Existing Style
- Step 6: In the Styles gallery or Styles pane, right-click the style you want to change, such as Heading 1, and choose Modify.
- Step 7: In the Modify Style dialog box, use the Formatting area to change the font, size, bold, italic, color, and alignment. Select the Format button at the bottom left for deeper options such as Font, Paragraph, Tabs, and Numbering.
- Step 8: Check the Style for following paragraph box. For a heading, this is usually Normal, so pressing Enter after a heading starts body text automatically.
- Step 9: Choose Only in this document to change the current file, or New documents based on this template to keep the change for future files. Click OK to apply it.
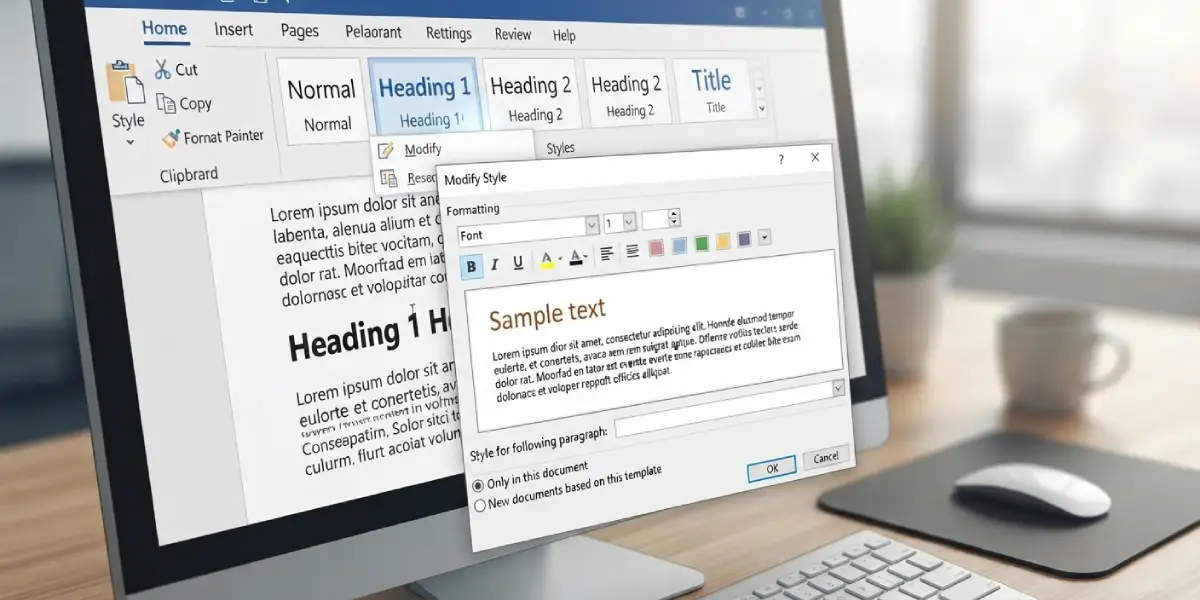
Every paragraph that uses the style now updates at once. Think of it like repainting one room color on a blueprint instead of repainting each wall by hand.
Update a Style by Matching a Formatted Paragraph
This method works best when a paragraph already looks right and the style should simply copy that look.
- Step 10: Format a paragraph the way you want it, using the Home tab font and paragraph controls.
- Step 11: Keep the cursor in that paragraph, right-click the matching style in the Styles gallery, and choose Update [Style Name] to Match Selection. For example, the option reads Update Heading 2 to Match Selection.
Create a New Style From Existing Formatting
- Step 12: Format a paragraph with the font, spacing, and alignment you want to reuse, then keep the cursor inside it.
- Step 13: On the Home tab, open the Styles gallery with the More arrow and choose Create a Style.
- Step 14: Type a clear name, such as Callout Note, and click OK. To adjust further, click Modify in the same dialog box before confirming.
The new style now appears in the Styles gallery and can be applied like any built-in style.
Change a Whole Look at Once With a Style Set
- Step 15: Open the Design tab and choose a design from the Document Formatting gallery. This swaps the formatting of every built-in style at once.
- Step 16: Use the Colors, Fonts, and Paragraph Spacing buttons on the same tab to fine-tune the overall look without editing each style one by one.
Tip: Make style edits first, then pick a Style Set. Picking a Style Set afterward can replace custom changes made to built-in styles.
Common Problems and Fixes
The Style Changes but Some Text Does Not Update
Manual formatting applied directly to the text overrides the style. Select the affected text, press Ctrl+Space to clear character formatting, and press Ctrl+Q to clear paragraph formatting. Alternatively, choose Clear All at the top of the Styles pane and then apply the style again.
The Modified Style Is Missing in a New Document
The change was saved with Only in this document selected. Reopen the Modify Style dialog box, choose New documents based on this template, and click OK. The change then saves to the template that new documents are built from, which is Normal by default.
Changing One Style Changes Others Unexpectedly
Many styles are based on another style, most often Normal. A change to the base style flows down to every style built on it. Open the Modify Style dialog box for the style that changed and look at the Style based on box. Switch it to No Style or another base, or reapply the intended formatting to the dependent style.
The Style Is Not Visible in the Gallery
Open the Styles pane, click Options, and set Select styles to show to All styles. To pin a style to the gallery, right-click it in the Styles pane and choose Add to Style Gallery.
Formatting Reverts After Typing
If the Automatically update box is checked in the Modify Style dialog box, any manual change to a paragraph using that style rewrites the style itself. Uncheck it to keep the style fixed unless Modify or Update to Match Selection is used on purpose.
Frequently Asked Questions
How do I modify a style in Word?
Right-click the style in the Styles gallery on the Home tab, choose Modify, change the formatting in the Modify Style dialog box, and click OK. Every paragraph using that style updates automatically.
What is the difference between Modify and Update to Match Selection?
Modify opens a dialog box where formatting is set manually. Update to Match Selection copies the formatting of the paragraph the cursor is in directly into the style, with no dialog box.
How do I open the Styles pane in Word?
On the Home tab, click the small arrow at the bottom right of the Styles group, or press Ctrl+Alt+Shift+S. The pane lists every style available and lets styles be applied, modified, or deleted.
How do I save a modified style for all new documents?
In the Modify Style dialog box, select New documents based on this template before clicking OK. The change is saved to the template, so new documents start with the updated style.
How do I create a new style in Word?
Format a paragraph the way you want it, open the Styles gallery with the More arrow on the Home tab, choose Create a Style, type a name, and click OK.
How do I apply a heading style with the keyboard?
Press Ctrl+Alt+1 for Heading 1, Ctrl+Alt+2 for Heading 2, and Ctrl+Alt+3 for Heading 3. Press Ctrl+Shift+N to return a paragraph to Normal.
How do I remove a style from text?
Select the text and choose Clear All in the Styles pane, or apply the Normal style from the gallery. Pressing Ctrl+Space also clears manual character formatting.
How do I change the default font for all body text?
Right-click Normal in the Styles gallery, choose Modify, set the font and size, select New documents based on this template if the change should carry forward, and click OK.
Can a custom style be deleted?
Yes. Open the Styles pane, click the arrow beside the custom style, and choose Delete. Built-in styles such as Heading 1 and Normal cannot be deleted.