
Quick Answer: Right-click the desktop, select Display settings, then under Scale & layout, click the Scale dropdown and pick a preset percentage — 125%, 150%, or 175%. That’s the fastest way to fix tiny text or oversized icons on any Windows 11 display.
Why Display Scaling Matters
Here’s the thing — plugging in a 4K monitor and seeing microscopic icons is one of the most common Windows frustrations. The display resolution is high, but everything looks impossibly small. Display scaling fixes that. It tells Windows how large to make text, icons, windows, and menus without touching the resolution itself.
The key is using Windows’ built-in preset percentages instead of typing a custom value. Custom scaling tends to make apps look blurry. Presets are tested and work cleanly with both modern and older programs.
Method 1: Change Scaling Using Preset Options (Easiest)
This is the best starting point for almost everyone. No risk of blurry apps, no sign-out required for most changes.
- Step 1: Right-click anywhere on the desktop and select Display settings.
- Step 2: Under Scale & layout, click the dropdown next to Scale.
- Step 3: Choose a percentage — 100%, 125%, 150%, or 175%.
- Step 4: Windows applies the change right away. Some older apps may need a sign-out to update.
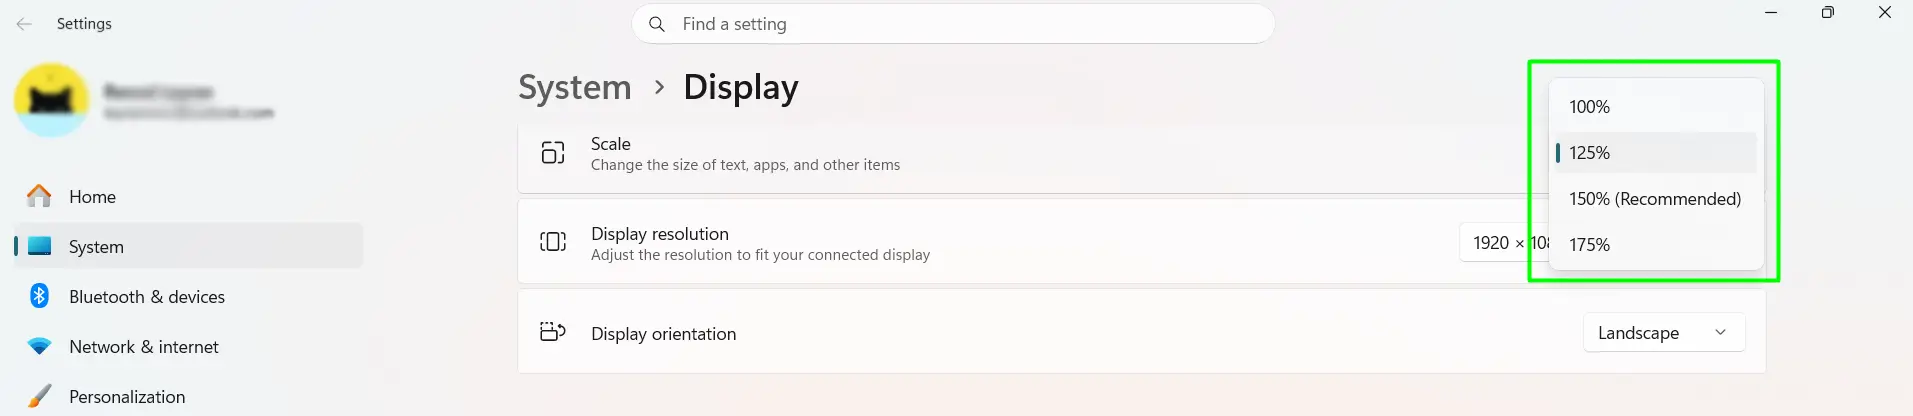
Which percentage should you pick?
- 100% — Native size. Good for smaller monitors and users who want maximum screen space.
- 125% — A small readability boost without shrinking your workspace much.
- 150% — Noticeably larger text and icons. Great for bigger monitors or sitting farther away.
- 175% — Best for large 4K displays or users with vision needs.
Most people find that 150% hits the sweet spot on a 27-inch 4K monitor.
Method 2: Adjust Scaling Per Monitor (Multiple Displays)
Running two monitors? Each screen can have its own scaling value. No need to match the percentages — match how things look physically instead.
- Step 1: Open Display settings (right-click desktop → Display settings).
- Step 2: Scroll up to the monitor diagram at the top of the page.
- Step 3: Click on the specific monitor to select it.
- Step 4: Change the Scale dropdown for that monitor only.
- Step 5: Repeat for the other monitor if needed.
Windows remembers each monitor’s setting independently. A 27-inch 4K display at 150% and a 24-inch 1080p screen at 100% can look visually consistent side by side.
Method 3: Change Text Size Only (Without Touching Scaling)
If the overall layout looks right but text still feels a bit small, there’s no need to change the whole display scale. Windows has a separate text-only slider under Accessibility.
- Step 1: Open Settings and click Accessibility in the left sidebar.
- Step 2: Click Text size under the Vision section.
- Step 3: Drag the slider anywhere between 100% and 225%.
- Step 4: Click Apply.
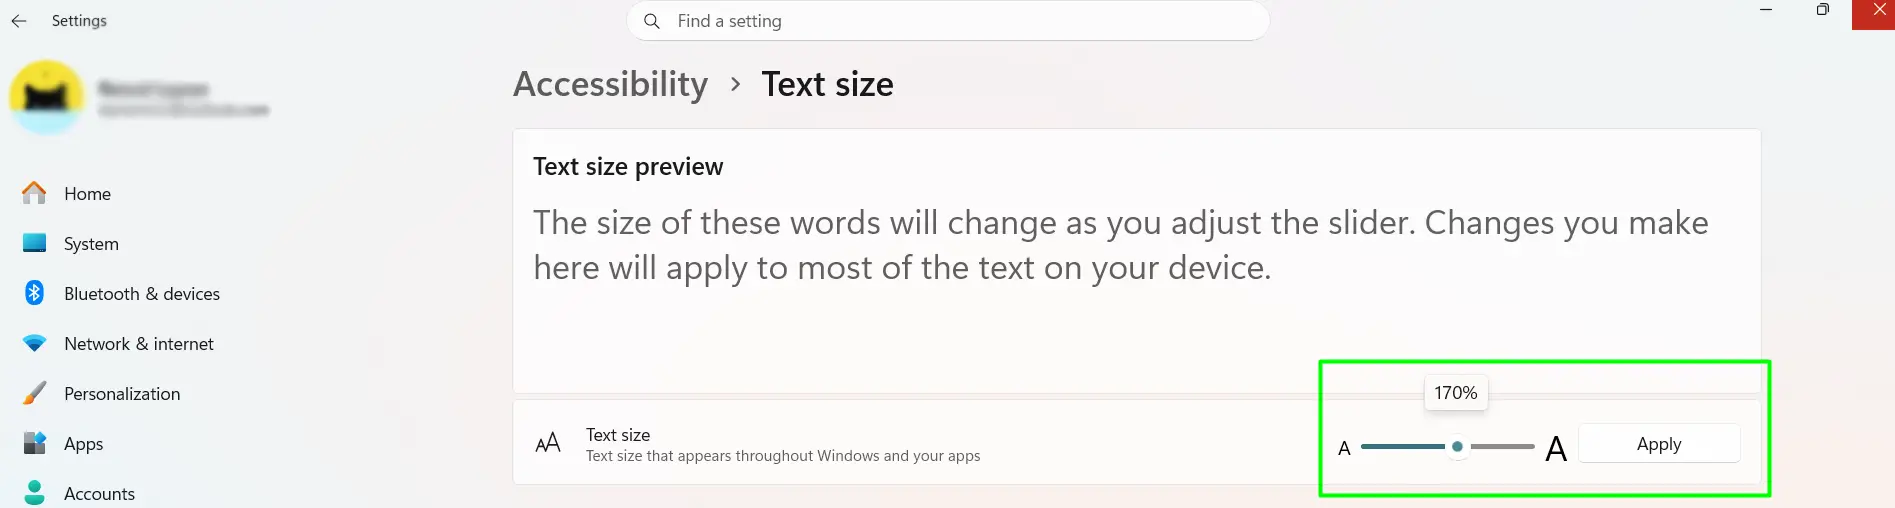
This enlarges text only — icons, windows, and layout stay exactly the same size.
Method 4: Set a Custom Scaling Value
The four presets cover most situations, but if none of them feel right, a custom value is possible. Windows does warn that this can make text and apps look blurry, so use it carefully.
- Step 1: Open Display settings.
- Step 2: Under Scale & layout, click the small arrow (›) on the right side of the Scale row.
- Step 3: On the Customised scaling page, type a value between 100 and 500.
- Step 4: Click the checkmark (✓) button to confirm.
- Step 5: Click Sign out now when prompted, then sign back in.
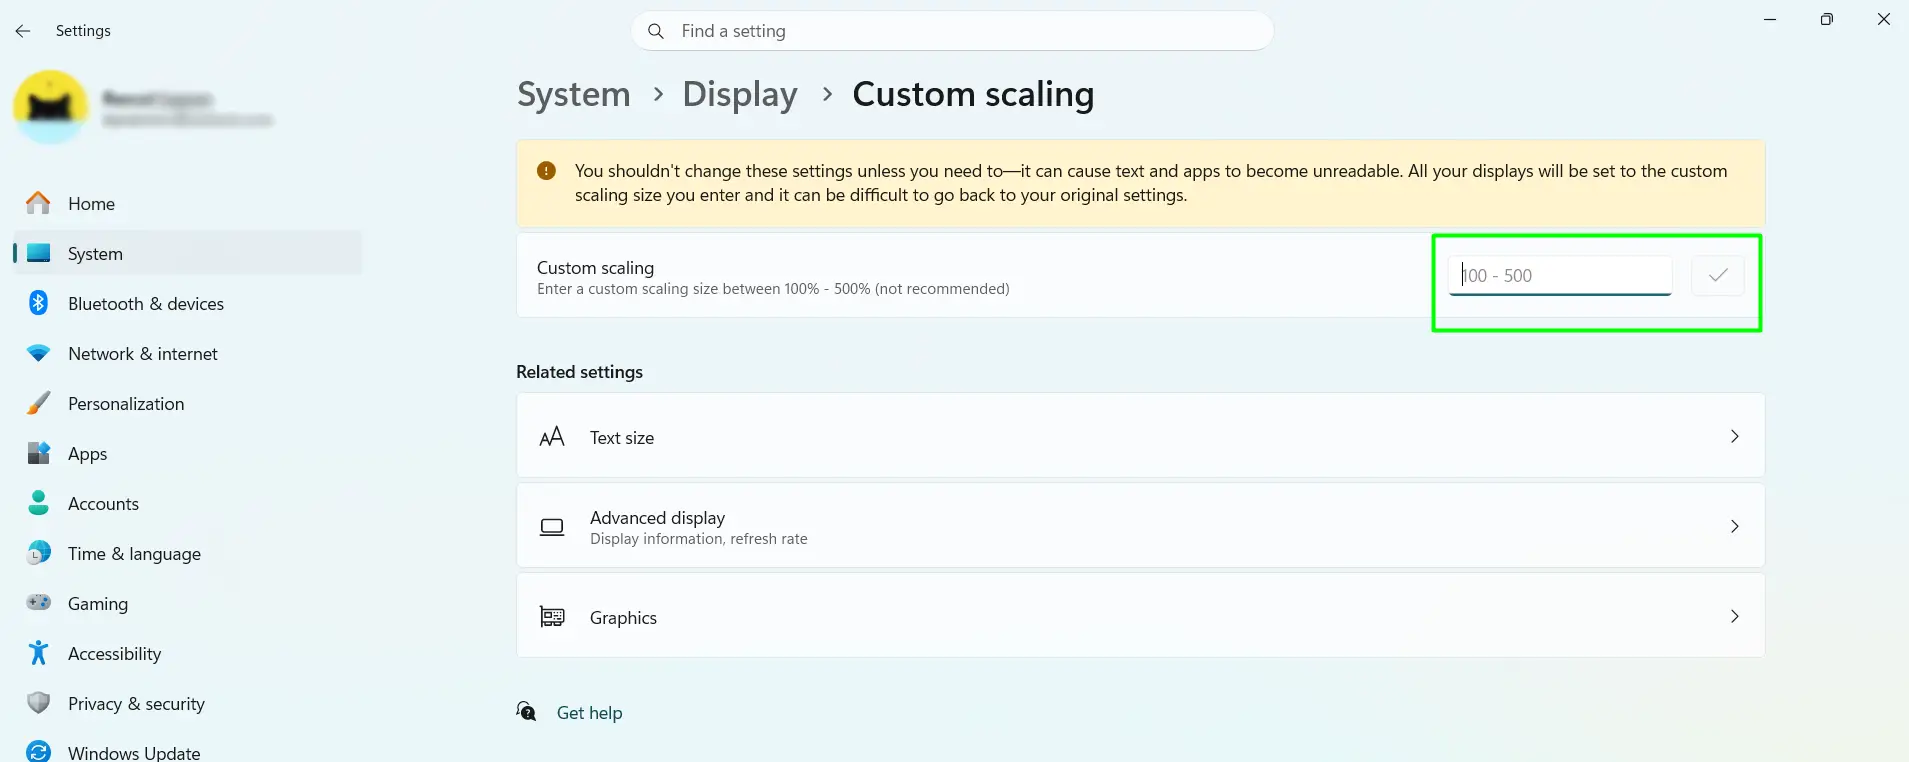
Start small — try 110% or 115% before going higher. The change applies to all connected displays at once.
To turn off custom scaling: Open Display settings. If a custom value is active, a yellow warning banner appears at the top. Click Turn off custom scaling and sign out, then sign back in. The standard preset dropdown will work normally again.
Tips for Getting Display Scaling Right
- Start with what Windows recommends. The suggested value accounts for screen size and resolution. Give it a day or two before tweaking — eyes adjust.
- Don’t stack high scaling with max text size. Setting display scaling to 175% and text size to 225% together can make dialog boxes feel cramped and hard to use.
- Always use preset percentages when possible. They’re tested by Microsoft and keep both modern apps and legacy programs sharp. Custom scaling is a last resort.
- After changing scaling, reopen important apps. Some programs need to be fully closed and relaunched to apply the new scale properly.
- For dual monitors, match appearance — not numbers. A 4K display at 150% and a 1080p display at 100% can look visually consistent. Don’t force identical percentages.
- Browser content isn’t affected by system scaling. Webpage zoom is controlled inside the browser itself, not through Display settings.
- Avoid changing scaling often. Apps remember window sizes based on the current scale. Constant switching causes windows to open at odd sizes.
Frequently Asked Questions
What display scaling should be used on a 4K monitor in Windows 11?
For a 27-inch 4K monitor, 150% is the most comfortable starting point for most people. A larger 32-inch 4K display might look great at 125%. Always start with whatever Windows recommends — it accounts for screen size and resolution automatically.
Why do some apps look blurry after changing display scaling in Windows 11?
Older apps that don’t support modern DPI scaling get stretched by Windows to fit the new size, which creates a blurry appearance. To fix this, right-click the app’s .exe file, go to Properties → Compatibility → Change high DPI settings, and check Override high DPI scaling behavior. A full system restart usually gives better results than just signing out.
Can different scaling percentages be set for each monitor?
Yes. In Display settings, click on the specific monitor in the diagram at the top of the page, then change the Scale dropdown for that display only. Windows saves each monitor’s setting independently, so there’s no need to use the same percentage across all screens.
Does display scaling slow down a Windows 11 PC?
No. Display scaling has virtually no impact on system performance. Windows 11 handles it efficiently and most users won’t notice any difference in speed or responsiveness, regardless of the scaling percentage chosen.
What is the difference between lowering screen resolution and increasing display scaling?
Lowering resolution makes everything bigger but blurrier, because fewer pixels are spread across the same screen. Increasing display scaling keeps the native resolution — and therefore the sharpness — while making interface elements appear larger. For almost every monitor, running at native resolution with adjusted scaling gives a much cleaner result.
Will display scaling settings reset after a Windows 11 update?
Scaling settings stay in place through most routine updates. Major Windows feature updates can occasionally reset display preferences. It’s worth checking Display settings after any significant update to confirm everything still looks right.
What is the quickest way to open Display settings in Windows 11?
Press Windows key + I to open Settings directly, then go to System → Display. All scaling options are available from that page. Alternatively, right-clicking anywhere on the desktop and selecting Display settings takes you there in two clicks.
Is 125% or 150% better for everyday use on a standard 1080p monitor?
For a typical 24-inch 1080p monitor, 100% or 125% usually works well. Going to 150% on a smaller 1080p screen can make windows and dialog boxes feel oversized. The right choice depends on how far away the monitor is and personal comfort — there’s no wrong answer as long as the text feels easy to read.
