
Quick Answer: Press Windows + I, go to System > Sound > Volume Mixer, scroll to the bottom, and click Reset under “Reset sound devices and volumes for all apps to the recommended defaults.” Done — no restart needed.
One minute everything sounds fine. Then Discord goes silent, Spotify is blasting, and your headset somehow switched back to the laptop’s built-in speakers. Windows audio settings have a habit of getting tangled up, usually after an app, driver, or “enhancement” quietly changes something in the background.
The good news? A proper audio reset sorts it out fast. Here’s the thing — most people don’t need to reinstall anything. The fix is already built into Windows. Below are seven methods, sorted from the easiest for everyday users to the more technical options for stubborn issues.
Method 1: Reset All App Volumes at Once (Windows 11 Only)
This is the fastest option. One click resets volume levels for every app and every connected device at the same time.
- Step 1: Press Windows + I to open Settings.
- Step 2: Click System, then click Sound.
- Step 3: Scroll down to the Advanced section and click Volume Mixer.
- Step 4: Scroll to the very bottom of the page.
- Step 5: Click Reset under “Reset sound devices and volumes for all apps to the recommended defaults.”
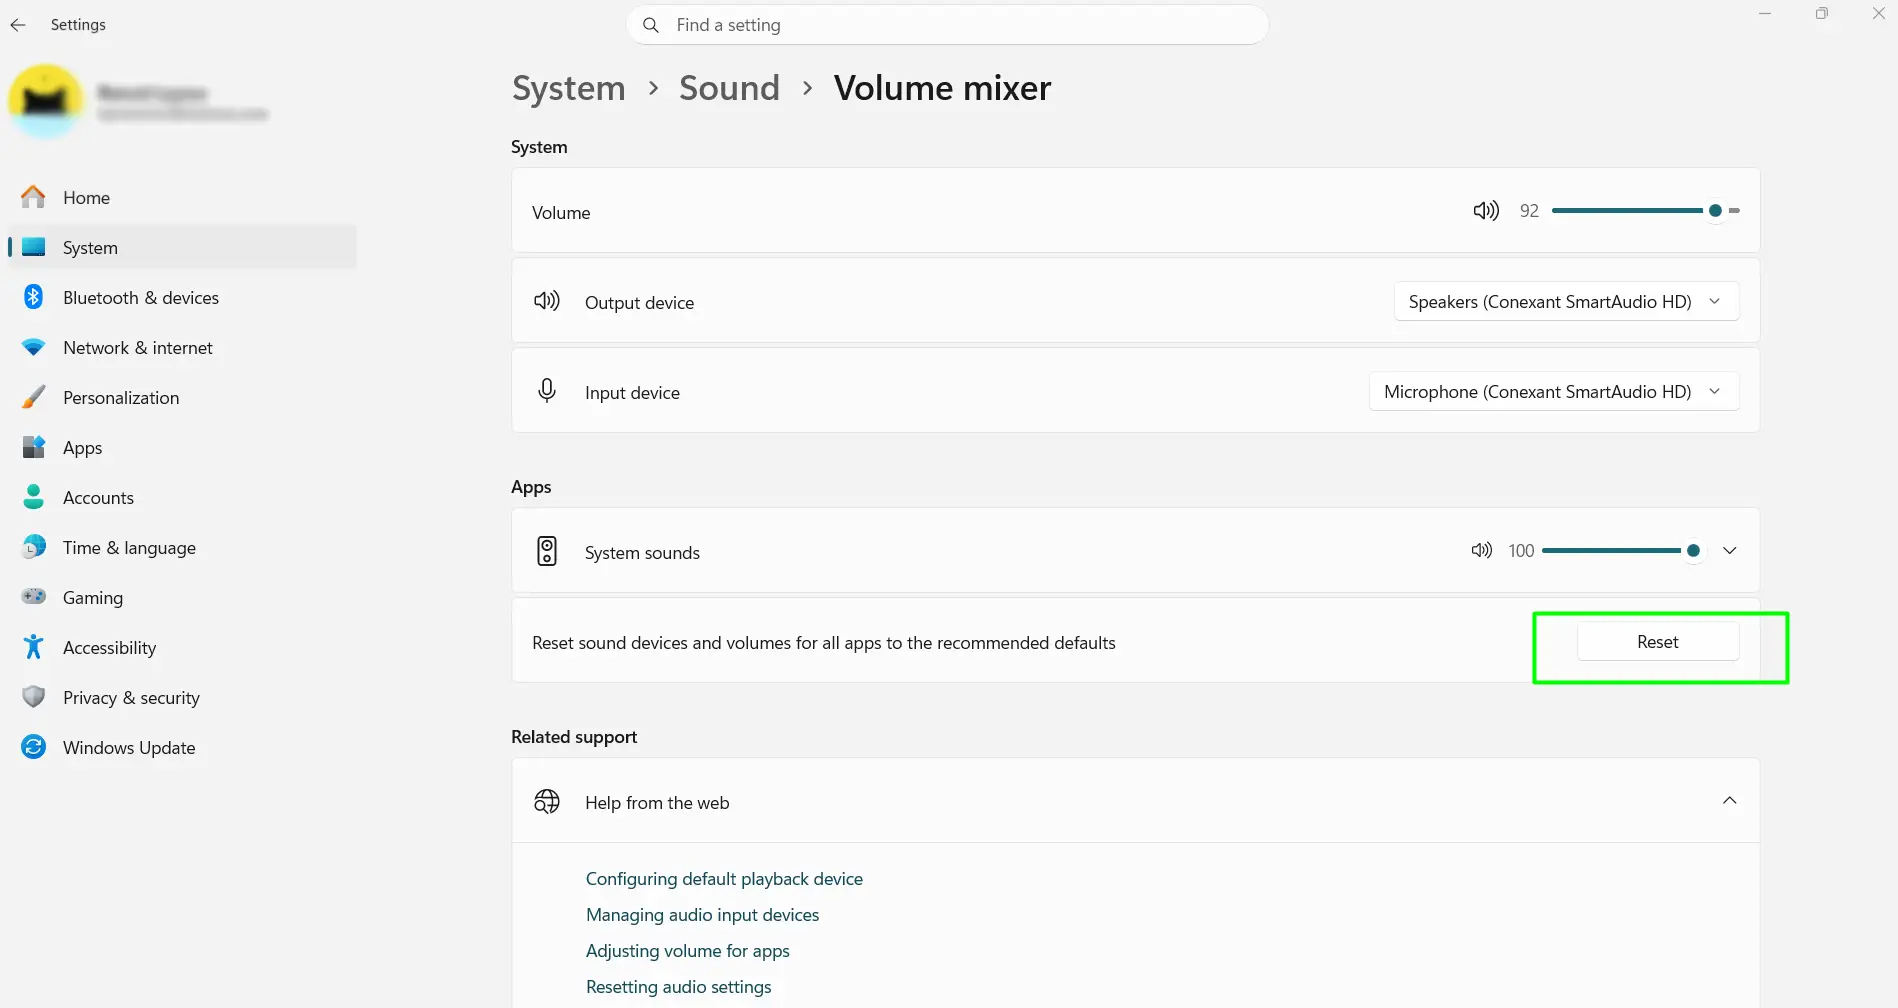
That’s it. Everything resets instantly with no restart. Best used when multiple apps have wrong volume levels or one app stays muted even though the system volume is fine.
Note: This can bring back audio devices that were previously hidden. If that happens, check Settings > System > Sound and disable them again.
Windows 10 users: This button doesn’t exist on Windows 10. Skip to Method 2 instead — that’s the equivalent.
Method 2: Reset a Specific Audio Device’s Settings
If Method 1 didn’t fully fix things, or a particular device is still acting up, this gives more control. Each device — speakers, headphones, headset — has its own settings panel with separate tabs.
- Step 1: Press Windows + I. Go to System > Sound.
- Step 2: Scroll to Advanced and click More sound settings. (Or press Windows + R, type mmsys.cpl, and press Enter — same result, faster.)
- Step 3: In the Playback tab, click a device to highlight it and click Properties.
- Step 4: Go to the Advanced tab. Click Restore Defaults.
- Step 5: Switch to the Enhancements tab (if it’s visible). Click Restore Defaults.
- Step 6: Switch to the Spatial sound tab. Click Restore Defaults.
- Step 7: Click Apply, then OK.
- Step 8: Repeat for any other devices listed in the Playback tab.
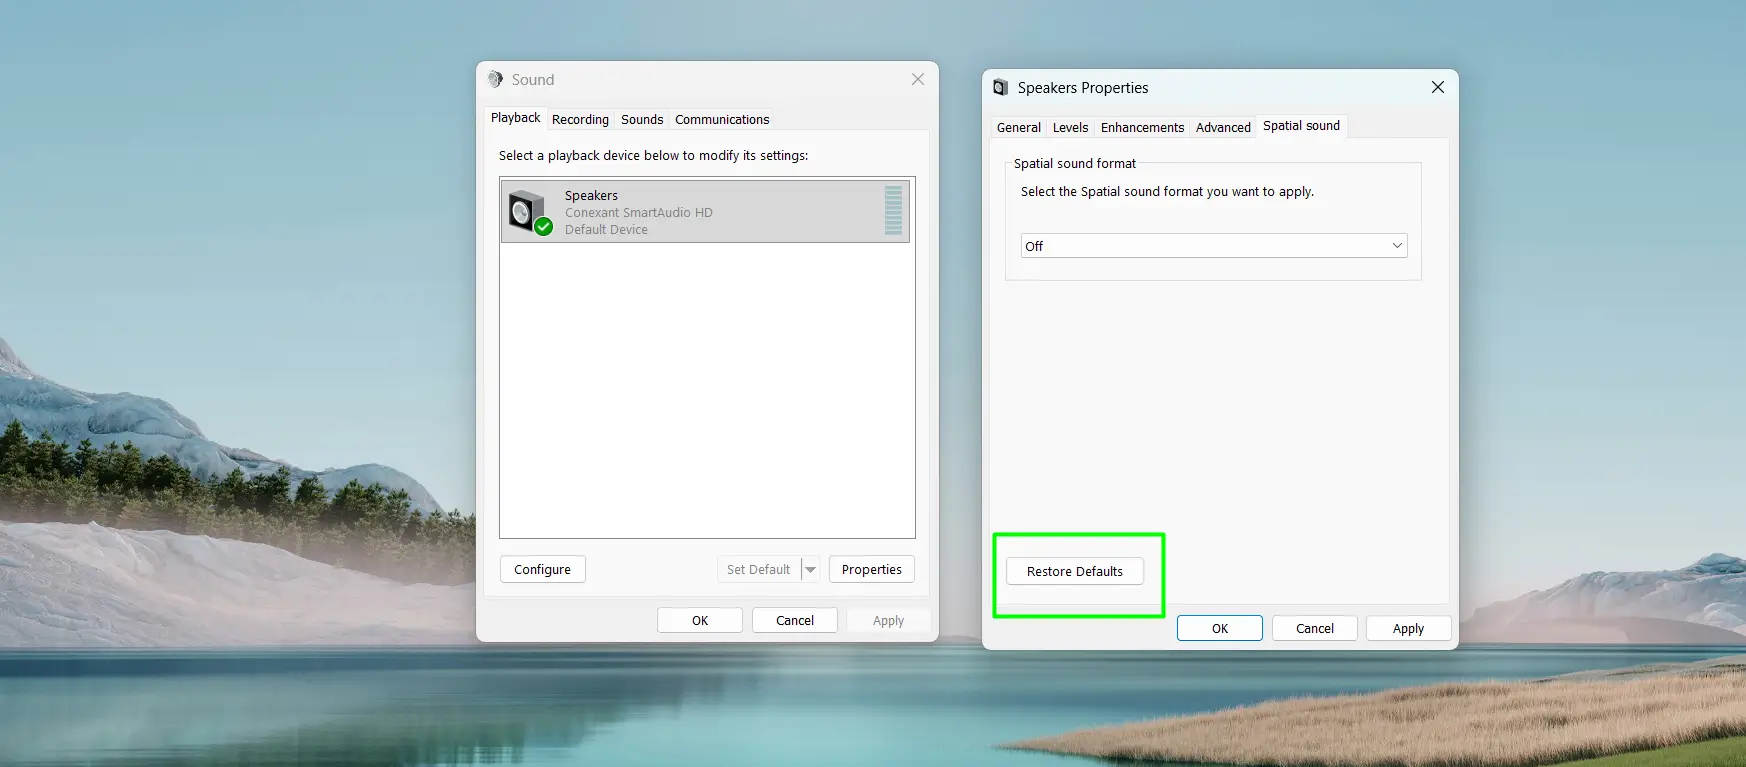
Don’t skip tabs — Advanced, Enhancements, and Spatial sound each hold their own settings. Resetting one doesn’t touch the others.
While here, switch to the Recording tab and do the same for the microphone. Input devices cause just as many problems as output devices.
Method 3: Reset System Sounds to Default
Notification sounds and error tones use their own separate sound scheme. If those are off, broken, or silent, this is the fix.
- Step 1: Press Windows + R, type mmsys.cpl, and press Enter.
- Step 2: Click the Sounds tab.
- Step 3: Open the Sound Scheme dropdown and select Windows Default.
- Step 4: Click Apply, then OK.
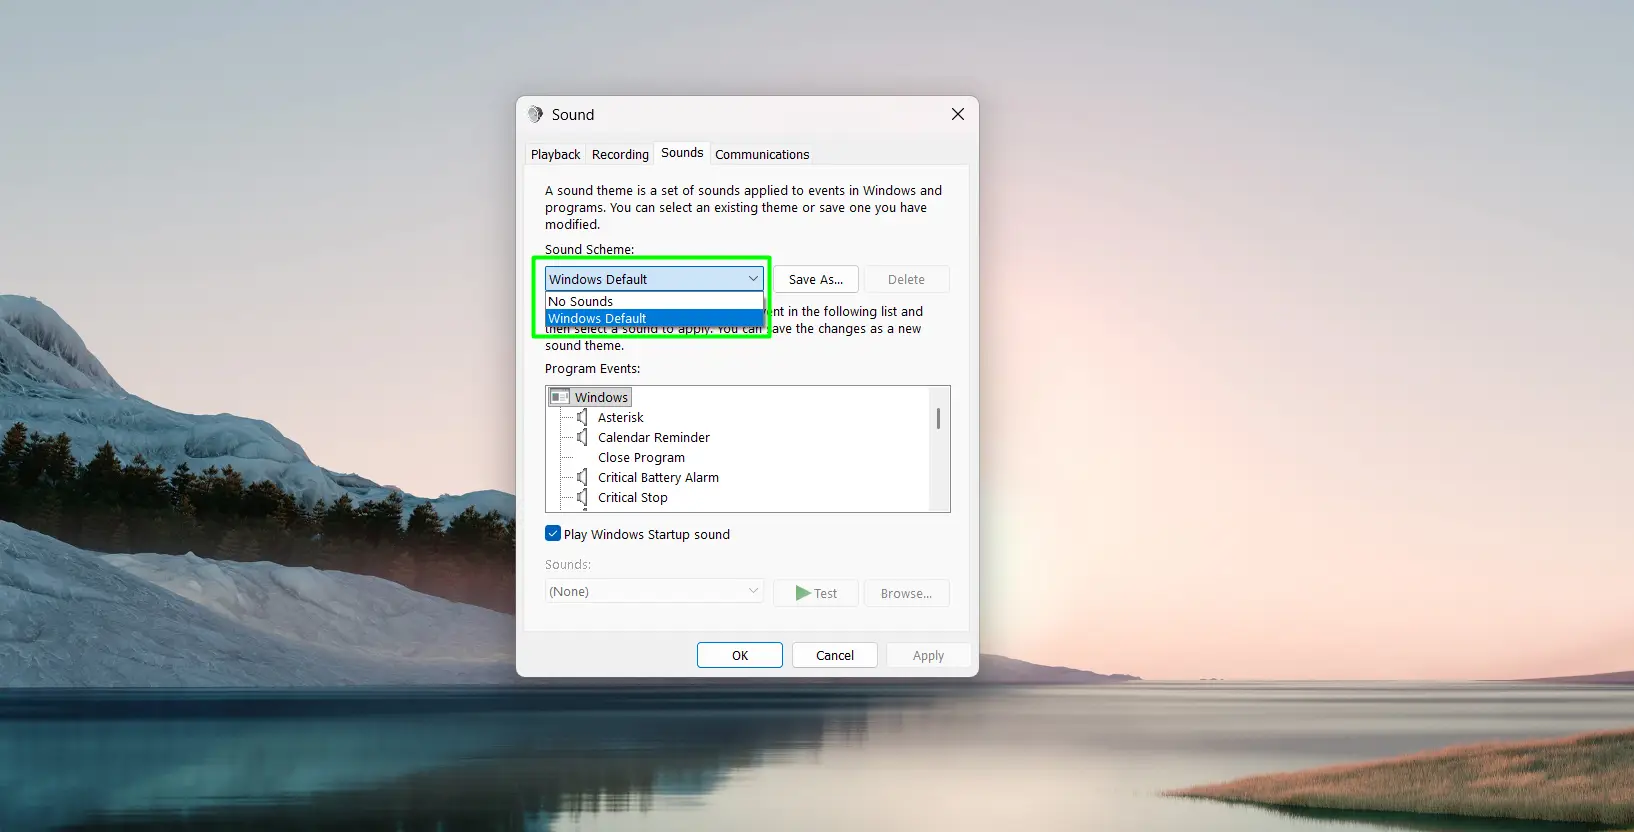
This one gets overlooked constantly. If notification sounds went quiet or started playing the wrong tone, this is the specific fix for that.
Method 4: Restart the Windows Audio Service
The Windows Audio service is what makes sound work at the system level. If it crashes, no setting change will fix anything until the service is back up. Restarting it takes under a minute.
- Step 1: Press Windows + R, type services.msc, and press Enter.
- Step 2: Scroll down and find Windows Audio.
- Step 3: Right-click it and select Restart.
- Step 4: Find Windows Audio Endpoint Builder. Right-click it and select Restart.
- Step 5: Close Services and test the audio.
Use this when sound just stops working out of nowhere — nothing was changed, nothing was installed, it just stopped.
If the Restart option is greyed out for either service, skip to Method 7 below. That fixes the same thing through PowerShell when the Services app won’t cooperate.
Method 5: Reset the Audio Driver
When all the settings look correct but sound is still broken, the driver is usually the real problem. Disabling and re-enabling it forces a clean restart without fully uninstalling anything.
- Step 1: Press Windows + R, type devmgmt.msc, and press Enter.
- Step 2: Expand Sound, video and game controllers.
- Step 3: Right-click the audio device (such as Realtek High Definition Audio) and select Disable device. Click Yes.
- Step 4: Wait 5 seconds, then right-click the same device and select Enable device.
- Step 5: Test the audio.
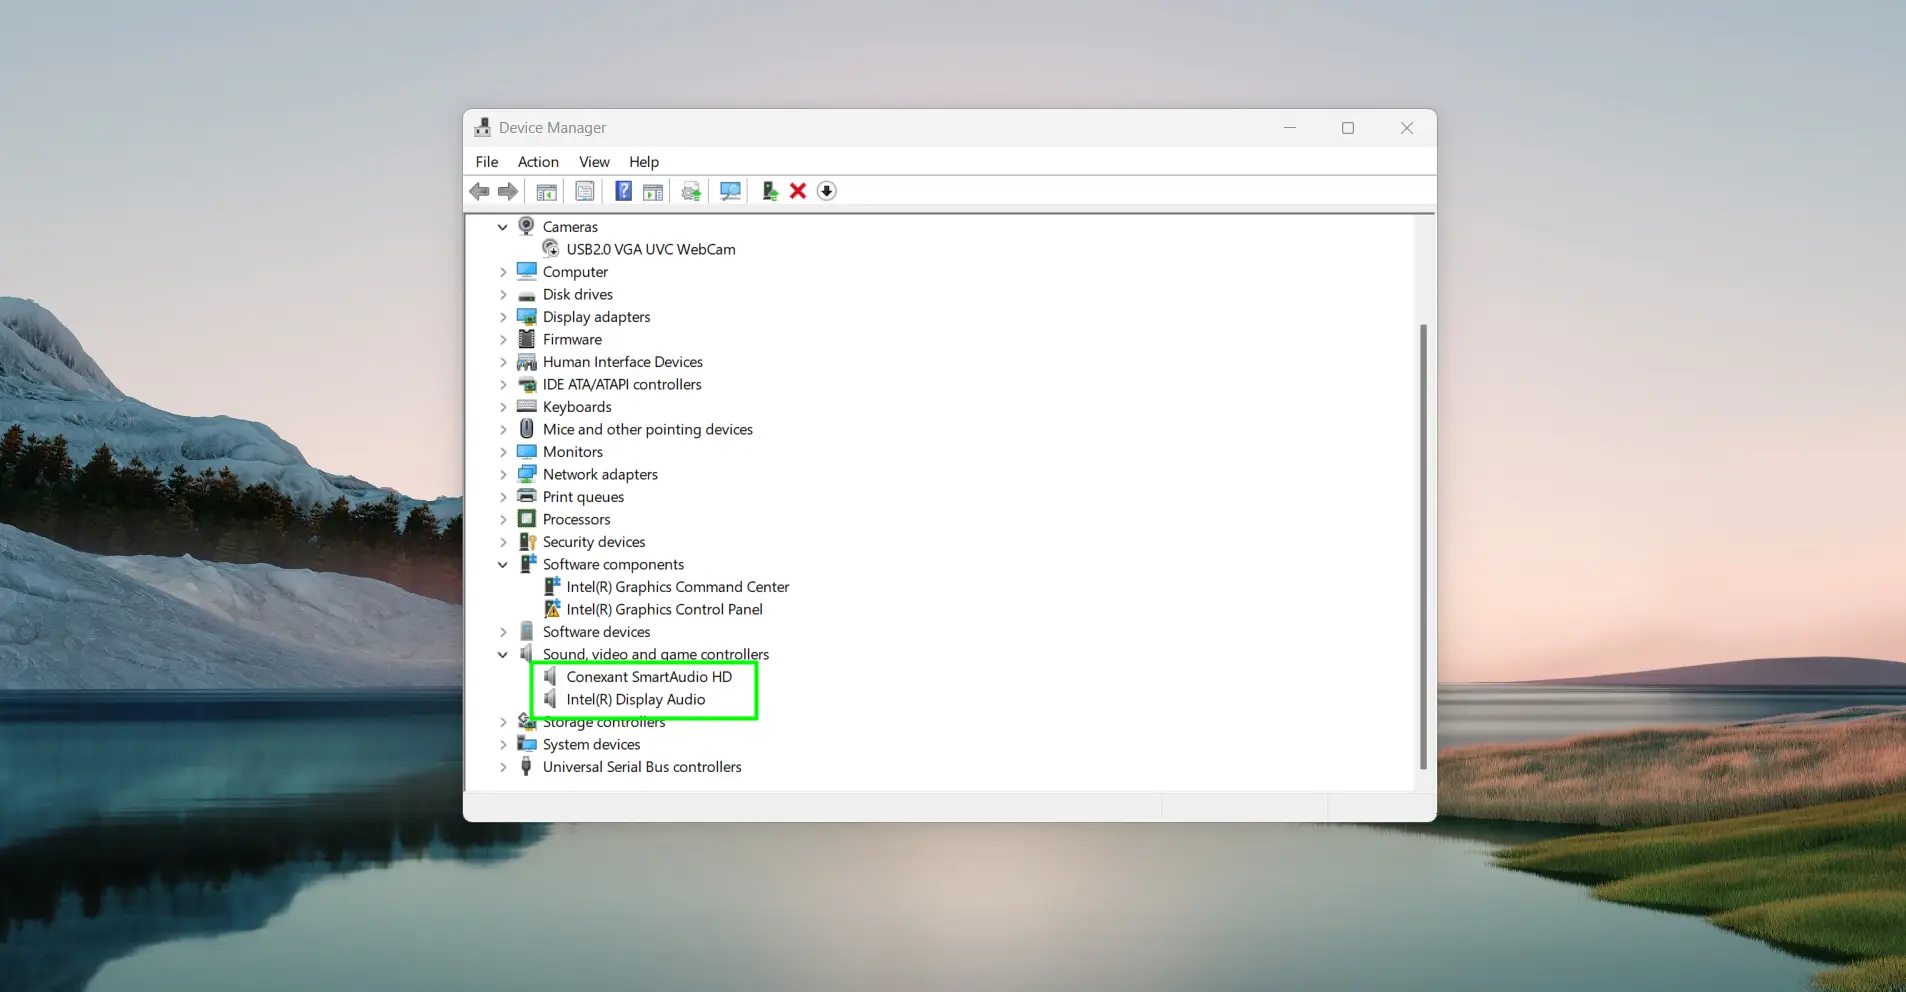
Still broken? Right-click the device, choose Uninstall device, check the box to also remove the driver software, then restart the PC. Windows reinstalls the driver automatically on the next boot.
Method 6: Run the Playing Audio Troubleshooter
Not sure what’s causing the problem? Let Windows check automatically. The built-in troubleshooter plays a test tone, checks drivers, and walks through possible fixes step by step.
- Step 1: Press Windows + I to open Settings.
- Step 2: Go to System > Troubleshoot > Other troubleshooters.
- Step 3: Find Playing Audio and click Run.
- Step 4: If the Get Help app opens, type Audio Troubleshooter in the search bar and press Enter. Click Yes to start the scan.
- Step 5: Follow the prompts. It will play a test tone and apply fixes based on the answers given.
- Step 6: Restart if prompted, then test the audio.
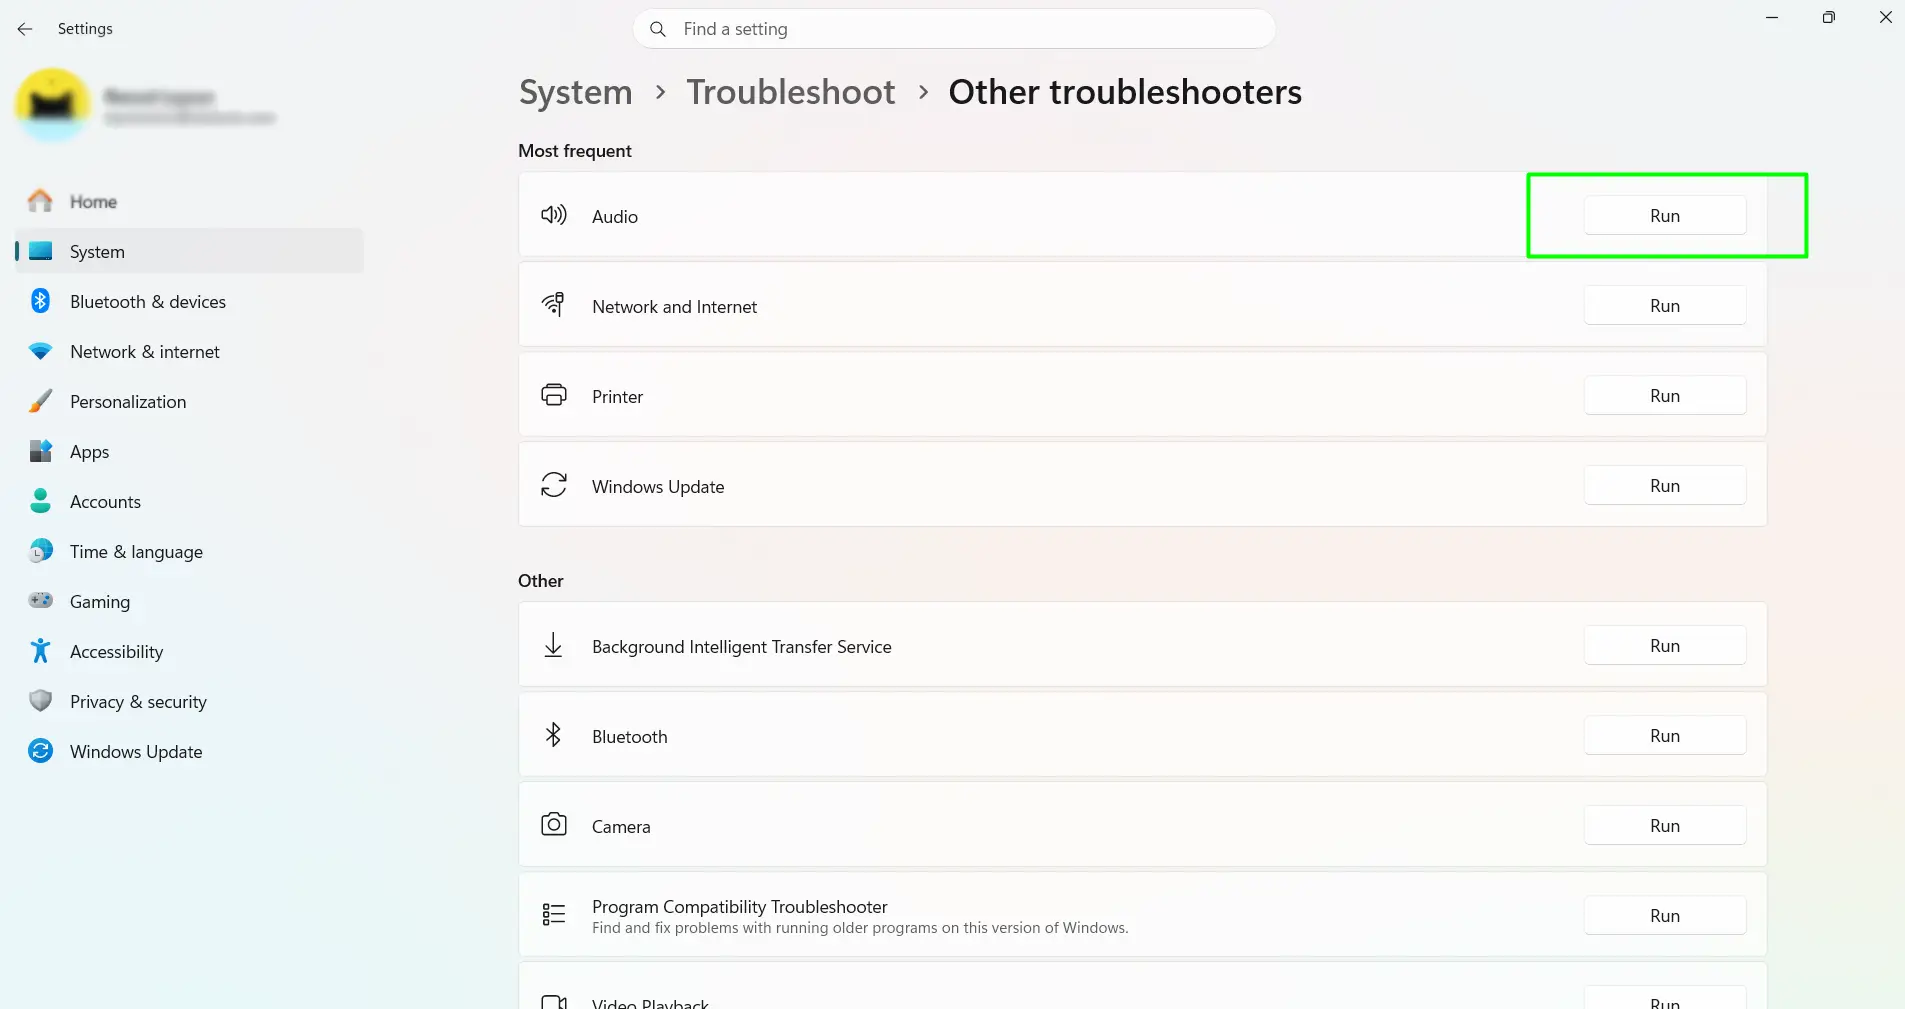
If the test tone doesn’t play during the scan, click No when asked — that routes the tool toward driver and device checks instead of stopping early.
Windows 10 note: Same troubleshooter, older interface. Find it under Settings > Update & Security > Troubleshoot > Additional troubleshooters > Playing Audio.
Method 7: Restart Audio Services via PowerShell
Sometimes the Restart option in Services is completely greyed out. PowerShell runs the same restart with a command that bypasses the permissions issue.
- Step 1: Right-click the Start button and select Terminal (Admin). Click Yes on the prompt.
- Step 2: Type the following and press Enter:
Restart-Service -Name AudioEndpointBuilder -Force
- Step 3: Then type this and press Enter:
Restart-Service -Name Audiosrv -Force
- Step 4: Close the window and test the audio.
The -Force flag handles any dependent services automatically. If an “access is denied” error appears, the window isn’t running as administrator — close it and repeat from Step 1.
Tips for Keeping Audio Settings Stable
- After any major Windows update, check Sound Settings. Feature updates are known to quietly reset the default device or swap in a generic Microsoft driver, undoing manufacturer settings.
- If settings keep reverting after every restart, disable Fast Startup. Go to Control Panel > Power Options > Choose what the power buttons do, and uncheck Turn on fast startup. This hybrid shutdown mode can stop audio settings from saving properly between sessions.
- Avoid running multiple third-party audio apps — like Dolby Access, Nahimic, or equalizer software — at the same time. They can conflict with Windows’ native settings and cause random resets.
- Set a permanent default output device under Settings > System > Sound. Windows auto-switches when a new device connects, which is often more annoying than helpful.
- Check the Volume Mixer occasionally. Apps get muted by accident more often than expected, especially after game sessions or calls.
- After completing a reset, check both the Playback and Recording tabs in More Sound Settings. A reset sometimes un-hides devices that were previously disabled.
- If volume randomly drops during calls in Teams, Discord, or Zoom, that’s a Windows feature — not a bug. Go to More Sound Settings > Communications tab and set it to Do Nothing to turn it off.
Frequently Asked Questions
Will resetting audio settings delete any files or apps?
No. An audio reset only restores configuration values — volume levels, enhancement settings, device selections — back to their defaults. Nothing stored on the PC is affected.
Why is there no sound after a Windows 11 update?
Feature updates sometimes replace the manufacturer’s audio driver with Microsoft’s generic “High Definition Audio Device” driver. This strips out any OEM tuning and can cause audio to stop working or behave inconsistently. The fix is to reinstall the driver directly from the PC or motherboard manufacturer’s support page rather than waiting for Windows Update to grab one.
Why does the default audio device keep changing on its own?
Windows automatically switches to any newly connected device. The key is to set a preferred default device manually in Settings > System > Sound, and avoid leaving multiple audio devices plugged in simultaneously if the auto-switching is causing problems.
Does the Volume Mixer reset also reset the microphone?
Yes. The Volume Mixer reset covers both output and input devices. For a more targeted microphone reset, open More Sound Settings, switch to the Recording tab, open the microphone’s Properties, and click Restore Defaults on each tab individually.
What is the difference between Restore Defaults and the Volume Mixer reset?
The Volume Mixer reset (Method 1) restores volume levels across every app and device in one click. Restore Defaults — found inside a specific device’s properties panel — resets the settings for just that one device, including its advanced options, enhancements, and spatial sound. They work on different layers of the same system.
Why do audio settings keep resetting after every restart?
Most people find that this is caused by either a driver issue or Fast Startup. A recent Windows update may have replaced the manufacturer’s driver with a generic one that doesn’t retain settings. Alternatively, Fast Startup creates a hybrid shutdown state that can prevent audio settings from saving between sessions. Disabling Fast Startup (Control Panel > Power Options > Choose what the power buttons do) is the most common fix.
Is it safe to uninstall the audio driver from Device Manager?
Yes. Windows automatically reinstalls a compatible driver on the next restart. No files, apps, or other system components are affected.
Can third-party audio software cause these problems?
Absolutely. Apps like Dolby Access, Nahimic, and standalone equalizers can override Windows’ own audio settings and create conflicts. If audio problems started right after installing one of these, try disabling or uninstalling it, then run a Volume Mixer reset.
How do audio settings get reset in Windows 11 without opening Settings?
Open Terminal as administrator (right-click Start > Terminal Admin), then run these two commands one at a time: Restart-Service -Name AudioEndpointBuilder -Force and Restart-Service -Name Audiosrv -Force. This restarts both audio services without touching the Settings app at all.
Does resetting audio settings fix Bluetooth headphone problems?
Not always. Bluetooth audio issues are usually a pairing or Bluetooth driver problem, not a Windows audio settings issue. Try removing the device and re-pairing it first. If that doesn’t help, update the Bluetooth driver through Device Manager.
