
Quick Answer: Go to Settings > System > Sound > Input to view, switch, or adjust any microphone connected to a Windows PC. For more control — like setting a Default Communication Device — press Windows + R, type mmsys.cpl, and open the Recording tab.
How to View All Connected Audio Input Devices
Before changing anything, it helps to see exactly what Windows recognizes. Here’s the thing — a device that isn’t listed here won’t work, no matter what settings are changed elsewhere.
- Press Windows + I to open Settings.
- Go to System, then click Sound.
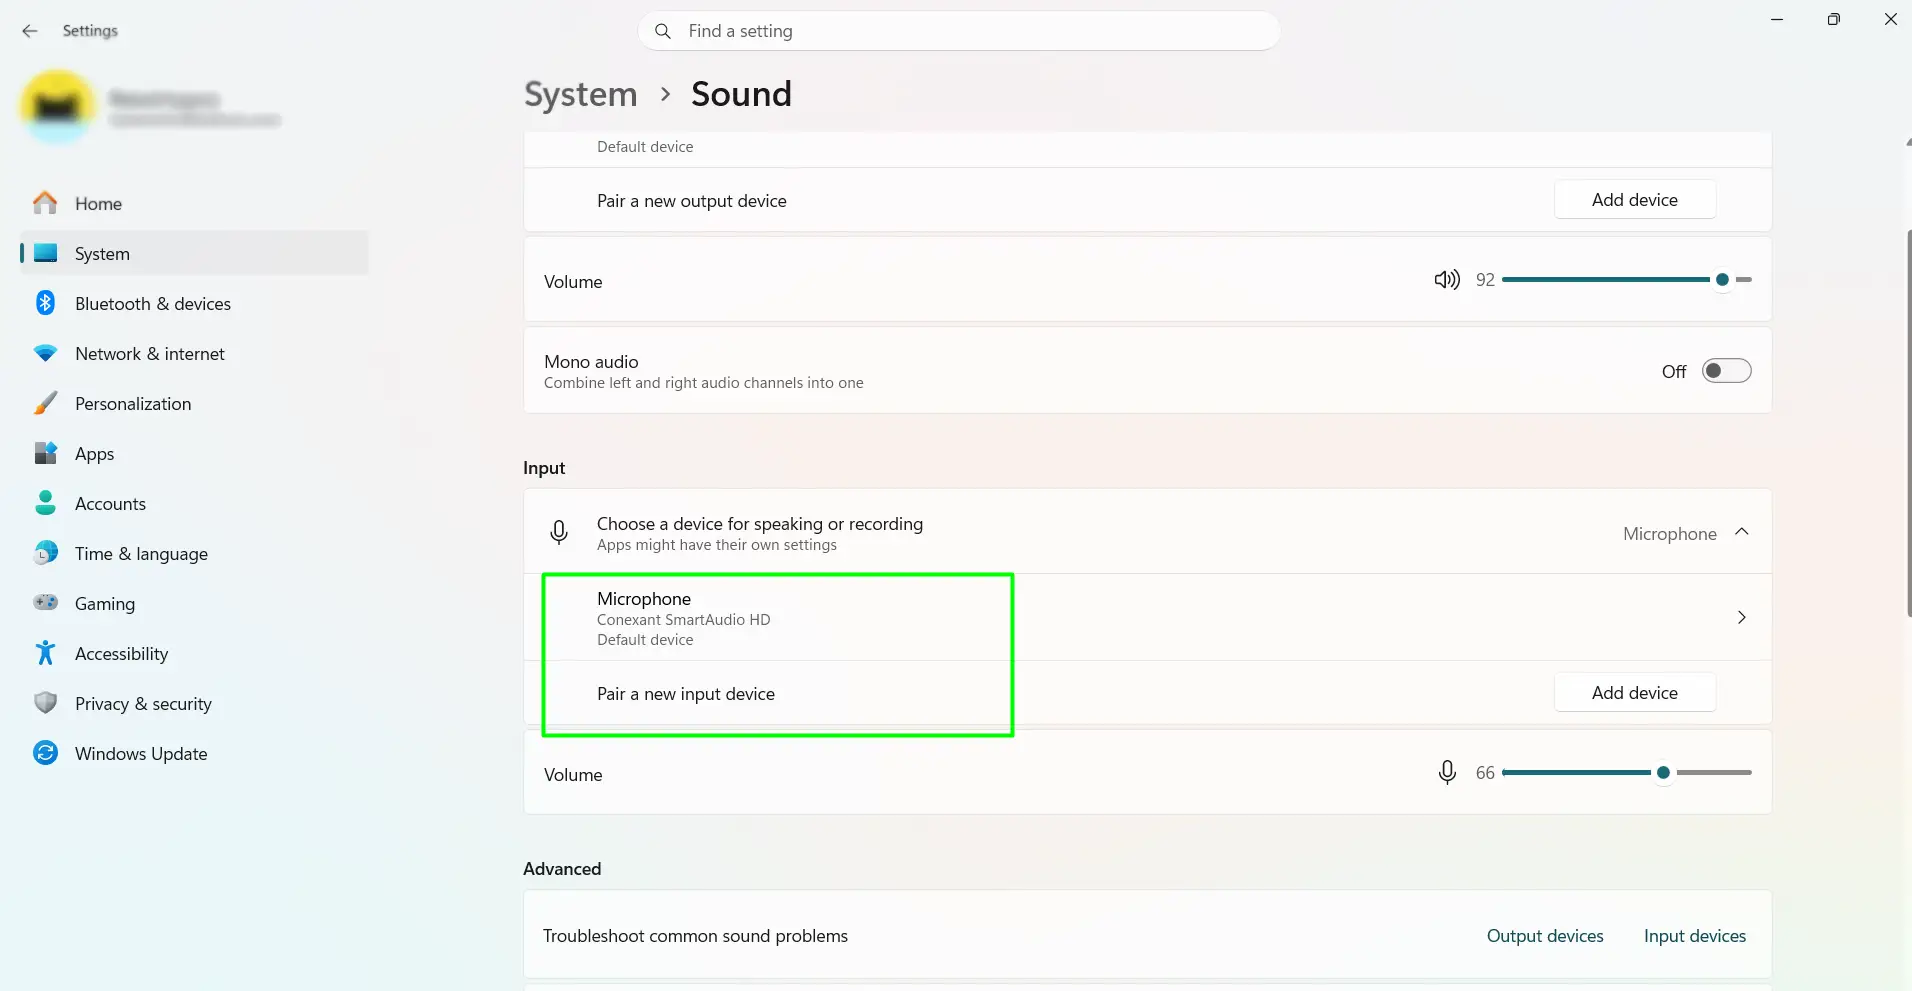
- Scroll down to the Input section.
- All connected microphones appear under “Choose your input device” (Windows 10) or “Choose a device for speaking or recording” (Windows 11).
If a microphone is missing from this list, it may be disabled. Press Windows + R, type mmsys.cpl, press Enter, click the Recording tab, then right-click any empty area and enable “Show Disabled Devices” and “Show Disconnected Devices.”
How to Set a Default Audio Input Device
Windows sends all microphone audio through one default device unless an app overrides it. Getting this right means no more guessing which mic is actually being used.
Method 1: Windows Settings (Easiest)
- Press Windows + I and go to System > Sound > Input.
- Click the “Choose your input device” dropdown.
- Select the preferred microphone. Windows saves it automatically.
Method 2: Classic Sound Control Panel (Most Reliable)
Most people find this method more dependable, especially for video calls. It also lets the device be set as the Default Communication Device — which apps like Zoom and Teams specifically look for.
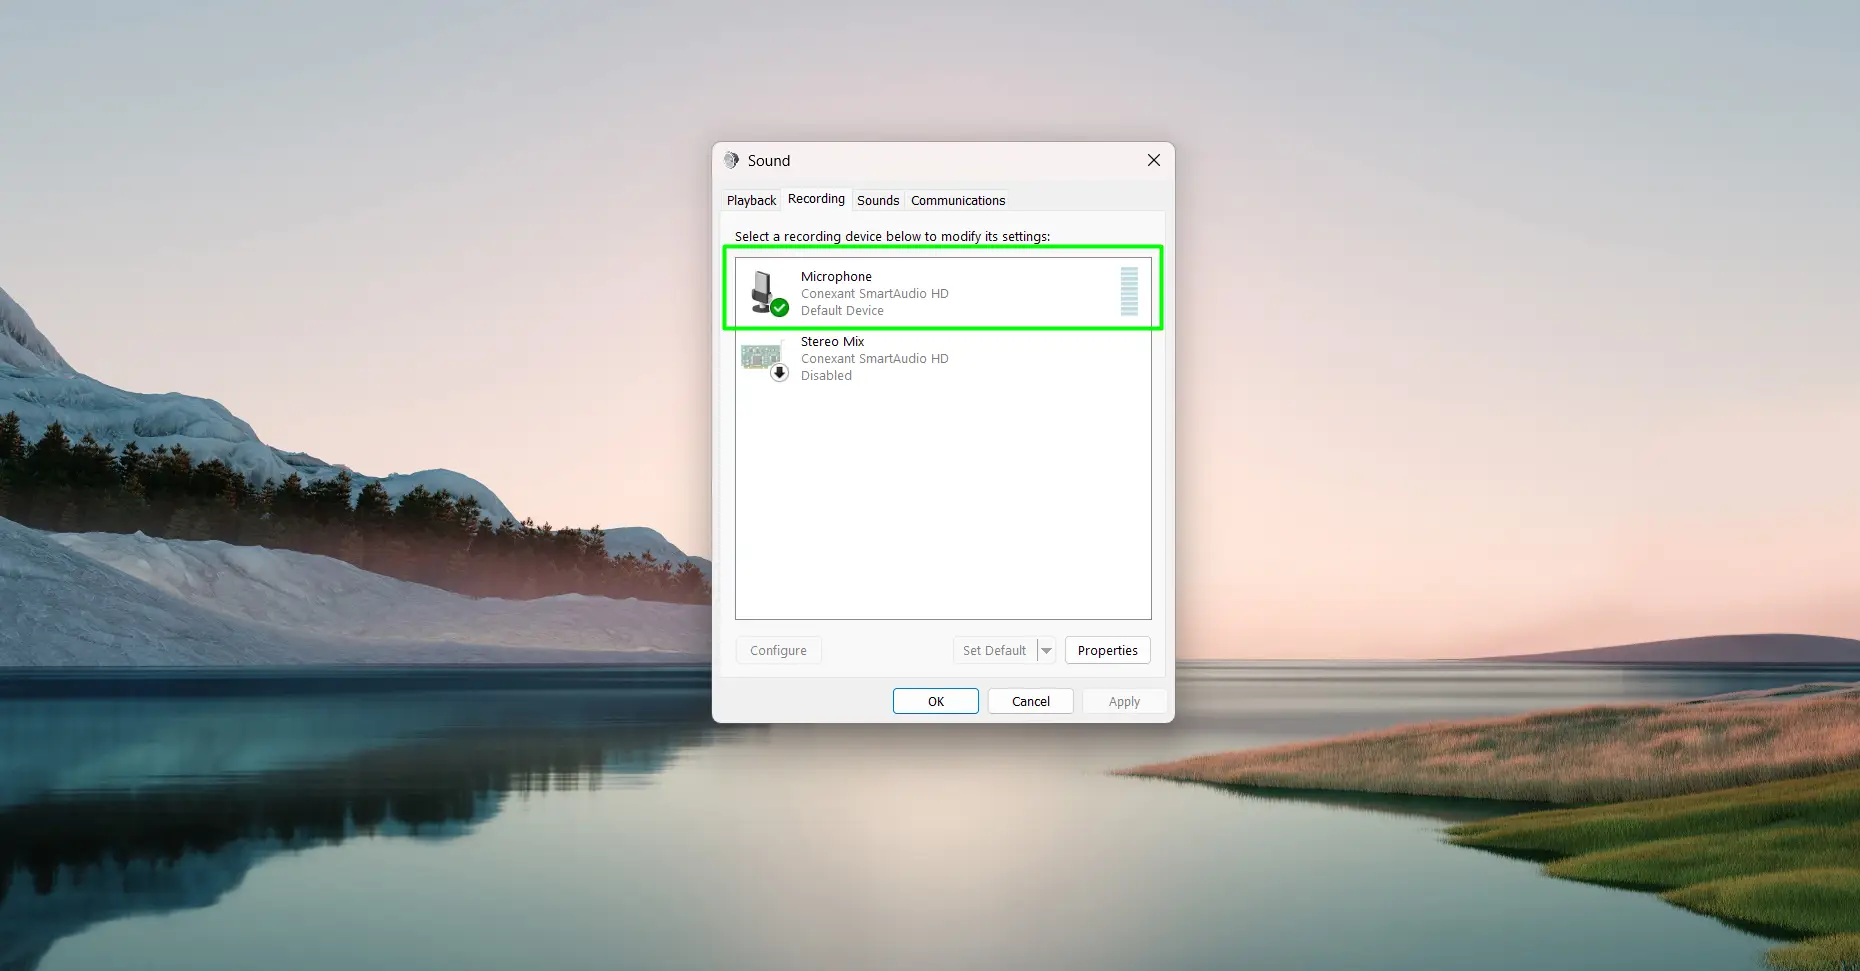
- Press Windows + R, type mmsys.cpl, and press Enter.
- Click the Recording tab.
- Right-click the preferred microphone and select “Set as Default Device.”
- Right-click it again and select “Set as Default Communication Device.”
- Click Apply, then OK.
Method 3: Taskbar Sound Icon (Windows 11 Only)
- Click the speaker icon in the bottom-right taskbar.
- Click the arrow next to the volume slider.
- Select the preferred microphone from the list.
This is the fastest option for a quick switch but doesn’t replace setting the Default Communication Device in mmsys.cpl.
How to Adjust Microphone Input Volume
The key is finding a level that’s loud enough to be heard clearly without distorting. Starting around 75–80% works well for most setups.
- Go to Settings > System > Sound > Input.
- Click the active microphone to expand its options.
- Drag the Input volume slider left to lower or right to raise sensitivity.
- Speak into the microphone and watch the level bar to confirm it’s responding.
For even more control, open mmsys.cpl, go to the Recording tab, double-click the microphone, and check the Levels tab. A Microphone Boost slider may appear there — useful for mics that still sound too quiet at full volume.
How to Test a Microphone in Windows
No need for third-party software. Windows has a built-in test that works in seconds.
- Go to Settings > System > Sound > Input.
- Click the active input device to expand it.
- Speak normally and watch the “Test your microphone” bar animate. If it moves, the mic is picking up sound.
- For a full playback test, click “Device properties” then “Start test.” Windows records a short clip and plays it back immediately.
How to Configure Advanced Audio Input Settings
For USB microphones, audio interfaces, or headsets with enhancement support, there are deeper options available through the classic Sound Control Panel.
- Press Windows + R, type mmsys.cpl, and press Enter.
- Click the Recording tab, then right-click the active microphone and select Properties.
- On the Levels tab — adjust the main volume slider. If a Microphone Boost option appears, increase it by +10 dB or +20 dB for quieter mics.
- On the Enhancements tab — options may include noise suppression and echo cancellation. Toggle only what’s needed. If audio sounds robotic, check “Disable all enhancements” and retest.
- On the Advanced tab — use the Default Format dropdown to set sample rate and bit depth:
- 16-bit, 44100 Hz — everyday use
- 16-bit, 48000 Hz — video calls
- 24-bit, 48000 Hz — higher-quality recording
- Still on the Advanced tab — consider unchecking “Allow applications to take exclusive control of this device” to stop a single app from locking the microphone away from everything else.
- Click Apply, then OK.
How to Assign a Specific Microphone to One App
There’s no need to keep switching the system default just because one app needs a different mic. Windows lets each app use its own input device.
- Go to Settings > System > Sound.
- Click “Volume mixer” (Windows 11) or “App volume and device preferences” (Windows 10).
- Under the Apps section, expand the app row by clicking the arrow next to it.
- If supported, an Input device dropdown appears — select the microphone to assign to that app only.
Apps like Zoom, Teams, Discord, and OBS Studio manage their own audio device settings internally. For those, set the preferred microphone directly inside the app’s audio or sound settings instead.
How to Manage Multiple Audio Input Devices
Running two or more microphones at once — common in podcast and streaming setups — is straightforward once the defaults are set correctly.
- Connect all devices and confirm they appear under Settings > System > Sound > Input.
- Set the primary microphone as both Default Device and Default Communication Device in mmsys.cpl.
- Assign secondary microphones to specific apps through the Volume mixer or the app’s own settings.
- After connecting any new audio device, reopen mmsys.cpl and confirm the preferred mic is still set as default — Windows sometimes reassigns it automatically when new hardware is detected.
How to Enable Microphone Privacy Permissions
Even a correctly configured microphone won’t work in an app if privacy access has been blocked. This is one of the most commonly missed steps — and Windows updates can silently reset these permissions without any warning.
- Press Windows + I to open Settings.
- Go to Privacy (Windows 10) or Privacy & Security (Windows 11).
- Click Microphone.
- Make sure “Microphone access” is toggled On at the top.
- Scroll down and find the specific app that isn’t working. Toggle its permission to On.
- For desktop apps like OBS or Audacity, scroll further to “Allow desktop apps to access your microphone” and confirm that toggle is also On.
Tips for Better Audio Input Management
- Always set both defaults. In mmsys.cpl, set the preferred mic as both “Default Device” and “Default Communication Device.” Skipping one can cause apps like Teams or Zoom to use a completely different microphone.
- Start input volume at 75–80%. This gives a strong signal while leaving room before audio starts clipping or distorting.
- Check for disabled devices first. Before assuming a microphone is broken, right-click inside the Recording tab in mmsys.cpl and enable “Show Disabled Devices.” It might just be turned off.
- Turn off enhancements for USB mics. USB microphones and audio interfaces already handle their own signal processing. Adding Windows enhancements on top often makes audio sound worse, not better.
- After every major Windows update, recheck privacy and defaults. Feature updates — including Windows 11 24H2 — are known to silently reset microphone permissions and default device assignments.
- Use manufacturer software for USB mics. Most brand-name USB microphones come with companion apps that offer more precise gain and EQ control than Windows settings alone.
- Restart audio services if the mic suddenly stops responding. Press Windows + R, type services.msc, find Windows Audio and Windows Audio Endpoint Builder, right-click each, and select Restart. This often fixes ghost issues without a full reboot.
Frequently Asked Questions
How do you open microphone settings in Windows 11?
Press Windows + I, go to System > Sound, and scroll to the Input section. Clicking any listed microphone expands its volume and property options. Alternatively, right-click the speaker icon in the taskbar and select Sound settings to get there faster.
Why is a microphone not showing up in Windows input settings?
It’s likely disabled or hidden. Open mmsys.cpl via the Run dialog, click the Recording tab, right-click any empty space, and enable “Show Disabled Devices.” If the mic appears grayed out, right-click it and choose Enable. If it doesn’t appear at all, reinstalling the driver through Device Manager usually resolves it.
What’s the difference between Default Device and Default Communication Device?
Default Device is used by general audio applications. Default Communication Device is specifically used by communication apps like Zoom, Teams, and Skype. Setting both to the same microphone prevents those apps from quietly switching to a different mic without any notice.
How do you increase microphone sensitivity in Windows?
Go to Settings > System > Sound > Input, click the active device, and raise the Input volume slider. For more gain, open mmsys.cpl, double-click the microphone in the Recording tab, go to the Levels tab, and look for a Microphone Boost slider. Adding +10 dB or +20 dB can make a noticeable difference for quieter mics.
Why does the default microphone keep switching on its own?
Windows automatically reassigns the default input whenever a new audio device connects. The fix: open mmsys.cpl, set the preferred mic as both Default Device and Default Communication Device, then open its Properties, go to the Advanced tab, and uncheck “Allow applications to take exclusive control of this device.”
Can different apps use different microphones at the same time?
Yes. Go to Settings > System > Sound and open the Volume mixer (Windows 11) or App volume and device preferences (Windows 10). Expand any app row that supports per-app input and assign a specific microphone to it. Apps like Zoom, Discord, and OBS Studio also have their own audio device selectors inside their settings menus.
Why is microphone audio picking up no sound even though it’s set as default?
Most likely a privacy permission issue. Go to Settings > Privacy & Security > Microphone and confirm microphone access is turned on — both for the system overall and for the specific app that isn’t working. Also check that the Input volume slider isn’t at zero and that the mic doesn’t have a physical mute button pressed.
How do you test a microphone in Windows without downloading anything?
Go to Settings > System > Sound > Input, click the active microphone, and speak while watching the test bar. For a full playback test, click “Device properties” then “Start test” — Windows records a short clip and plays it back immediately. No third-party software needed.
Why does microphone audio sound robotic or muffled after a Windows update?
Windows updates can silently re-enable audio enhancements that were previously turned off. Open mmsys.cpl, right-click the active microphone, select Properties, go to the Enhancements tab, and check “Disable all enhancements.” Also verify the Default Format under the Advanced tab wasn’t reset to a lower quality setting during the update.
Does changing the audio format in Device Properties actually improve recording quality?
It can — but only if the microphone hardware supports the selected format. Formats like 24-bit, 48000 Hz capture more detail and dynamic range, which matters for recording music or voiceovers. For standard video calls, 16-bit 48000 Hz is more than enough. If an unsupported format is chosen, Windows typically reverts it automatically.
Can a Bluetooth microphone be set as the default input in Windows?
Yes. Once paired and connected, a Bluetooth headset or mic appears in the Recording tab inside mmsys.cpl just like any wired device. Right-click it and set it as both Default Device and Default Communication Device. Just keep in mind — Bluetooth audio quality can drop when both mic input and audio playback are active at the same time, since the headset may switch to a lower-quality codec to handle both directions.
How do you check which app has microphone permission blocked in Windows?
Go to Settings > Privacy & Security > Microphone (Windows 11) or Settings > Privacy > Microphone (Windows 10). Each app listed has its own toggle. Any app showing Off won’t be able to capture audio. Desktop apps like OBS or Audacity appear at the bottom under “Allow desktop apps to access your microphone” — make sure that toggle is on too.
