
Learning how to replace a laptop DC power jack is one of the most useful repairs a laptop owner can pick up, because a worn charging port is among the most common reasons a laptop stops charging. A loose, wobbly, or dead jack can usually be fixed for the cost of a small replacement part and a bit of patience. This guide covers both common jack designs: the cable-connected type and the soldered type.
Key Takeaways
- Confirm the jack is the real fault before opening the laptop, since a bad charger, cable, or battery can look identical.
- Laptops use either a cable-connected jack (an easy swap) or a jack soldered directly to the motherboard (needs soldering skill).
- The replacement jack must match the exact laptop model and connector type, because DC jacks are not universal.
- Always disconnect the battery before touching any internal part, and test charging before closing the case for good.
Before You Start
Preparation takes only a few minutes and prevents most of the damage seen in home repairs.
- Shut the laptop down fully, unplug the charger, and remove the battery if it is removable.
- Let the laptop cool if it was recently running, especially around the charging port.
- Work on a clean, well-lit, non-carpeted surface, and touch bare metal or wear an anti-static strap to discharge static before handling internal parts.
- Take clear photos of each stage so cable routing and screw positions are easy to restore.
Tools and Materials
- Precision screwdriver set that fits the laptop screws (usually Phillips, sometimes Torx)
- Plastic pry tools or an old guitar pick for releasing the bottom cover and clips
- Fine tweezers
- Replacement DC jack that matches the exact laptop model number and connector style
- Small containers or a magnetic mat to keep screws sorted by location
- Anti-static wrist strap (recommended)
- For soldered jacks only: a temperature-controlled soldering iron, flux, desoldering braid or a desoldering pump, fresh solder, and a magnifier
- 90 percent or higher isopropyl alcohol, a soft brush, and a lint-free cloth for cleaning flux residue
Tip: Check the part number printed on the old jack or the laptop’s service manual before ordering. A jack that looks similar can have a different pin layout or mounting style and will not work.
One honest note: opening a laptop can affect the manufacturer warranty. Replacing a soldered jack also takes real soldering experience, and a lifted pad or burned trace on the motherboard can be costly to repair. If soldering is new territory, it is smarter to hand a soldered-jack job to a professional repair shop.
How to Replace a Laptop DC Power Jack Step by Step
The first two steps apply to every laptop. After that, follow the method that matches the jack type found inside the machine.
Confirm the Jack Is the Problem
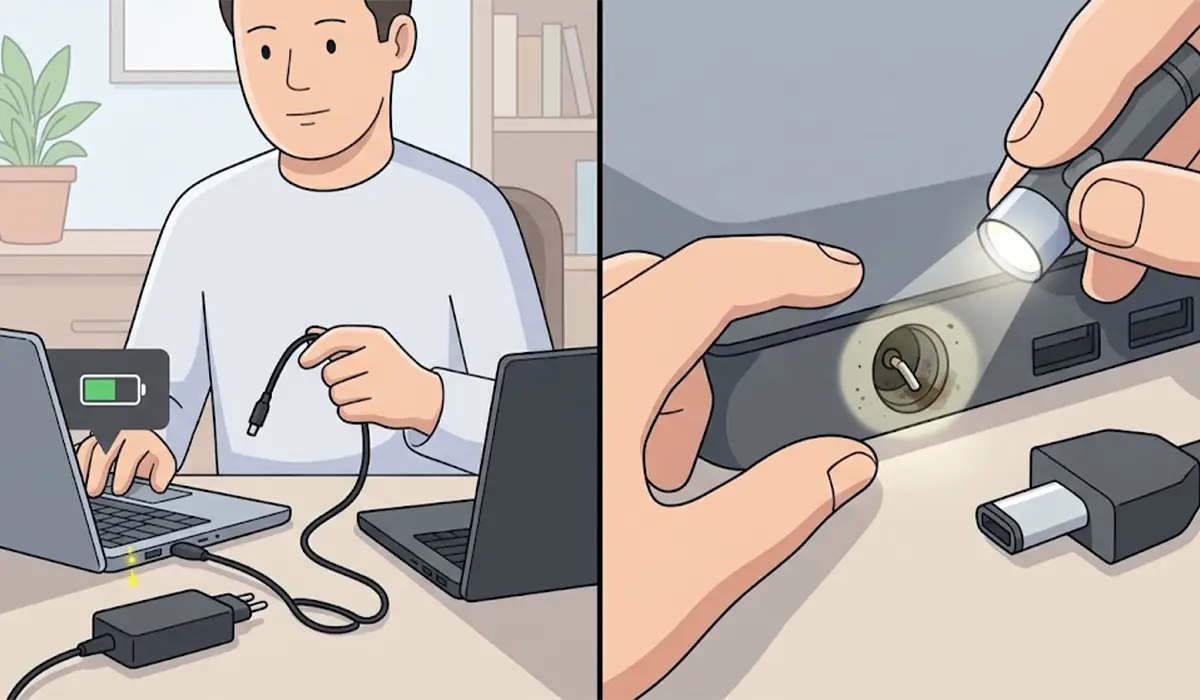
- Step 1: Test the charger on another compatible laptop, or try a known-good charger on this one. If the charger works elsewhere, the fault is inside the laptop.
- Step 2: Inspect the charging port with a flashlight. Look for a bent or missing center pin, debris, burn marks, or a plug that wobbles noticeably. A plug that only charges when held at an angle almost always points to a worn jack or broken solder joints.
Open the Laptop and Isolate the Power
- Step 3: Shut down the laptop, unplug the charger, and remove the removable battery. Press and hold the power button for several seconds to drain any leftover charge.
- Step 4: Remove the bottom cover screws, noting any that are different lengths, and release the cover gently with a plastic pry tool working around the edges.
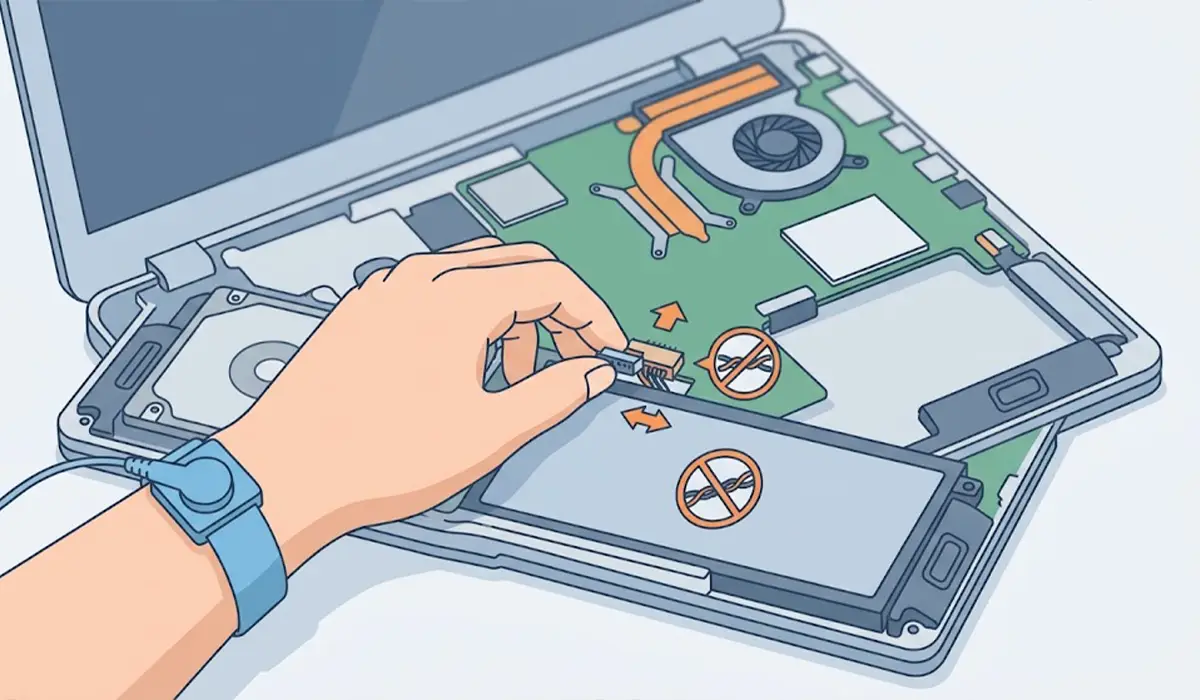
- Step 5: If the battery is internal, disconnect the battery connector from the motherboard by pulling the connector straight out. Never pull on the wires themselves.
- Step 6: Locate the DC jack near the charging port and check how it connects. A jack on a short cable with a small plug is the cable-connected type. A jack with metal pins going straight into the motherboard is the soldered type.
Method A: Replacing a Cable-Connected DC Jack
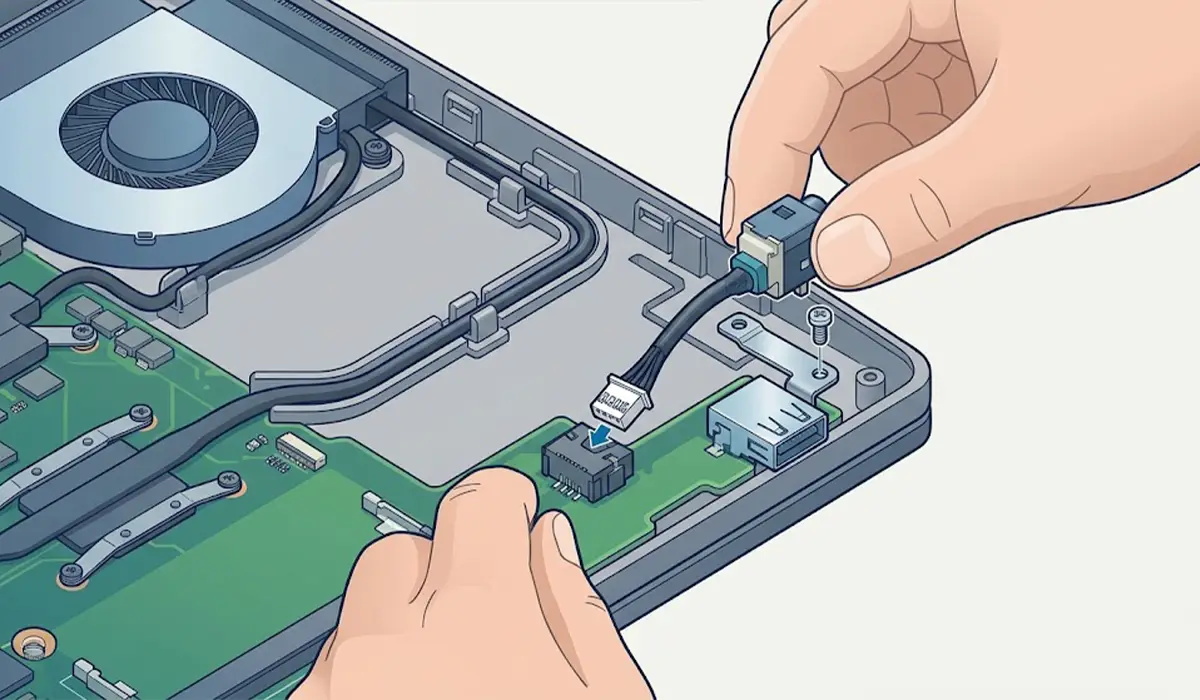
- Step 7: Unplug the small connector from the motherboard by gently lifting or pulling the plug straight out. If a piece of tape holds the cable down, peel it back and note where it runs.
- Step 8: Free the cable from any routing clips or channels in the chassis, and remove the screw or bracket that secures the jack, if present.
- Step 9: Lift the old jack out of the chassis and compare it side by side with the new one. The shape, cable length, and plug should be identical.
- Step 10: Seat the new jack in the same spot, secure the bracket or screw, and route the cable along the original path so it does not get pinched by the cover or fan.
- Step 11: Plug the new connector firmly into the motherboard socket and skip ahead to the testing steps below.
Method B: Replacing a Soldered DC Jack
- Step 7: Remove everything that blocks access to the motherboard: the keyboard and palm rest if required, the fan, and every ribbon cable and connector, photographing each one first.
- Step 8: Unscrew the motherboard and lift it out carefully, freeing it from the port openings at the edges of the case. Never force the board.
- Step 9: Support the board on a stable, heat-safe surface. Apply flux around the jack pins, then heat each joint and remove the old solder with desoldering braid or a pump. The pins sit on large copper areas that pull heat away quickly, so use short bursts of heat with fresh flux rather than holding the iron down for a long time.
- Step 10: When every pin moves freely, lift the old jack out. Do not tug on a pin that is still stuck, because that can tear the plated hole or lift a pad. Add flux and clear the remaining solder first.
- Step 11: Clean the holes, test-fit the new jack so it sits flat against the board, and solder each pin with a smooth, shiny joint. Avoid bridging neighboring pins.
- Step 12: Clean away the flux residue with isopropyl alcohol and a soft brush, then inspect the joints under magnification for bridges, cold joints, or damaged pads.
- Step 13: Return the motherboard to the case, refit the screws, reconnect all cables, and reinstall the fan and other parts in reverse order.
Tip: Before soldering, check the pin count and layout of the new jack against the old one by holding them together. Catching a mismatch at this point saves a repeat desoldering job.
Test Before Closing the Case
- Step 14: Reconnect the battery connector (or reinsert the removable battery) and leave the bottom cover off for now.
- Step 15: Plug in the charger and watch for the charging indicator light. Turn the laptop on and confirm the operating system shows the charger as connected.
- Step 16: Gently move the plug a little in the port. The connection should feel firm and charging should not drop out.
- Step 17: Shut down, unplug, disconnect the battery again, and refit the bottom cover with all screws in their original positions.
Common Problems and Fixes
The laptop still does not charge after the new jack is installed
Recheck that the cable connector is fully seated in the motherboard socket, or that every pin on a soldered jack is properly joined. Also confirm the charger works on another laptop, and that the battery connector is fully attached.
Charging works only when the plug is held at an angle
On a soldered jack, this usually means a cold joint or an incompletely soldered pin. Reflow each pin with a little fresh flux and solder. On a cable-connected jack, check that the jack is secured firmly in its mount and not loose in the chassis.
A message says the adapter is not recognized
Many laptops identify the charger through a center pin or signal line in the jack. A damaged center pin, a mismatched replacement part, or a poor connection on that line can trigger this warning. Verify that the replacement matches the original design and inspect the connection.
The laptop does not power on after reassembly
Disconnect the charger and battery, then recheck that every ribbon cable and connector removed during the repair is back in place. A loose display, keyboard, or power button cable is a frequent cause after a motherboard-removal job.
The new jack does not fit the port opening
This points to the wrong part. Stop and compare the jack against the model number in the service manual rather than bending or trimming the chassis.
The jack area smells burnt or gets very hot
Unplug the charger and stop immediately. Burn marks or heat damage on the board may mean a damaged trace or component, and that repair belongs with a professional.
Frequently Asked Questions
How can a failing laptop DC power jack be identified?
Common signs include a charger that only works at a certain angle, an intermittent charging light, a plug that feels loose in the port, visible burn marks or a bent center pin, and battery charging that starts and stops while the cable is touched. Testing with a known-good charger rules out the adapter.
Can a laptop DC power jack be replaced at home?
Yes, in many cases. A cable-connected jack is a reasonable project for a careful beginner with the right screwdrivers. A soldered jack is possible at home too, but it requires proper soldering tools and experience.
Is soldering always required to replace a laptop DC power jack?
No. Laptops with a cable-connected jack need no soldering at all, since the jack plugs into the motherboard through a small connector. Only laptops with the jack soldered directly to the board require desoldering and soldering.
How long does the replacement take?
A cable-connected jack is typically a fairly quick job once the bottom cover is off. A soldered jack takes considerably longer because the motherboard usually has to be removed and the joints need to be desoldered and resoldered carefully.
Could the charger be the problem instead of the jack?
Yes. A damaged cable, a worn charger tip, or a failed adapter can mimic a bad jack. Trying a known-good compatible charger, or testing the original charger on another laptop, is the quickest way to tell the difference.
Is it safe to keep using a laptop with a loose charging jack?
It is best to avoid it. A loose jack can cause intermittent power, sparking, and heat at the connection, and repeated stress can damage the motherboard pads and make the eventual repair more expensive.
Can any DC power jack be used as a replacement?
No. Jacks differ in pin layout, mounting style, connector type, and sometimes the presence of a center pin. The replacement should match the laptop’s exact model and part number.
Does replacing the jack void the laptop warranty?
Opening a laptop can affect the warranty, depending on the manufacturer’s terms. A laptop still under warranty is better handled through the manufacturer or an authorized service provider.
How can a new DC power jack be protected from wearing out?
Avoid tugging or twisting the charger cable, do not let the laptop hang from the plug, and keep the cable positioned so it is not bent sharply at the connector. Plugging in straight rather than at an angle also reduces long-term wear.