
Learning how to turn off mouse acceleration in Windows 11 takes about a minute, and the whole job comes down to one checkbox named Enhance pointer precision. Once it is cleared, the cursor moves the same distance for the same hand movement, no matter how fast the mouse travels. The change works on every Windows 11 edition and does not need administrator rights.
Key Takeaways
- Mouse acceleration in Windows 11 is controlled by the Enhance pointer precision checkbox.
- The fastest route is Settings > Bluetooth & devices > Mouse > Additional mouse settings > Pointer Options.
- Clearing the checkbox takes effect right away in the Settings and Control Panel methods.
- Re-checking the same box restores the default behavior at any time.
Step-by-Step Guide to Turn Off Mouse Acceleration in Windows 11
Method 1: Use the Settings App
- Press Windows + I to open Settings.
- Click Bluetooth & devices in the left sidebar.
- Click Mouse.
- Scroll down to the Related settings area and click Additional mouse settings. The Mouse Properties window opens.
- Switch to the Pointer Options tab.
- In the Motion group, clear the checkbox next to Enhance pointer precision.
- Click Apply, then click OK.
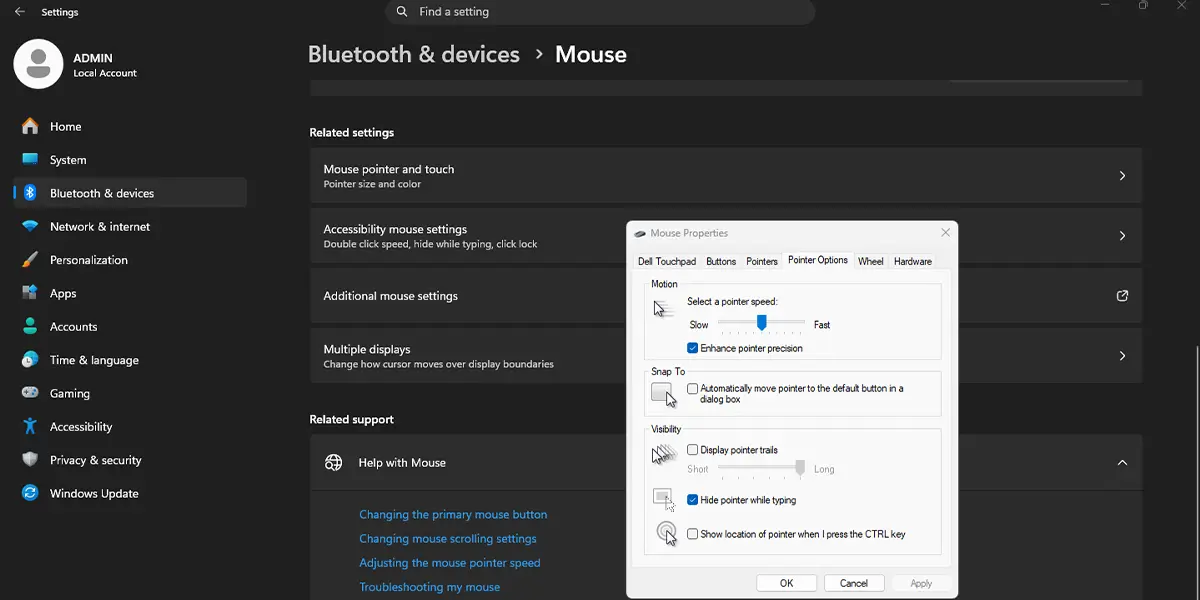
Move the mouse across the desktop right after closing the window. The cursor should now follow the hand in a steady, predictable way, with no sudden jumps when the mouse is flicked quickly.
Tip: With Enhance pointer precision off, the Select a pointer speed slider on the same tab behaves in a straight line. Many people find that the sixth notch from the left feels like a true one-to-one match with hand movement, and it makes a good starting point before fine-tuning.
Method 2: Use the Classic Mouse Properties Window
This route skips the Settings app and opens the same Mouse Properties window directly. It is handy on a shared family computer or any PC where the Settings pages feel slow to load.
- Press Windows + R to open the Run box.
- Type main.cpl and press Enter.
- Open the Pointer Options tab.
- Clear the Enhance pointer precision checkbox.
- Click Apply, then OK.
The result is identical to Method 1, and the cursor changes behavior as soon as the window closes.
Method 3: Use PowerShell
This method suits anyone who sets up several Windows 11 PCs and prefers typing commands. It edits the current user’s mouse values in the registry, so creating a restore point first is a sensible precaution. A normal (non-elevated) window is enough because the change only touches the signed-in account.
- Right-click the Start button and choose Terminal.
- Run the first command below and press Enter.
- Run the second command, then the third.
- Sign out of Windows and sign back in so the new values load.
Set-ItemProperty -Path ‘HKCU:\Control Panel\Mouse’ -Name MouseSpeed -Value ‘0’
Set-ItemProperty -Path ‘HKCU:\Control Panel\Mouse’ -Name MouseThreshold1 -Value ‘0’
Set-ItemProperty -Path ‘HKCU:\Control Panel\Mouse’ -Name MouseThreshold2 -Value ‘0’
After signing back in, open the Pointer Options tab from Method 1 or Method 2. The Enhance pointer precision box should now be cleared.
How to Undo or Reverse This Change
To bring acceleration back, open Settings > Bluetooth & devices > Mouse > Additional mouse settings > Pointer Options, tick Enhance pointer precision, and click Apply and then OK.
Anyone who used the PowerShell method can run the same three commands with the default values instead: use ‘1’ for MouseSpeed, ‘6’ for MouseThreshold1, and ’10’ for MouseThreshold2. Then sign out and back in.
Common Problems and Fixes
The Additional Mouse Settings Link Is Hard to Find
On the Mouse page in Settings, the link sits near the bottom under Related settings, so it can be out of view on a small laptop screen. Scroll down, or skip the Settings app and press Windows + R, type main.cpl, and press Enter to open the same window.
The Checkbox Turns Back On or Seems Unchanged
The most common cause is closing the window without clicking Apply or OK. Reopen the Pointer Options tab, clear the checkbox again, and confirm with both buttons. If the PowerShell method was used, remember that a sign-out and sign-in is needed before the change shows up.
The Cursor Feels Too Slow or Too Fast Afterward
Without acceleration, the pointer no longer speeds up on quick swipes, so it can feel slower at first. Open the Pointer Options tab and move the Select a pointer speed slider one notch at a time until the cursor reaches every corner of the screen comfortably. A second monitor often calls for a slightly higher setting.
Frequently Asked Questions
Is mouse acceleration the same as Enhance pointer precision?
Yes. In Windows 11, the Enhance pointer precision checkbox is the setting that switches mouse acceleration on or off.
Does this work on Windows 11 Home?
Yes. The checkbox is available on Windows 11 Home, Pro, Enterprise, and Education, and no administrator rights are required.
Does the change need a restart?
No restart is needed for the Settings and Control Panel methods, because the change applies the moment Apply or OK is clicked. The PowerShell method needs a sign-out and sign-in.
Where is the mouse acceleration setting in Windows 11?
The path is Settings > Bluetooth & devices > Mouse > Additional mouse settings > Pointer Options. The checkbox is inside the Motion group.
Is there a keyboard shortcut to turn it off?
No single shortcut toggles it. Pressing Windows + R, typing main.cpl, and pressing Enter opens Mouse Properties, and Ctrl + Tab then switches between its tabs until Pointer Options appears.
Does turning it off affect battery life or performance?
No noticeable effect. The setting only changes how pointer movement is calculated, so it has no meaningful impact on battery life or system speed.
Does this also apply to a laptop touchpad?
The setting applies to the pointer as a whole, so it covers a laptop touchpad as well as a USB or wireless mouse.
Why does the cursor still feel different in some games?
Some games read mouse input in their own way and ignore the Windows pointer setting. When that happens, look for a mouse acceleration or raw input option inside the game’s own settings menu.