
Learning how to free up disk space using Storage Sense takes only a few minutes, and it can stop a Windows PC from filling up again. Storage Sense is the built-in Windows tool that clears temporary files, empties the Recycle Bin, and tidies the Downloads folder on a schedule. Think of it as a housekeeper that quietly takes out the trash before the bin overflows.
Key Takeaways
- Storage Sense lives in Settings under System, then Storage, and works on both Windows 10 and Windows 11.
- Turning on automatic cleanup keeps temporary files and Recycle Bin clutter from piling up.
- The Downloads folder is set to Never by default, so a cleanup schedule there has to be chosen on purpose.
- The Run Storage Sense now button frees space immediately without waiting for the schedule.
Before You Start
Storage Sense deletes files, so a quick check first saves regrets later. Open the Downloads folder and move anything worth keeping, such as installers, receipts, or signed documents, to Documents or an external drive. Files already in the Recycle Bin should be reviewed too, because a cleanup can remove them for good. No special tools are needed, only a Windows 10 or Windows 11 PC and an account with permission to change settings.
How to Free Up Disk Space Using Storage Sense on Windows 11
These steps follow the Windows 11 Settings layout. Most people find the whole setup takes under five minutes.
Turn On and Configure Storage Sense
- Step 1: Press the Windows key and I together to open Settings.
- Step 2: Select System in the left pane, then click Storage.
- Step 3: Under Storage management, click Storage Sense.
- Step 4: Turn on the switch for Automatic User content cleanup so Storage Sense can run on its own.
- Step 5: Tick the checkbox for cleaning up temporary system and app files. This is the setting that removes leftover files apps no longer need.
- Step 6: Open the Run Storage Sense drop-down and pick how often it should run: every day, every week, every month, or during low free disk space. A weekly or monthly schedule suits most home PCs.

Tip: The low free disk space option only triggers when the drive is already nearly full. A fixed schedule keeps space available before trouble starts, much like servicing a car on a calendar instead of waiting for the warning light.
Set Rules for the Recycle Bin, Downloads, and OneDrive
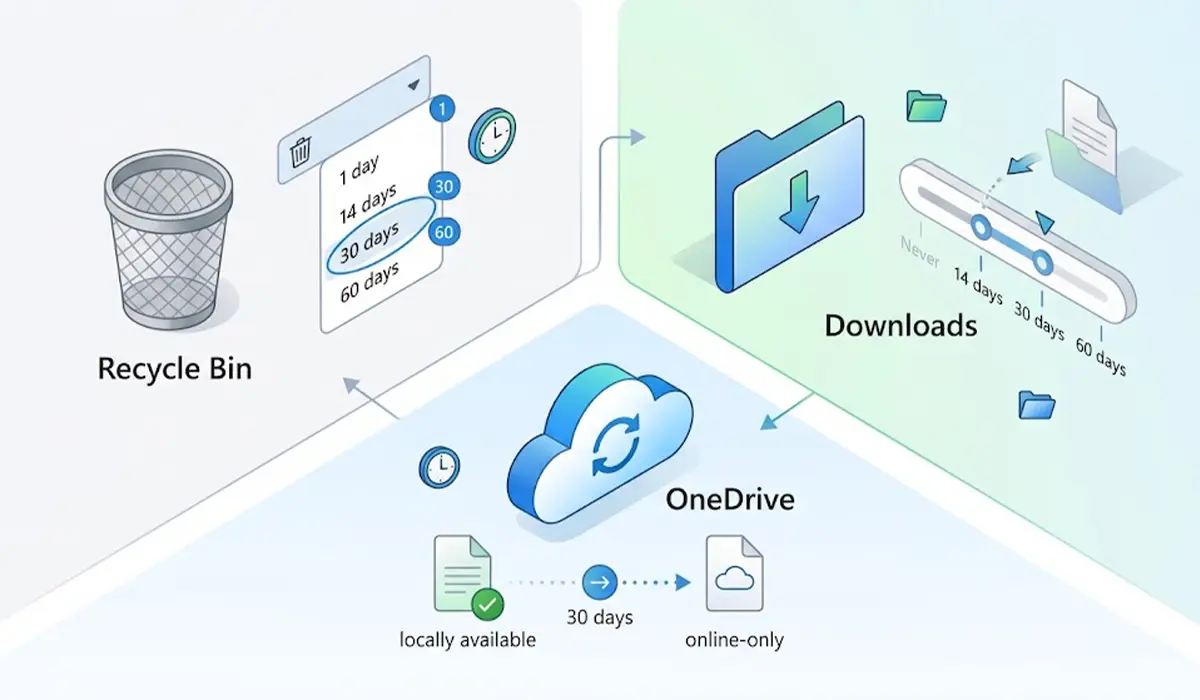
- Step 7: Find the Delete files in my recycle bin if they have been there for over setting and choose 1 day, 14 days, 30 days, or 60 days. The default is 30 days.
- Step 8: Find the Delete files in my Downloads folder if they have been there for over setting. It starts at Never, so choose 14, 30, or 60 days only if nothing important sits in Downloads for long.
- Step 9: If OneDrive is in use, review the setting for locally available cloud content. Files left unopened for the chosen time become online-only, which frees local space while keeping them in the cloud.
Run Storage Sense Right Now
- Step 10: Scroll to the bottom of the Storage Sense page and click Run Storage Sense now.
- Step 11: Wait for the message showing that cleanup has finished and how much space was freed.
- Step 12: Go back to System, then Storage, and check the bar at the top to confirm the used space has dropped.

Tip: Run the cleanup once before changing any schedule. The freed amount shows how much clutter had built up and helps in choosing sensible day limits for the Recycle Bin and Downloads.
Using Storage Sense on Windows 10
The tool works the same way on Windows 10, only the menu wording differs slightly. Open Settings, select System, then Storage, and turn on the Storage Sense switch at the top. Click Configure Storage Sense or run it now to set the schedule, choose the Recycle Bin and Downloads rules, and click Clean now to run it immediately.
Common Problems and Fixes
The Storage Sense switch is greyed out or says settings are managed by an organization
This usually means a work or school policy controls the setting. On a personal PC, restart Windows and check again, since a pending update can lock settings briefly. On a managed PC, only the IT administrator can change it.
Run Storage Sense now freed very little space
Storage Sense only cleans temporary files, the Recycle Bin, Downloads when configured, and OneDrive local copies. Large games, videos, and installed apps are untouched. For those, open the Storage page and review the category breakdown to see what is using the most room.
Files disappeared from the Downloads folder
The Downloads rule is probably set to a day limit. Check the Recycle Bin first, because recently deleted files may still be restorable. After that, change the Downloads setting back to Never.
Storage Sense does not seem to run automatically
Confirm the Automatic User content cleanup switch is on and look at the chosen schedule. If it is set to low free disk space, it will not run until the drive is nearly full. Switching to a weekly or monthly schedule fixes this.
OneDrive files now show a cloud icon
That is expected. Files unopened for the chosen number of days became online-only to save local space. Right-click a file and choose Always keep on this device to store it locally again, or set the OneDrive option in Storage Sense to Never.
Frequently Asked Questions
What is Storage Sense in Windows?
Storage Sense is a built-in Windows feature that removes temporary files, empties the Recycle Bin, and clears old Downloads automatically based on chosen rules.
Is it safe to use Storage Sense?
Yes. It only removes files that are temporary or that the chosen rules target. The main risk is the Downloads rule, so move important files out of that folder first.
Does Storage Sense delete personal files?
Not by default. Documents, Pictures, and similar folders are untouched. Files are removed from Downloads and the Recycle Bin only when those options are given a day limit.
How often should Storage Sense run?
A weekly or monthly schedule works well for most PCs. Daily suits machines with small drives that fill quickly.
Where is Storage Sense in Windows 11?
Open Settings, select System, click Storage, and then click Storage Sense under Storage management.
Can Storage Sense delete the Windows.old folder?
Storage Sense does not remove Windows.old on a schedule. That folder is cleared through the temporary files options on the Storage page, which show previous Windows installation files when they exist.
Why is Storage Sense not freeing much space?
The tool only targets temporary data and configured folders. Large apps, games, and media files stay where they are until they are uninstalled or moved.
Can Storage Sense be turned off later?
Yes. Return to the Storage Sense page and switch off Automatic User content cleanup. Already deleted files do not come back, but no further cleanups will run.