
Quick Answer: Go to Settings → System → Sound → Output, then pick the audio device from the dropdown. That’s it — the change kicks in right away, no restart needed.
How to Set or Change Default Audio Device in Windows 11
Sound coming out of the wrong speakers? New headset being ignored? Here’s the thing — Windows doesn’t always pick the right audio device automatically. The good news is switching it takes under a minute. Below are four ways to do it, starting with the easiest.
Method 1: Change It Through Windows Settings (Easiest)
Most people find this the fastest and most beginner-friendly option. Works on both Windows 11 and Windows 10.
- Press Windows key + I to open Settings.
- Click System, then click Sound.
- Under Output, click the dropdown (labeled “Choose where to play sound” in Windows 11, or “Choose your output device” in Windows 10).
- Select the audio device to use as the default.
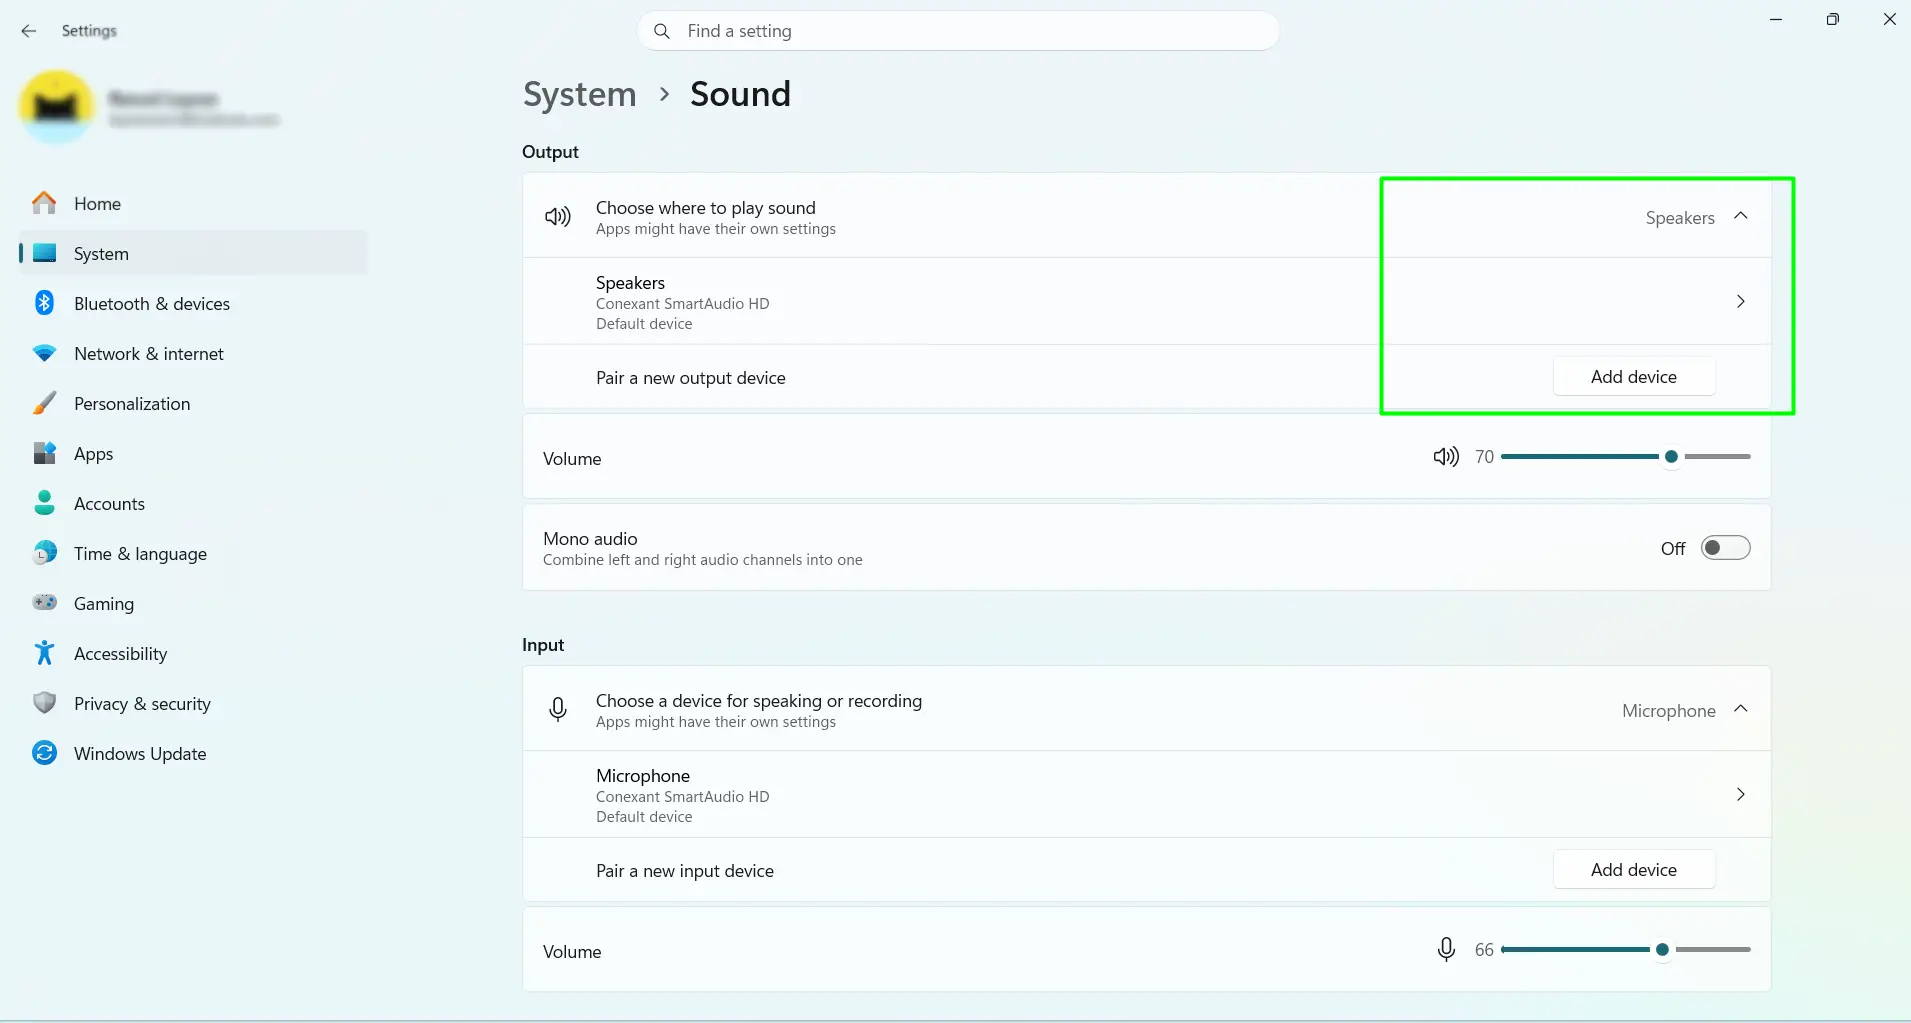
Done. No confirmation button, no restart — the change applies immediately.
Method 2: Use the Taskbar Speaker Icon (Fastest Daily Switch)
This one is perfect for people who swap between headphones and speakers throughout the day. The key is knowing where to click.
- Click the speaker icon in the bottom-right corner of the taskbar.
- Click the small arrow ( > ) on the right side of the volume slider.
- A list of available audio devices appears — click the one to set as default.
A checkmark appears next to the selected device. All audio switches over instantly.
Method 3: Use the Sound Control Panel (Most Control)
This method shows every audio device Windows knows about — including ones that are disabled or hidden. It works the same way on Windows 11 and Windows 10.
- Press Windows + R, type mmsys.cpl, and press Enter.
- The Sound window opens. Click the Playback tab.
- Right-click the preferred audio device.
- Select “Set as Default Device.”
- Click Apply, then OK.
The green checkmark moves to the selected device right away. If a device isn’t showing up in the list, right-click any empty space inside the Playback tab and enable “Show Disabled Devices” and “Show Disconnected Devices.”
Method 4: Go Through the Classic Control Panel
Some users still prefer the old Control Panel route — and it still works perfectly.
- Open the Start menu and search for Control Panel, then open it.
- In the top-right corner, set View by to Small icons.
- Click Sound.
- Make sure the Playback tab is selected.
- Right-click the audio device to use as default.
- Click “Set as Default Device.”
- Click Apply, then OK.
This opens the exact same Sound window as Method 3 — just a different way to get there.
Tips for Managing Audio Devices in Windows
- Test before closing. In the Sound Control Panel (mmsys.cpl), right-click any device and select “Test” to hear a chime play through it. Saves time catching the wrong device while still in settings.
- Set a separate device for calls. Windows supports a “Default Communication Device” — right-click a headset in mmsys.cpl and choose that option. Music can play through speakers while calls go through the headset at the same time.
- Bluetooth devices appearing twice is normal. One entry handles high-quality stereo audio, the other handles call audio (lower quality). Always pick the stereo version for general listening.
- Multiple monitors, multiple audio devices. Each display with built-in speakers shows up as its own device in mmsys.cpl. Pick the right monitor there if sound is going to the wrong screen.
- Some apps have their own audio settings. If the default changed but a specific app still plays from the wrong device, check that app’s settings — video players, browsers, and video call apps often manage their own audio output separately from Windows.
- For daily switching, Method 2 wins. The taskbar flyout takes about five seconds and doesn’t require opening any settings at all.
Frequently Asked Questions
How do you set a default audio device in Windows 11?
Open Settings, go to System → Sound, then click the dropdown under Output labeled “Choose where to play sound” and pick the preferred device. The change takes effect immediately — no restart needed.
Why is sound still coming from the wrong device after switching?
Some apps don’t respond to the Windows default change while they’re already open. Close and relaunch the app. If the issue keeps happening, check whether the app has its own audio output setting in its preferences — many media players and video call apps manage this independently.
Why does the audio device keep reverting back to speakers after a restart?
This usually happens when OEM audio software like Realtek HD Audio Manager overrides the Windows default at startup. Open mmsys.cpl, right-click the preferred device, go to Properties → Advanced tab, and uncheck “Allow applications to take exclusive control of this device.” Also check startup apps for any audio software that may be resetting the setting on login.
Why is the audio device not showing up in the Playback list?
The device may be disabled or hidden. Open mmsys.cpl (press Windows + R, type mmsys.cpl, press Enter), right-click any empty area inside the Playback tab, and turn on “Show Disabled Devices” and “Show Disconnected Devices.” The missing device should appear — right-click it and select Enable, then set it as default.
Can different apps use different audio devices at the same time in Windows 11?
Yes. Go to Settings → System → Sound → Volume mixer. From there, a specific audio output can be assigned to individual apps. For example, music can play through speakers while Teams calls go through a headset simultaneously.
What is the difference between Default Device and Default Communication Device?
The Default Device handles all general system audio — music, videos, games. The Default Communication Device is used specifically by call and meeting apps like Teams, Zoom, and Discord. Both can point to different devices at the same time, which is useful for routing calls to a headset while other audio plays through speakers.
How do you set HDMI as the default audio output in Windows?
Open mmsys.cpl and go to the Playback tab. Look for a device with the TV or monitor name alongside “NVIDIA High Definition Audio,” “AMD HD Audio,” or “Intel Display Audio.” Right-click it, select “Set as Default Device,” then click Apply and OK. If it’s not showing, right-click empty space and enable “Show Disconnected Devices.”
Does changing the default audio device affect other user accounts on the same PC?
No. Audio settings are stored per user profile. Changing the default playback device only affects the account currently signed in and has no impact on other accounts on the same computer.
Why does a Bluetooth audio device keep getting skipped over as the default?
When a Bluetooth device powers off or goes out of range, Windows automatically falls back to the last available wired device. This is expected behavior. Once the Bluetooth device reconnects, switch back to it using the taskbar flyout — it takes just a few seconds.
How can the current default playback device be identified quickly?
Open mmsys.cpl and check the Playback tab. The device with a green checkmark is the current default. In Windows 11, the active output is also shown at the top of the Output section under Settings → System → Sound.
